


29
EN
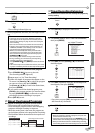
WATCHING TV
OPERATING VCR
OPERATING DVDINTRODUCTION
PREPARATION
INITIAL SETTING DVD SETTING INFORMATION
TROUBLESHOOTING
ESPAÑOL
9
Press [ENTER] to complete setting.
10
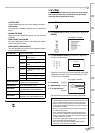
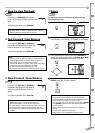
Press [STANDBY-ON
y
] to set the timer recording.
STANDBY-ON
• The recording indicator lights up.
11
At the programmed start time, the unit begins record-
ing.
Note:
• If you have not yet set the clock, “MANUAL CLOCK SET”
menu appears. Set to the present time and date (refer to
“Manual Clock Setting” on page 12) then start setting the
timer recording.
• You must turn off the unit to activate the timer recording.
• If power is not turned off and you continue watching TV,
“TIMER REC STANDBY” starts flashing on the TV screen 2
minutes before the programmed start time.
• Make sure a cassette tape with erase-prevention tab is
inserted before turning off the unit. If the cassette tape
does not have the tab, it will be ejected when you press
[STANDBY-ON
y
] to turn off.
• The recording starts without turning on the TV screen.
• During recording, you can watch only currently being
recorded TV program or DVD playback.
Press [STANDBY-ON
y
y] and [SELECT] to select the desired
mode.
• If the cassette tape runs out before the end time, the record-
ing stops immediately and the cassette tape will be ejected.
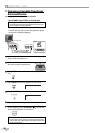
To confirm, correct or cancel the timer program
1 Press [STANDBY-ON
y
] to turn on the unit.
(The recording indicator lights off.)
2 Repeat steps 1 to 3 in “Timer Recording“.
3 Confirm the details of programs that appear on the
TV screen. Use [Cursor
K / L] to select the program
you want to correct, then press [ENTER].
Use [Cursor
K / L / B] to correct the desired item,
then press [ENTER].
4 If you want to cancel the desired program, press
[CLEAR] at the program position you want to delete.
Or, press [STOP/EJECT
C A] on the unit to stop
recording if the timer recording is in progress.
5 Press [SET-UP] to exit.
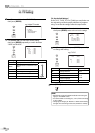
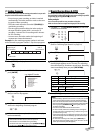
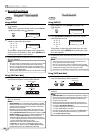
About Overlapped Programs
When programs are overlapped, some program will not be recorded.
• The program with an earlier start has priority.
• Once the earliest program finishes, the overlapping
programs will begin recording in sequence.
• When the starting time is the same, the program set
on the highest position in the program list has priority.
• The illustration below demonstrates the sequence of
recordings.
9:00am 10:00am 12:00pm
prog. 1 10:00am-11:00am
*recording period is shaded
prog. 2 9:00am-10:00am
prog. 3 9:30am-12:00pm
11:00am
recording sequence
5
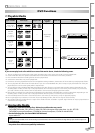
Timer Recording Extension
You can shift the time schedule of the timer recording after programming
or during recording.
1
Press [STANDBY-ON
y
] to turn on the unit.
STANDBY-ON
2
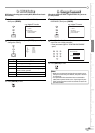
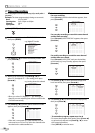
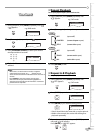
Press [SET-UP] to display the main menu.
3
Use [Cursor
K
/
L
] to select “TIMER PROGRAMMING“,
then press [ENTER].
e.g.) digital TV mode
or
– TV/VCR SETUP –
TIMER PROGRAMMING
SETTING CLOCK
CHANNEL SETUP
USER'S SETUP
V-CHIP SETUP
LANGUAGE [ENGLISH]
CAPTION [OFF]
ZERO RETURN
TIME SEARCH
INDEX SEARCH
DTV SETUP
B
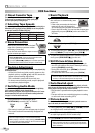
4
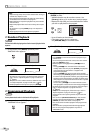
Press [REC] and use [Cursor K / L] to select the
desired program.
or
CH DATE BEGIN END
-- -
12
7
/
03
TUE
7
:
30 PM
8
:
50 PM
SP
-- ---- -/-- --- --:-- --- --:-- --- --
-- ---- -/-- --- --:-- --- --:-- --- --
-- ---- -/-- --- --:-- --- --:-- --- --
-- ---- -/-- --- --:-- --- --:-- --- --
-- ---- -/-- --- --:-- --- --:-- --- --
-- ---- -/-- --- --:-- --- --:-- --- --
-- ---- -/-- --- --:-- --- --:-- --- --
--- TIMER PROGRAMMING ---
5
Press [REC] repeatedly until your desired begin/end
time appears, then press [ENTER].
CH DATE BEGIN END
-- -
12
7
/
03
TUE
7
:
40 PM
9
:
00 PM
SP
-- ---- -/-- --- --:-- --- --:-- --- --
-- ---- -/-- --- --:-- --- --:-- --- --
-- ---- -/-- --- --:-- --- --:-- --- --
-- ---- -/-- --- --:-- --- --:-- --- --
-- ---- -/-- --- --:-- --- --:-- --- --
-- ---- -/-- --- --:-- --- --:-- --- --
-- ---- -/-- --- --:-- --- --:-- --- --
--- TIMER PROGRAMMING ---
• Every time you press [REC], the begin/end time will
shift increase by 10 minutes.
6
Press [SET-UP] to exit.
Note:
• When the recording is already in progress, each press will
shift forward the end time only.
• If you want to cancel while setting, press [PAUSE F] on the
remote control. The recording time returns to the original time.
• When you shift forward the time schedule during recording,
the recording speed will be automatically set to the SLP mode.
5
P77B1UT.indd 29 2007/09/21 13:22:01