


92 Chapter 7. Using the TV with a PC
Overview
1. Connect the Computer to the TV
See the connection diagrams in this chapter to find
the method best suited to your needs.
2. Perform NetCommand Setup for the PC
• For first-time NetCommand setup:
Start NetCommand setup as described in chapter
3 and check mark the PC check box in the Device
Setup screen.
• If NetCommand has already been set up:
Press TV MENU and select the NetCommand
icon. In the Edit NetCommand screen, select
Add and follow the on-screen prompts to add the
PC. See chapter 3 for more information.
3. Select the PC in the Device Selection menu
1 Press DEVICE to open the Device Selection
menu.
2. Move the highlight to the PC icon.
3. Press DEVICE again to close the menu.
4. Change the resolution of the PC image
Maximize the resolution while maintaining a suitable
aspect ratio for the image. See the explanation later
in this chapter.
5. Perform TV video adjustments
Press VIDEO repeatedly until you see the PC video
settings displayed on screen. Your choices are:
Auto Position. Press ENTER to automatically
center the position of the PC video.
HorizPosition (Horizontal Position). Manually
adjust the horizontal position of the PC. This
selection overrides the Auto Position selection.
VertPosition (Vertical Position). Manually adjust
the vertical position of the PC. This selection
overrides the Auto Position selection.
Fine Detail. Manually adjust the picture quality of
the PC. This selection overrides the Auto Position
selection.
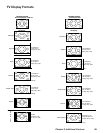
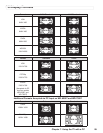
6. Change the TV picture format
Press FORMAT to cycle through the available picture
formats. See the chart later in this chapter showing
how various PC resolutions are displayed on the TV.
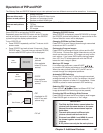
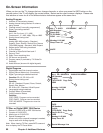
Connecting a PC
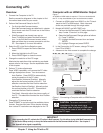
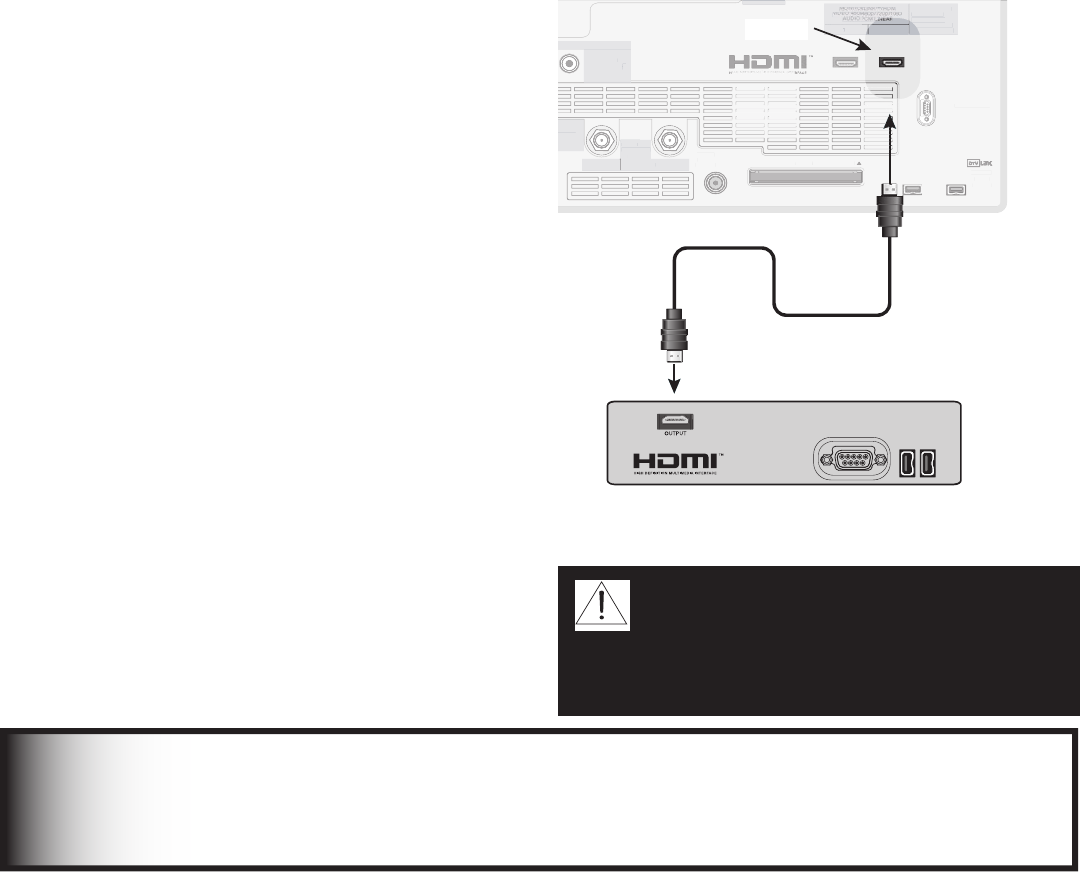
Computer with an HDMI Monitor Output
Figure 1
An HDMI-to-HDMI cable is required. This is not included with
the TV. It may be available at your local electronics retailer
1. Connect an HDMI cable from HDMI 2 on the TV back
panel to the PC’s HDMI output. Both video and
audio are provided through this single cable.
2. Models WD-62927 and WD-73927 only:
a. Perform the NetCommand PC setup described in
step 2 under “Overview” on this page.
b. Select the NetCommand Change option as follows:
(1) Press TV MENU.
(2) Highlight the NetCommand icon and press
ENTER.
(3) Highlight Change and press ENTER.
3. In the Connection for PC screen, change TV Input
from PC to HDMI-2.
4. Advance to the finish screen to complete the change.
1$XJUI)%.*0VUQVU
$0.10/&/5
:1C1SJQQJ
*/165
47*%&0
7*%&0
"6%*0
-&'5
.0/0
"6%*0
3*()5
%57$"#-&
7)'6)'
%*(*5"-
"6%*0
065165
$BCMF$"3%
64&8*5)"/5$"3%501
2
:
1C
1S
"6%*0
-&'5
.0/0
"6%*0
3*()5
065165
"6%*0
065165
3&$03%
065165
%7*
"OBMPH"VEJP
7*%&0
AUDIO-
LEFT/
(MONO)
"6%*0
3*()5
*&&&
*/165
065165
/FU$PNNBOE
*3&.*55&3
¸
(-JOL
¸
*/165
1$'03)%.*
0/-:)[
7("87("
47("847("
9("9
64&8*5)
$BCMF$"3%
"/5."*/"/5"69
.0/*503-*/,
$0/530-34$
%57$"#-&
7)'6)'
%*(*5"-
"6%*0
065165
$BCMF$"3%
64&8*5)
"/5$"3%501
*&&&
*/165
065165
/FU$PNNBOE
*3&.*55&3
¸
1$'03)%.*
0/-:)[
7("87("
47("847("
9("9
64&8*5)
$BCMF$"3%
"/5."*/
"/5"69
.0/*503-*/,
$0/530-34$
)%.*
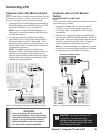
Figure 1. Connecting a Computer with an HDMI Monitor
Output
IMPORTANT
• After connecting the PC, activate the PC option in NetCommand. Do this either during initial NetCommand setup
(in the Device Setup screen), or at any time afterwards with the NetCommand Add function. See chapter 3.
• See Appendix A for signal compatibility.
CAUTION: To ensure continued FCC
compliance, the user must use a
shielded video interface or HDMI cable
with bonded ferrite cores at both ends when
using the PC input.