


EN – 18
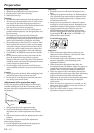
Image adjustment
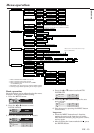
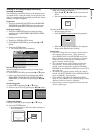
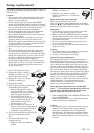
CONTRAST R
COLOR TEMP.-USER
0
CONTRAST B 0
BRIGHTNESS R 0
BRIGHTNESS B 0
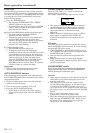
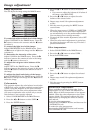
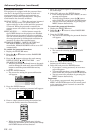
CONTRAST
IMAGE
0
BRIGHTNESS 0
STANDARD
0
COLOR
AUTO
0
XGA60
COMPUTER
OFF
TINT
0SHARPNESS
COLOR TEMP.
GAMMA MODE
COLOR MATRIX
sRGB
opt.
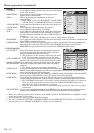
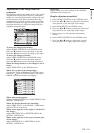
4. Press the { or } button to select the desired
color.
• If you want to adjust the balance of all colors of
the image, select RGB-TINT.
5. Press the $ or % button to adjust the color
balance of the selected color.
6. Repeat steps 4 and 5 for optimum adjustment
results.
7. Exit the menu by pressing the MENU button
several times.
• When the input source is VIDEO or COMPUTER,
the setting items in the color matrix adjustment
are automatically set to the predetermined values.
You can change these settings manually.
• To cancel the color matrix adjustment, select OFF
in step 2.
• When the color matrix adjustment is carried out,
the colors in the menu will also vary. This isn’t a
product malfunction.
Color temperature
1. Select COLOR TEMP. in the IMAGE menu.
2. Press the $ or % button to select USER .
3. Press the ENTER button.
4. Press the { or } button to select the desired
item.
5. Press the $ or % button to adjust the selected
item.
6. Repeat steps 4 and 5 for optimum adjustment
results.
7. Exit the menu by pressing the MENU button
several times.
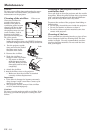
COLOR MATRIX
0
0
0
0
0
0
0
RED
RGB-TINT
GREEN
BLUE
YELLOW
CYAN
MAGENTA
About color temperature
There are different kinds of white color. Color
temperature is a way to show the differences in
white. White of which temperature is low appears
reddish. When the color temperature rises, white
appears bluish. This projector adjusts this color
temperature by changing the values of contrast
blue and red.
To rise the color temperature:
Increase the CONTRAST B (blue) and decrease the
CONTRAST R (red).
To reduce the color temperature:
Decrease the CONTRAST B (blue) and increase
the CONTRAST R (red).
Image adjustment
You can adjust the image using the IMAGE menu.
To control the white-to-black level of the image :
Adjust CONTRAST in the IMAGE menu. Press the
% button to increase the contrast and the $ button
to reduce it.
To control the light level of the image :
Adjust BRIGHTNESS in the IMAGE menu. Press
the % button to lighten the image and the $ button
to darken it.
To determine the intensity of the color :
Adjust COLOR in the IMAGE menu. Press the %
button to increase the amount of color in the image
and the $ button to decrease it.
To adjust the red-green color balance of the
image :
Adjust TINT in the IMAGE menu. Press the %
button to increase the intencity of green in the image
and the $ button to increase the amount of red in
the image.
To adjust the detail and clarity of the image :
Adjust SHARPNESS in the IMAGE menu. Press the
% button to sharpen the image and the $ button to
soften the image.
Color matrix
This projector adjusts the color balance in each color
of RGB (red, green, and blue) and their neutral colors
(yellow, cyan, and magenta) by the color correction
adjustment. Use the color correct adjustment when
you want to emphasize color or when only a certain
color balance is not correctly adjusted.
1. Select COLOR MATRIX in the IMAGE menu.
2. Press the $ or % button to select USER .
3. Press the ENTER button.