


EN – 16
IMAGE REVERSE
ON
AUTO POWER
ON
OFF
AUTO POWER
OFF
OFF
ON
INSTALLATION
BLUE
OFF
BACK COLOR
USER
BLACK
XGA60
LENS SHIFT
SPLASH SCREEN
MUTE MODE
STANDARD
opt.
LAMP MODE
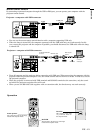
1 IMAGE
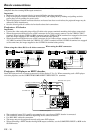
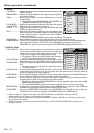
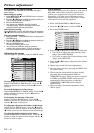
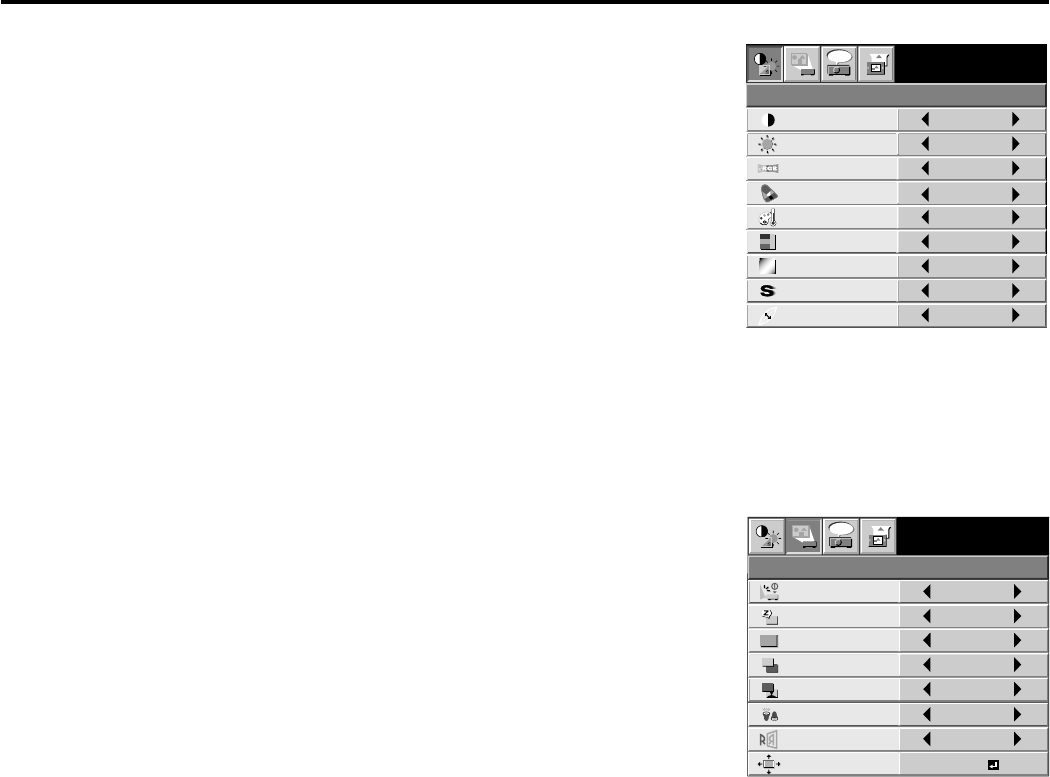
CONTRAST ......... Adjusts the picture contrast. The contrast becomes higher as the
number increases.
BRIGHTNESS ..... Adjusts the image brightness. The image becomes brighter as
the number increases.
sRGB .................... Select ON to display an image emphasizing on the color
reproducibility.
• When sRGB is ON, COLOR MATRIX, COLOR TEMP. and
GAMMA COLLECTION can’t be ad justed.
COLOR MATRIX .........
Adjusts the color balance in each color of the image. See page 18.
COLOR TEMP. .... Adjusts the color temperature. See page 19.
COLOR ................ Adjusts the color intensity of the image. (Available only when
VIDEO is selected as the source.)
TINT .................... Adjusts the color balance of the image. The color balance of the
image shifts green as the number increases and shifts to purple
as the number decreases. (Available only when VIDEO is
selected as the source.)
• When the TV50 (PAL, SECAM) signal is inputted, TINT can’t be adjusted.
SHARPNESS ....... Adjusts the image sharpness. The image sharpness rises as the number increases.
GAMMA MODE ... When AUTO is selected, the appropriate gamma mode is automatically selected depending on the
input signal. For normal use, select AUTO. Select DYNAMIC for computer sources. Select
STANDARD for sport scenes and video sources. Select THEATER for projecting film sources.
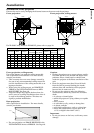
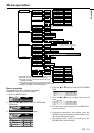
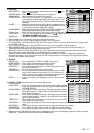
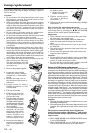
2 INSTALLATION
AUTO POWER ON ......
Select ON to boot up the projector automatically by turning on
an externally connected power switch such as a breaker even
when the main power switch of the projector is off. Use this
setting when the projector is hanging from the ceiling.
• The projector will be in the stand-by mode when the lamp
is off. Use the remote control to turn on the lamp.
AUTO POWER OFF ....
Set the time elapsed before the projector enters into the stand-by
mode when there is no signal inputted from the selected source.
SPLASH SCREEN .......
Select ON to display the splash screen when the power is turned
ON.
• The splash screen can be changed. For more details, please
consult your dealer.
BACK COLOR ...... Use to select the background, BLUE, BLACK or LOGO, which
will be displayed when there is no signal inputted from the selected source. When the LOGO is
selected, the splash screen will be displayed.
MUTE MODE ...... Use to select the background, BLACK or LOGO, which will be displayed when the MUTE button is
pressed. When the LOGO is selected, the splash screen will be displayed.
LAMP MODE ....... Use to change the brightness of the lamp. When LOW is selected, the image will become darker,
though the power will be saved, operating sound will be reduced.
• The intensity of the lamp will be STANDARD for 2 minutes regardless of the setting of the LAMP
MODE when the lamp turns on.
• When the LAMP MODE is changed, the screen may flicker. This is not a failure of the lamp.
IMAGE REVERSE ......
Use to reverse or invert the projected image. Select MIRROR in rear projection. Select MIRROR,
INVERT in rear projection with the projector hanging from the ceiling.
LENS SHIFT........ To enter the LENS SHIFT setting mode, press the ENTER button. For lock the lens position, set
LOCK to ON. For reset the lens position, select RESET and press the ENTER button.
• When no signal is supplied for 6 hours with BACK COLOR set to BLACK, it changes to BLUE
automatically for the purpose of protecting the projector.
• When you continue projection for a long time with BACK COLOR or MUTE set to LOGO, an after-image
may persist on the screen.
• When the signal is lost during muting with MUTE set to LOGO, AUTO POWER OFF is ignored even
though it is active.
CONTRAST
IMAGE
0
BRIGHTNESS 0
STANDARD
0
COLOR
AUTO
0
XGA60
COMPUTER
OFF
TINT
0SHARPNESS
COLOR TEMP.
GAMMA MODE
COLOR MATRIX
sRGB
opt.
Menu operation (continued)