


EN – 25
ENGLISH
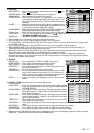
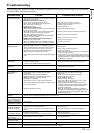
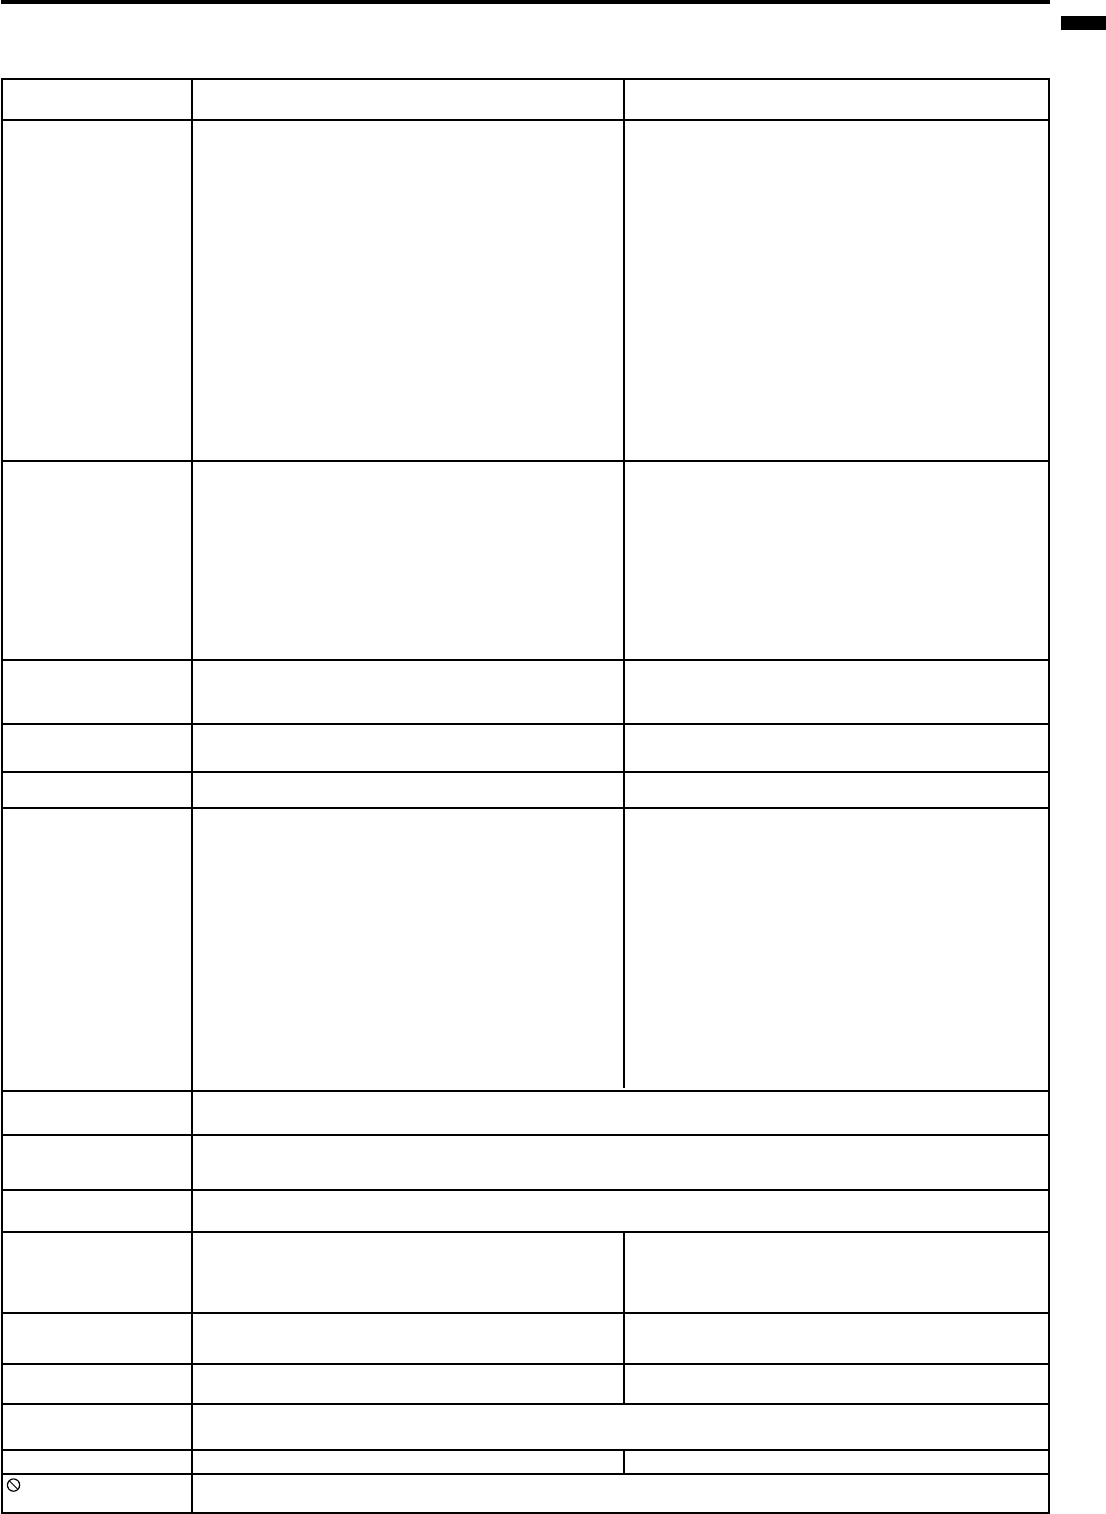
Troubleshooting
The following offers solutions to some of the common problems you may encounter. We suggest that you consult
this chart before contacting your dealer.
CAUSE
POSSIBLE SOLUTIONS
PROBLEMS
Only the motion area in the
image supplied from the
computer is not displayed.
• The air inlet slots, outlet slots or air filter is clogged
with dust or some objects.
POWER indicator does not light up.
• Power cord is unplugged from the outlet.
• Power cord is disconnected from the projector.
• The main switch is turned off.
• The lamp lid is open.
POWER indicator blinks red.
• The projector has been turned on again too soon after
having been turned off.
• When the power switch was turned off while the fan
was running, during or after lamp operation.
• The room temperature is too high.
(Does the LAMP indicator show an unusual condition?)
•
Lamp is no longer working.
POWER indicator blinks between red and green.
• The filter cover is not closed.
• When the LAMP indicator or the TEMP indicator is
either on or blinking, the main unit requires repairs.
•
Lens is covered by lens cap.
• When the LAMP indicator or the TEMP indicator is
either on or blinking, the main unit requires repairs.
•
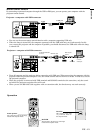
The equipment connected to this projector is not turned on.
•
Hookup is not made correctly with other equipment.
•
The input source is not selected correctly.
•
An extension cord is being used instead of the supplied
cable.
• The air inlet slots, outlet slots or air filter is clogged
with dust or some objects.
(In this case, the TEMP indicator does not light up.)
•
The projector is not at a right angle to the screen.
•
Brightness, tint and color are not adjusted correctly.
•
The projecting distance is beyond the focused area.
•
Lens is dirty.
•
Screen size exceeds screen size specifications.
•
Brightness and contrast are not adjusted correctly.
•
FINE adjustment is not made correctly.
• Tracking is not adjusted.
•
The projector is not at a right angle to the screen.
•
The output resolusion of the computer exceeds the reso-
lution of the projector.
•
Keystone adjustment is used.
•
Remove the object.
•
Plug the power cord into the outlet.
• Insert the power cord into the projector.
•
Turn the main switch on.
• Close the lamp lid.
•
Wait for the lighting sequence.
• Turn the power switch on and off several times.
•
Refer to "Indicators" on page 26.
•
Replace the lamp with a new one.
•
Close the cover correctly.
•
Contact your dealer.
•
Take the lens cap off.
•
See page 26.
•
Turn on the connected equipment.
• Confirm the hookup.
•
Select the correct source according to the equipment
connected to this projector.
•
Check whether the image is displayed correctly by
replaceing it with the supplied cable. When the image
is displayed correctly, use the extension cord along with
an RGB signal amplifier.
•
Remove the object and turn off the main power switch.
After about 10 minutes, Turn the projector on.
•
Adjust the angle of the projector to make a right angle
to the screen. See page 12.
•
Adjust brightness, tint and color correctly. See page 18.
•
Adjust the projecting distance. See page 9.
•
Clean lens.
•
Reduce screen size to within 60" to 300".
•
Adjust brightness, contrast.
•
Make FINE adjustment.
• Adjust tracking. See page 17.
•
Adjust the angle of the projector to make a right
angle to the screen. See page 12.
•
Adjust the output resolution of the computer to the
resolution of the projector. (See page 29.) For changing
the output resolution of the computer, contact the
computer manufacturer.
•
When you use the keystone adjustment, graphics or
characters may be blurred in some images. In this case,
use the projector with using the keystone adjustment
disabled. (See page 12.)
•
It is normal.
•
The cable for connection with other equipment is not
plugged securely into the terminal.
•
The projector is installed too close to other equip-
ment.
•
Volume is not turned up.
•
Connection to other equipment is not made correctly.
•
The PC monitor is not turned on.
•
This is typical of the LCD projector.
•
The operation is incorrectly made due to noise or interference.
•
Plug the connecting cable securely into the terminal.
See pages 10-11.
•
Install the projector far away from other equipment.
•
Turn up the volume.
• Check connections. See pages 10-11.
•
Turn on the monitor.
•
Press the reset button on the Terminal board. See page 15.
The power is off.
No picture appears
on the screen.
The image is
turned off.
The image is
distorted.
The image is
blurred.
Red, blue or green dots are
viewed on the text of image.
The afterimage
remains.
The image is dis-
torted on the screen
and noise is heard.
•
When a stationary image is projected for a long time, its afterimage may persist on the screen. This is not a
failure, and the afterimage will disappear in a few minutes.
•
This is caused by a problem of the computer. Contact the computer manufacturer.
The image is dark.
No sound is heard.
Adjustments cannot be made.
Warm air comes out of
the exhaust vents.
Nothing is displayed on
the PC monitor.
is displayed.
•
This mark is displayed when an invalid operation is executed (for example, when the COMPUTER or VIDEO
button is pressed while the menu is displayed). This is not failure.