


En-31
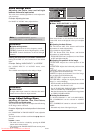
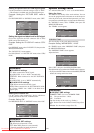
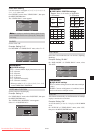
The “REPEAT TIMER” screen appears.
Adjust the items.
Use the
ᮤ
and
ᮣ
buttons to select “SINGLE”.
Use the ▲ and ▼ buttons to select the item, then press the
ᮤ
and
ᮣ
buttons to set.
SEL. ADJ. RETURN
1 WORK TIME
INPUT MODE
2 WORK TIME
INPUT MODE
: 00H10M
: VIDEO1
: 00H15M
: DVD1
EXIT
REPEAT TIMER
: SINGLE
REPEAT TIMER
Information
Ⅵ REPEAT TIMER function
* The two repeat timers run consecutively, i.e., Timer 1-
Timer 2-Timer1-Timer2.
* This becomes effective when the on-screen menu goes
out.
Ⅵ SINGLE settings
WORK TIME: Set the time duration of the display.
Time range is from 1 minute to 24 hours.
INPUT MODE: Set the signal that will be displayed.
* Set the DIVIDER “OFF” and ID NUMBER “ALL”
before the operation.
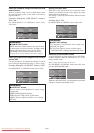
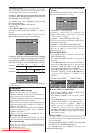
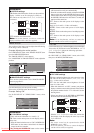
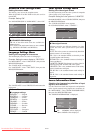
Ⅵ MULTI settings
MODE: Select the input mode to be displayed from
“SINGLE”, “S BY S1~3” and “PICTURE IN
PICTURE (BTM LFT~TOP LFT)”.
WORK TIME: Set the time duration of the display.
Time range is from 1 minute to 24 hours.
INPUT MODE: Set the signal that will be displayed.
Select “MAIN” or “SUB” for “PICTURE IN PICTURE
(BTM LFT~TOP LFT)” and “LEFT” or “RIGHT” for
“S BY S1~3”.
Only one signal is selected for “SINGLE”.
SEL. ADJ. RETURN
REPEAT TIMER
1 MODE
WORK TIME
INPUT MODE
MAIN
SUB
2 MODE
WORK TIME
INPUT MODE
LEFT
RIGHT
: BTM LFT
: 04H00M
: RGB1
: VIDEO1
: S BY S1
: 02H30M
: RGB3
: DVD1
EXIT
: MULTI
REPEAT TIMER
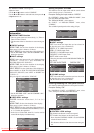
* Set the DIVIDER “OFF” and ID NUMBER “ALL”
before the operation.
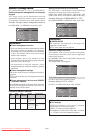
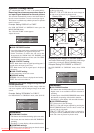
Ⅵ VIDEO WALL settings
DIVIDER: Divide the screens into 1, 2ן2 or 3ן3
sections.
WORK TIME: Set the time duration of the display.
Time range is from 1 minute to 24 hours.
INPUT MODE: Set the signal that will be displayed.
* Turn on the AUTO ID and set the DIVIDER (at 1, 2ן2
or 3ן3) before the operations.
* In the case of Video Wall, timer No.1 can be used to
control all the displays simultaneously.
REPEAT TIMER
SEL. ADJ. RETURN
1 DIVIDER
WORK TIME
INPUT MODE
2 DIVIDER
WORK TIME
INPUT MODE
: 1
: 00H03M
: VIDEO1
: 2ן2
: 00H06M
: RGB1
EXIT
REPEAT TIMER
: VIDEO WALL
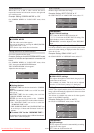
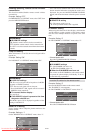
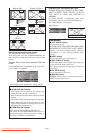
Setting the power on mode
This function sets the input mode and the sound volume
at the time the power is switched on.
Example: Setting the input mode to “VIDEO2”
On “OPTION3 ” menu, select “PWR.ON MODE ”, then
press the MENU/ENTER button.
The “PWR.ON MODE ” screen appears.
On “INPUT ” of “PWR.ON MODE ” menu, select
“VIDEO2”.
The available inputs depend on the setting of input.
SEL. ADJ. RETURN
EXIT
PWR. ON MODE
INPUT
VOLUME
: VIDEO2
: LAST
Information
Ⅵ INPUT settings
LAST: Last mode (the input that was last selected at
the time the power was switched off).
VIDEO1, 2, 3: VIDEO input mode.
RGB1, 2, 3: RGB input mode.
DVD/HD1, 2: DVD/HD input mode.
DVD/HD2, 3: DVD input mode.
MULTI: Multi screen mode.
Follow the procedure used for PROGRAM TIMER. See
page En-30.
PICTURE IN PICTURE SIDE BY SIDE
Ⅵ VOLUME settings
LAST: Last mode (the volume that was last selected at
the time the power was switched off).
0 to 42: The level of sound volume.
Enabling/disabling the front panel controls
This function enables/disables the front panel controls.
Example: Setting “ON”
On “CONTROL LOCK” of “OPTION3” menu, select
“ON”, then press the MENU/ENTER button.
SEL. ADJ. RETURN
OPTION3 3 / 4
PREVIOUS PAGE
TIMER
PWR. ON MODE
CONTROL LOCK
IR REMOTE
LOOP OUT
REMOTE ID
ID NUMBER
VIDEO WALL
NEXT PAGE
: ON
: ON
: OFF
: ALL
: ALL
EXIT
Information
Ⅵ CONTROL LOCK settings
ON: Disables the buttons on the front panel.
OFF: Enables the buttons on the front panel.
* Even when the CONTROL LOCK is set, the POWER
switch will not be locked.
* This becomes effective when the on-screen menu goes
out.
SEL. ADJ. RETURN
PWR. ON MODE
MULTI SCREEN SETTING
MULTI MODE
: BOTTOM LEFT
INPUT MODE
MAIN
SUB
: DVD/HD1
: VIDEO1
EXIT
SEL. ADJ. RETURN
PWR. ON MODE
MULTI SCREEN SETTING
MULTI MODE
: SIDE BY SIDE1
INPUT MODE
LEFT
RIGHT
: DVD/HD1
: VIDEO1
EXIT
Downloaded From TV-Manual.com Manuals