


En-28
SCREEN WIPER
When this is set to ON, a white vertical bar moves
repeatedly from the left and of the screen to the right end
at a constant speed.
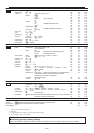
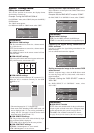
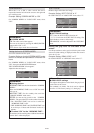
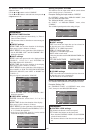
Example: Setting “SCREEN WIPER” to “ON”
On “SCREEN WIPER” of “LONG LIFE” menu, select
“ON”.
SEL. ADJ. RETURN
EXIT
LONG LIFE
PLE
ORBITER
INVERSE
SCREEN WIPER
SOFT FOCUS
: AUTO
: AUTO1
: OFF
: ON
: OFF
Information
Ⅵ SCREEN WIPER
ON: The white vertical bar appears.
You can set the time by pressing the MENU/ENTER
button while “ON” is set.
OFF: Screen wiper mode does not function.
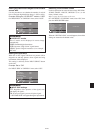
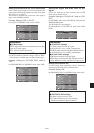
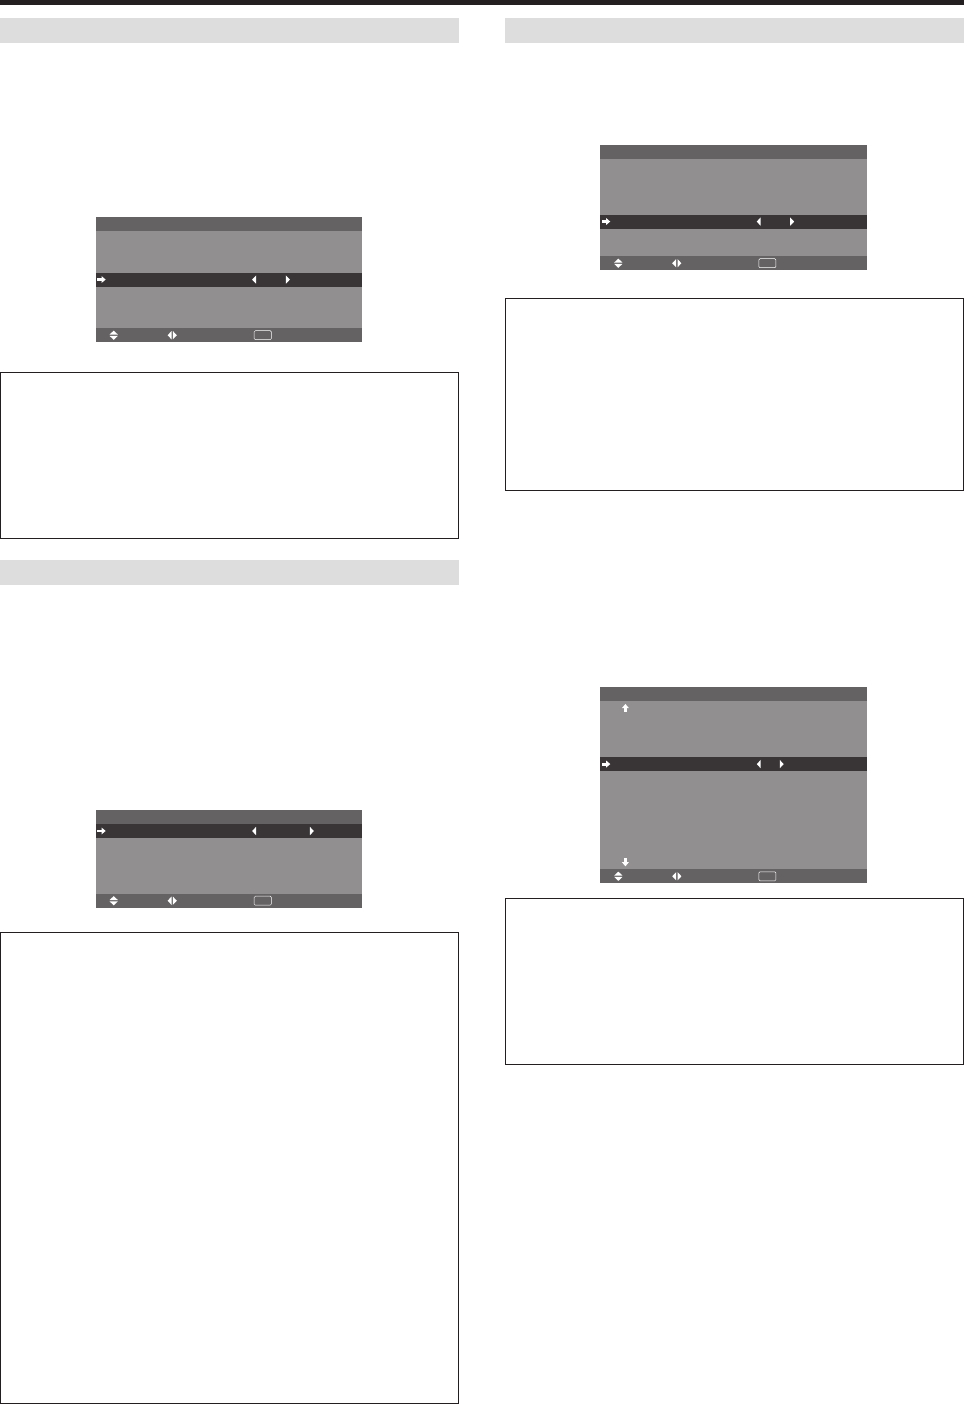
Setting the time for SCREEN WIPER
Set a time duration and the speed.
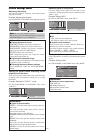
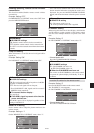
Example: Setting so that the SCREEN WIPER mode
starts in 30 minutes and proceeds for one and a half
hours.
On “SCREEN WIPER” of “LONG LIFE” menu, select
“ON”, then press the MENU/ENTER button.
THE “SCREEN WIPER” screen appears.
Adjust the times and speed.
SEL. ADJ. RETURN
SCREEN WIPER
EXIT
WORKING TIME
WAITING TIME
SPEED
: 01H30M
: 00H30M
: 3
Information
Ⅵ Setting the time
WORKING TIME: Set the time duration for “SCREEN
WIPER”.
When the WORKING TIME is set to “ON” the mode
will stay on.
WAITING TIME: Set the standby time until the
“SCREEN WIPER” mode starts.
SPEED: Set the moving speed for the “SCREEN
WIPER”. The speed decreases as the number increases.
* The “WAITING TIME” can not be set when the
“WORKING TIME” is ON.
* THE “WORKING TIME” and “WAITING TIME” can
be set for up to 12 hours and 45 minutes in units of 3
minutes.
Ⅵ To select “ON” for the “WORKING TIME”...
Set the hours of the working time to 0H and the minutes
to 0M. “ON” will be displayed.
SOFT FOCUS
Reduces edges and softens the image.
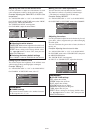
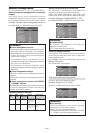
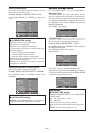
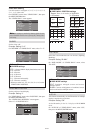
Example: Setting “SOFT FOCUS” to “2”
On “SOFT FOCUS” of “LONG LIFE” menu, select “2”.
SEL. ADJ. RETURN
EXIT
LONG LIFE
PLE
ORBITER
INVERSE
SCREEN WIPER
SOFT FOCUS
: AUTO
: AUTO1
: OFF
: OFF
: 2
Information
Ⅵ SOFT FOCUS settings
OFF: Turns the SOFT FOCUS function off.
1, 2, 3, 4: Activates the SOFT FOCUS setting. The
higher numbers create a softer image.
“SHARPNESS” can not be adjusted in the “PICTURE”
menu.
Setting the gray level for the sides of the
screen
Use this procedure to set the gray level for the parts on the
screen on which nothing is displayed when the screen is
set to the 4:3 size.
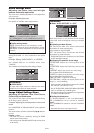
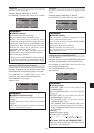
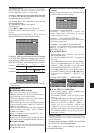
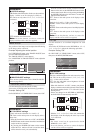
Example: Setting “GRAY LEVEL” to “5”
On “GRAY LEVEL” of “OPTION2” menu, select “5”.
SEL. ADJ. RETURN
OPTION2 2 / 4
PREVIOUS PAGE
PWR. MGT.
CINEMA MODE
LONG LIFE
GRAY LEVEL
S1/S2
PICTURE SIZE
DVI SET UP
PROTOCOL SET
CLOSECAPTION
CAPTION CONT
NEXT PAGE
: OFF
: ON
: 5
: OFF
: ON
: OFF
: OFF
: LOW
EXIT
Information
Ⅵ GRAY LEVEL settings
This adjusts the brightness of the black (the gray level)
for the sides of the screen.
The standard is 0 (black). The level can be adjusted
from 0 to 15. The factory setting is 3 (dark gray).