


22
External Equipment Connection
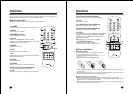
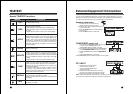
S-VIDEO INPUT
If using an S-VIDEO source, the picture quality will be
improved over a video source.
1. Connect the S-VIDEO output of a VCR to the
S-VIDEO input on the TV.
2. Connect the audio cables from the S-VIDEO
VCR to the L (MONO), R inputs on the TV.
3. Select S-VIDEO mode by pressing the TV/AV
button repeatedly.
4. Press the PLAY button on the VCR.
The VCR playback picture appears on the screen.
When connecting to other equipment, please ensure you turn the main switch OFF to
prevent any damage to the equipment.
Headphone jack
Insert the headphone plug to the headphone jack on the TV. You can listen to the
sound through the headphone; no sound from the speaker on the TV. To adjust the
headphone volume, press the VOLÏq button. If you press the MUTE( )button, the
sound from the headphone is turned off.
S-VIDEO VCR
COMPONENT S-VIDEO
A/V-IN
L(MONO) R
Headphone
24
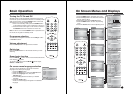
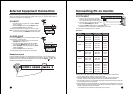
A/V INPUT
1. Connect the A/V out jacks on a VCR to A/V-IN
jacks on the TV.
2. Use the TV/AV button to select VIDEO mode.
3. Press the PLAY button on the VCR.
The VCR playback picture appears on the TV screen.
Note : If you have a mono VCR, connect the audio cable
from the VCR to the L(MONO) socket of the set.
VCR
AV-IN
VIDEO L(MONO) R
COMPONENT
2225
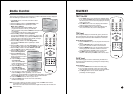
Connecting PC as monitor
The set can be operated as the PC monitor.
Note:
a. If the set is cold, there may be a small “flicker” when the set is switched on.
This is normal, there is nothing wrong with the set.
b. Some dot defects may appear on the screen, like Red, Green or Blue spots.
However, this will have no impact or effect on the monitor performance.
c. The resolution which is not supported will appear at the resolution which gets near
to the resolution which is supported
d. When resolutions are displayed that are not native to the panel resolution, text may
appear choppy or lines may appear to be bold or thicker than others. To minimise,
choose a resolution similar to the panel
* The standard of the resolution which gets near : H/V sync.
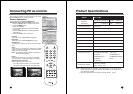
PC/DTV INPUT
1. Connect the PC IN cable D-sub jack
from the monitor output socket of the
PC to the PC/DTV input socket of the set.
2. Connect the PC Audio IN cable from the
PC to the PC AUDIO IN of the set.
3. Press the TV/AV or PC button to select PC mode.
4. Switch on the PC, and the PC screen appears on the set.
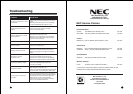
Resolution
640 x 480 37.9 KHz 72 Hz
640 x 480 37.5 KHz 75 Hz
720 x 400 31.4 KHz 70 Hz
800 x 600 35.1 KHz 56 Hz
800 x 600 37.9 KHz 60 Hz
800 x 600 48.1 KHz 72 Hz
800 x 600 46.9 KHz 75 Hz
1024 x 768 48.4 KHz 60 Hz
1024 x 768 56.5 KHz 70 Hz
1024 x 768 60.0 KHz 75 Hz
1280 x 768 47.4 KHz 60Hz RB
1280 x 768 47.8 KHz 60 Hz
1280 x 768 60.3 KHz 75 Hz
720 x 480p 31.5 KHz 60 Hz
720 x 576p 31.2 KHz 50 Hz
1280 x 720p 45.0 KHz 60 Hz
1280 x 720p 37.5 KHz 50 Hz
1920 x 1080i 33.7 KHz 60 Hz
1920 x 1080i 28.1 KHz 50 Hz
VGA
SVGA
XGA
WXGA
DTV
Mode Resolution
Horizontal
frequency(KHz)
Vertical
frequency(Hz)