


The SLEEP key accesses the Sleep Timer of your
home entertainment components (TV, CBL/SAT,
RCVR and AUX modes only). Even if your compo-
nent does not have a Sleep Timer, the Cinema 5
may access its own built-in sleep timer. See page
29 for additional information.
The REW (Rewind), PL (PLAY), FF (Fast Forward)
REC (Record), STOP, and PAUSE keys operate
the same as the transport keys on your original
VCR, Laser Disc, DVD and CD Player remote. As
a safety feature of the Cinema 5, you must press
the REC key twice before recording.
The TV/VCR key operates the same as the
TV/VCR key on your original VCR remote. The
TV/VCR key may also control the following func-
tions in other modes: TV mode = TV/VIDEO,
CBL/SAT mode = A/B or TV/SAT, DVD/LD mode =
TV/LD, RCVR mode = Input Select, CD mode =
A/B.
The MENU key operates the same as the MENU
or OSD (On Screen Display) key on your original
remote. Use , , and (Menu Up, Down, Left
and Right) to navigate your menus. If your original
remote control had a SELECT key to select
options in your menus, use SEL. Use the EXIT
key to exit/clear your On-Screen menus. Please
consult your home entertainment component’s
original owner’s manual for more detailed instruc-
tions on using On-Screen menus.
The , , and (Menu Up, Down, Left and
Right) keys are used to navigate your On-Screen
menus. The , , and keys may also control
the following functions in other modes: RCVR
and AUX mode = Rear Level +/- and Balance
Left/Right, CD mode = Track +/- and Disc +/-.
The SEL (Select) key selects options in your On-
Screen menus. The SEL key may also control the
following functions in other modes: RCVR and
AUX mode = Surround Mode, CD mode = Disc
Select, DVD/LD mode = Chapter.
The EXIT key exits or clears your on screen
menus. The EXIT key may also control the follow-
ing functions in other modes: RCVR and CD mode
= Open/Close.
The PROG/GUIDE key operates your components
secondary menus as well as your DBS system’s
and Cable Converter’s Guide function. Use the ,
, and (Menu Up, Down, Left and Right)
keys to navigate your menus. If your original
remote control had a SELECT key to select
options in your menus, use SEL. Use the EXIT
key to exit/clear your On-Screen menus. Please
consult your home entertainment component’s
original owner’s manual for more detailed instruc-
tions on accessing and navigating your On-Screen
menus.
The DISPLAY key operates the Display function of
your home entertainment components.
The PIP On/Off key accesses your TV’s Picture-
in-Picture feature. The PIP On/Off key may also
control the following functions in other modes: CD
mode =Disk Skip, DVD/LD mode = Subtitle
On/Off, CBL/SAT mode = View.
The SWAP key swaps the Picture-in Picture win-
dow and the TV’s main picture. The SWAP key
may also control the following functions in other
modes: CBL/SAT mode = SAT.
The MOVE PIP key moves the Picture in-Picture
window around your TV screen. The MOVE PIP
key may also control the following functions in
other modes: DVD/LD mode = Angle, CBL/SAT
mode = Next.
The SURROUND key operates the same as the
Surround On/Off key on your original remote. The
SURROUND key may also control the following
unctions in other modes: VCR mode = Auto
Tracking, DVD/LD mode = Disc, CBL/SAT mode =
Favorite Channel, CD mode = 10+.
The MACRO and MACRO2 keys can sequentially
memorize up to 15 key strokes per key for access
with a single key press. These keys are not mode
specific. See page 27 for more details.
1L, 2L, 3L, and 4L are mode-specific learning keys
that allow you to customize your Cinema 5 for
unique functions not found on your new remote
control. They
will accept up to four new functions per device
mode for a total of 28 new functions. See page 23
for additional details.
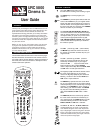
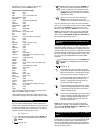
INSTALLING THE BATTERIES
Your Cinema 5 requires four (4) new AAA alkaline batteries.
To install the batteries:
1. On the back of the Cinema 5, pull back on
the tab and lift the battery cover off.
2. Match the + and - marks on the batteries to
the + and - marks in the battery case, then
insert the
batteries.
3. Press the battery cover back into place.
4. Test the unit by pressing POWER. If the bat-
teries are inserted correctly, the red light will
blink.
NOTE: Removing the batteries will not require you to repro-
gram your remote control because the Cinema 5 has 60 min.
memory backup : Allows you time to replace batteries with-
out having to re-program the remote.
SETTING UP YOUR COMPONENTS
Programming the Cinema 5 to operate your TV:
NOTE: If you are trying to program a TV/VCR combination,
do not perform these instructions. Instead, follow the steps in
“Programming the Cinema 5 to operate your TV/VCR
Combo
”
starting on page 13.