12
Front & Rear Panels
For detailed information, refer to the pages in brackets.
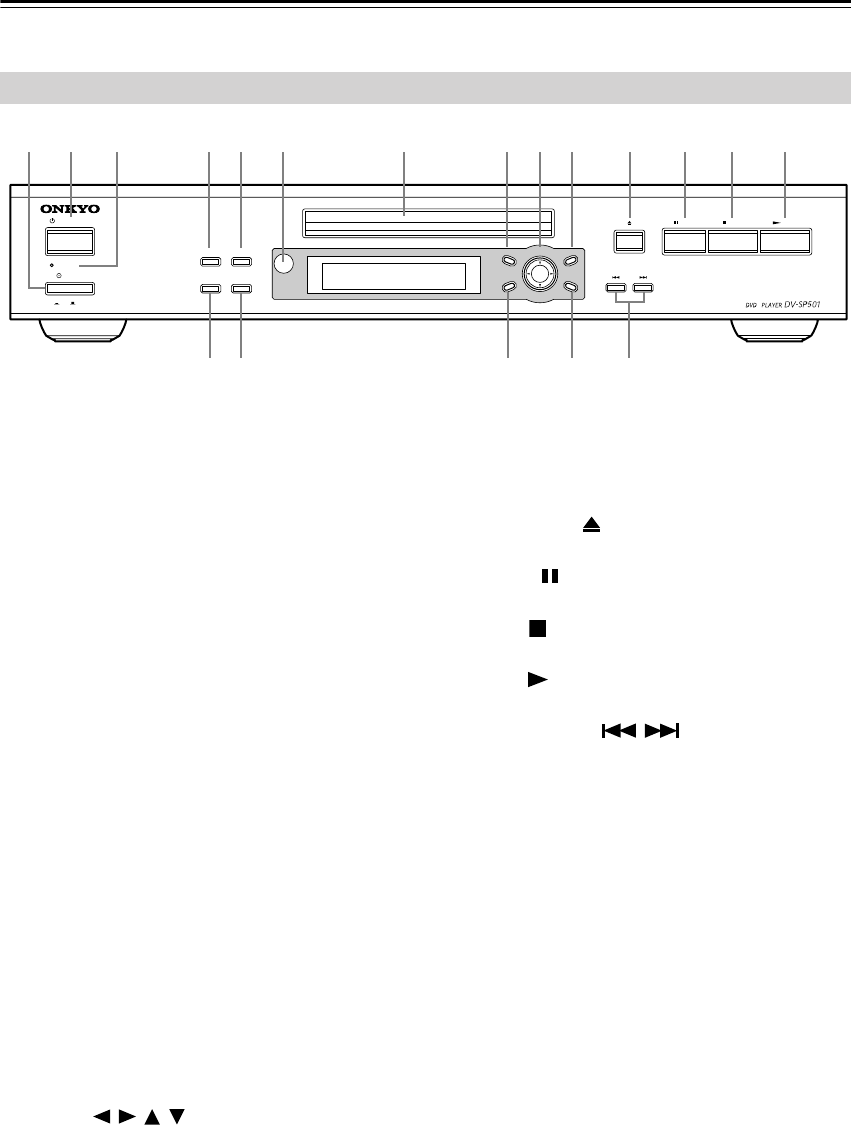
A
POWER switch [23]
This is the main power switch. When set to OFF, the
DV-SP501 is completely shutdown. When set to
ON, the DV-SP501 can be set to On or Standby.
Don’t turn on the power until you’ve completed,
and double checked all connections (pages 18–22).
B
STANDBY/ON button [23, 26]
This button is used to set the DV-SP501 to On or
Standby. For models with a POWER switch, this
button has no effect unless the POWER switch is set
to ON.
C
STANDBY indicator [23]
This indicator lights up when the DV-SP501 is in
Standby.
D
DISPLAY button [39]
This button is used to display information about the
current disc, title, chapter, or track, including the
elapsed time, remaining time, total time, and so on.
Press it repeatedly to display more information.
E
PLAY MODE button [31–36]
This button is used to open and close the Play Mode
menu.
F
Remote control sensor [11]
This sensor receives control signals from the remote
controller.
G
Disc tray [26]
Discs are loaded here.
H
TOP MENU button [28]
This button is used to display the top menu of a
DVD-Video disc.
I
Cursor /// & ENTER buttons [24]
The four cursor buttons located around the central
[ENTER] button are used to navigate DVD-Video
menus and the onscreen setup menus.
The central [ENTER] button is used to start play-
back of the selected title, chapter, or track and to
confirm settings.
J
MENU button [28]
This button is used to display a menu on a
DVD-Video disc or to open the Disc
Navigator
when using a Video CD, audio CD, WMA/MP3/
JPEG disc, or
VR format DVD-RW
disc.
K
Open/Close button [26]
This button is used to open and close the disc tray.
L
PAUSE
button [27]
This button is used to pause playback.
M
STOP
button [27]
This button is used to stop playback.
N
PLAY
button [26, 27]
This button is used to start playback.
O
Previous/Next / buttons [27]
The Previous button is used to select the previous
chapter or track. During playback it selects the
beginning of the current chapter or track.
The Next button is used to select the next chapter or
track.
P
SETUP button [24]
This button is used to open and close the onscreen
setup menus.
Q
RETURN button [24, 28]
This button is used to return to the main menu with-
out saving your changes.
R
CLEAR button [35]
This button is used to cancel various functions.
S
DIMMER button
This button is used to adjust the display brightness.
Front Panel
RETURN SETUP
TOP MENU MENU
C
U
R
S
O
R
P
U
S
H
T
O
E
N
T
E
R
ANDBY
ST
OFF
ON
STANDBY/ON
POWER
DISPLAY PLAY MODE
DIMMER CLEAR
STOP
PLAYPAUSE
B C D E F G H I J K
S R Q P O
L M NA


