


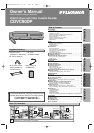


Setup
–
8
–
EN
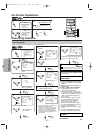
About the Remote Control and Front PanelAbout the Remote Control and Front Panel
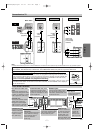
•To turn the unit on or off. •To turn the unit on or off. •To turn the unit on or off.
•To display the current disc
mode.
•To display the current disc
mode.
•To display the current time,
tape counter, and channel.
•To open or close the disc
tray.
•To open or close the disc
tray.
•To eject the video cassette
from the VCR.
•
To select chapter or title directly.
•To select track directly.
•To select camera angles on
a disc.
•To select subtitles on a disc.
•To put the VCR into standby
mode for a timer recording.
•To select audio languages on
a disc.
•To select STEREO,
L-CH or R-CH. (CD)
•To repeat between your
chosen point A and B.
•To repeat between your
chosen point A and B. (CD)
•To play a chapter or title
repeatedly.
•To play a track or disc
repeatedly. (CD)
•To play a track, group or disc
repeatedly. (MP3)
•To return to the previous
operation on the DVD setup
menu.
•To set black level on/off.
•To set virtual surround on/off.
•To arrange the playing
order or play randomly.
•To set virtual surround on/off.
•To call up the MP3 menu.
(MP3)
•To magnify part of a picture.
(x2/x4)
•To call up the Menu
on a disc.
•To call up the VCR Menu.
•To call up the Top Menu
on a disc.
•To return to the previous
operation on the DVD setup
menu.
•
To search chapter, title or time.
•To rapidly return to
a location of disc.
•Search the markers.
•To search track.
•To search time. (CD)
•To rapidly return to a location
on the disc.
•Search the markers. (CD)
•To select the recording speed.
•To select channel.
•The +10 button has no effect
in VCR mode.
•To clear the markers.
•To clear the markers. (CD)
•To remove status No.
in program input.
•To clear the numbers
entered incorrectly.
•To clear the numbers
entered incorrectly.
•To exit the VCR Menu.
•To reset the tape counter.
•To search forward/backward
through a disc.
•
To begin slow forward/reverse
playback during the pause mode.
•To search forward/backward
through a disc.
•To forward/backward a tape.
•To advance playback
one frame at a time.
•To advance playback
one frame at a time.
•To pause disc playback.
• To pause disc playback.
• To pause tape playback or
recording.
• To stop playback. • To stop playback.
• To stop playback or recording.
• To skip chapters. • To skip tracks.
•
To return to the top file of the
highest hierarchy in the program
and MP3 menu. (MP3)
• To change channels.
•
To adjust the tracking manually
during playback.
• To begin disc playback. • To begin disc playback.
• To begin tape playback.
•To call up the DVD setup
menu.
•To call up the index or time
search menu.
•To call up the DVD setup
menu.
• To activate the remote control
in DVD mode.
• To select the DVD output
mode.
•
To activate the remote control
in DVD mode.
• To select the DVD output
mode.
• To select VCR position or
TV position.
• To select CD/MP3 position
or TV position.
• To select DVD position or
TV position.
• To view the tape
in slow motion.
• To select the VCR output
mode.
• To activate the remote control
in VCR mode.
• To start a recording.
•To move the cursor and
determine its position.
•To move the cursor and
determine its position.
• To select an item
on the VCR Menu.
•To advance to the next
VCR Menu.
•
To go back one step during
clock and timer setting.
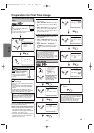
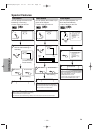
VCR mode
DVD mode
POWER
MENU
TOP MENU
MODE
SUBTITLE
T- SET
ANGLE
REPEAT
A-B
123
456
789
0
+10
ZOOM
SPEED
VCR
PAUSE
SLOW
VCR/TV
SKIP/CH.
SKIP/CH.
PLAY
STOP
REC/OTR
SETUP
ENTER
DVD-V
DVD-V
CDCD
CD
MP3MP3
MP3
VCRVCR
VCR
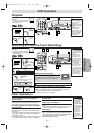
Button
(Alphabetical order)
Disc/Tape
OPEN/CLOSE
/EJECT
CLEAR/
C. RESET
SEARCH
MODE
DVD
RETURN
AUDIO
DISPLAY
POWER
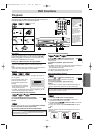
DISPLAY VCR DVD PAUSE
SLOW
VCR/TV
SKIP/CH.
PLAY
STOP
REC/OTR
MENU
SETUP TOP MENU
MODE ZOOM
SUBTITLE
T- SET
ANGLE
ENTER
RETURN
SEARCH
MODE
REPEAT A-B
OPEN/CLOSE
/EJECT
SPEED AUDIO
CLEAR/
C. RESET
123
456
789
0
+10
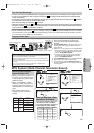
2
1
3
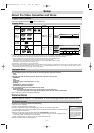
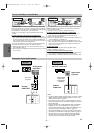
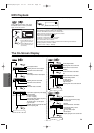
Installing the Batteries
for the Remote Control
Install two AA batteries
(supplied) matching the polarity indi-
cated inside battery compartment of
the remote control.
Remote Control
Within about
23 feet (7m)
Remote
control
Keep in mind the following when using
the remote control:
• Make sure that there is no obsta-
cle between the remote and the
remote sensor on the unit.
• Use within the operating range
and angle, as shown.
H9603CD(EN)v1.qx3 04.3.1 9:57 PM Page 8