


Connection to a TV
Connections
Recording
Playing discs EditingBefore you start Connections Getting started
Changing the SETUP menu
Others Español
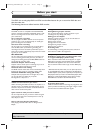
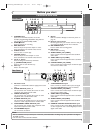
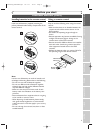
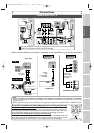
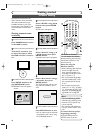
Make one of the following connections, depending on the capabilities of your existing equipment.
AUDIO IN
RL
or
S-VIDEO IN
CB
Y
C
R
COMPONENT
VIDEO IN
AUDIO OUT
TV
Basic Audio
Method 1 Method 2
Better picture Best picture
S-VIDEO OUT
COMPONENT VIDEO OUT
Audio cable
(supplied)
S-Video
cable
(commercially
available)
Component
Video cables
(commercially
available)
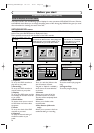
DVD Recorder
AUDIO IN VIDEO
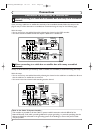
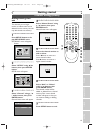
RF Cable
(supplied)
Video
Cable
(supplied)
Audio
Cable
(supplied)
(Back of TV)
Plug in the AC power cord of the DVD recorder.
or
Cable
Signal
or
Cable
Signal
Connect
Connect
ConnectConnect
Disconnect
Antenna
Antenna
(Back of DVD recorder)
(Back of TV)
3
2
1
6
4
5
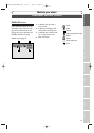
Note
•
Connect this unit directly to the TV. If the A/V cables are connected to a VCR, pictures may be distorted due to the copy
protection system.
•
When progressive scanning mode is selected, no video signal will be output from the VIDEO OUT or S-VIDEO OUT jack.
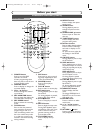
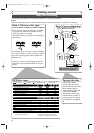
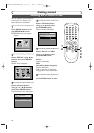
If your TV is compatible with 525p (480p) progressive scanning and you want
to enjoy that high quality picture;
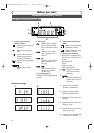
You must select the connection Method 2 above and progressive scanning mode.To set
the mode, press and hold the SETUP button on the remote control for more than 3 sec-
onds during DVD playback, so that “P.SCAN” will appear on the display of this unit.
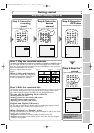
If your TV is not compatible with progressive scanning;
Use this unit in interlace mode. Make sure that no “P.SCAN” is on the display of this unit.
If not, press and hold the SETUP button on the remote control for more than 3 seconds
during DVD playback, so that “P.SCAN” on the display of this unit will disappear.
SETUP
REPEAT
ZOOM
ENTER
RETURN
MENU/LIST
TOP MENU
{B
FWD
g
STOP
C
PLAY
B
REV
h
K
more than 3 seconds
during DVD playback
[Interlace mode]
[Progressive scanning mode]
13
E6501UD_DVR90DEA.qx3 04.3.17 16:27 Page 13