


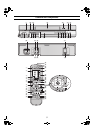

10
Option Setting
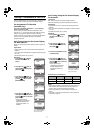
1 Press [MENU] (7) to display the Main menu on the TV
screen.
2 Press [Cursor] (37) (34) to select [OPTION] then
press [OK] (23).
3 Press [Cursor] (37) (34) to select the desired field.
TAPE SELECT: To select the corresponding video
cassette tape length to display the
approximate remaining tape time.
• Press [Cursor] (37) (21) to select the corresponding
video cassette tape length.
AUTO: The VCR automatically distinguishes E30, -60, -90,
-120, -180 and -240 tapes.
E195: For E195 tape
E260: For E260 tape
E300: For E300 tape
• The remaining tape time may not be displayed correctly
depending on the tape used.
NTSC INPUT SELECT:To select the colour TV system
used to record NTSC signals.
• Press [Cursor] (37) (21) to select [AUTO].
Allows NTSC [4.43] or [3.58] signals to be distinguished
automatically.
• If the tape has not recorded correctly, select 4.43 or 3.58.
4.43: When recording NTSC 4.43 signals.
3.58: When recording NTSC 3.58 signals.
• Some programmes on NTSC 3.58 system cannot be
recorded correctly at this position.
NTSC PB SELECT: To select the colour TV system of
the TV used to play back a tape
recording NTSC signals.
• Press [Cursor] (37) (21) to select the desired position
according to the colour TV system of the TV.
on PAL TV: For TVs that can receive PAL signals.
4.43: For TVs that can receive NTSC 4.43 signals.
3.58: For TVs that can receive NTSC 3.58 signals.
JET NAVIGATOR: To set the conditions for the Jet
Navigator Function.
• Press [Cursor] (37) (21) to select [ON] or [OFF].
OFF: Initially set at this position.
ON: Jet Navigator function works. If you select [ON],
[OSD REC] is set to [OFF] automatically.
DELETE NAVIDATA: To delete all the Jet Navigator data
stored in the VCR memory.
• Press [Cursor] (37) (21) to select [OK] then press [OK]
(23) to do the deletion.
NO: Initially set at this position.
END: It is done to delete all the Jet Navigator data.
OSD REC: To set the conditions for the OSD
Recording function.
• Press [Cursor] (37) (21) to select [ON] or [OFF].
OFF: Initially set at this position.
ON: This setting enables OSD Recording. (See page 13.)
If you select [ON], [JET NAVIGATOR] is set to [OFF]
automatically.
OSD: To select the On Screen Display
mode.
• Press [Cursor] (37) (21) to select [AUTO] or [OFF].
AUTO: To make various indicators appear On Screen
Display for 5 seconds press [OSD] (35).
OFF: No indications appear.
4 Press [MENU] (7) twice to exit the On Screen Display.
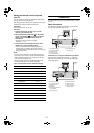
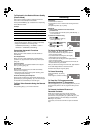
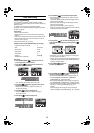
CLOCK SET
TUNER PRESET
SYSTEM
OPTION
MENU
SELECT
END
: , OK
:MENU
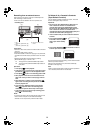
END :MENU
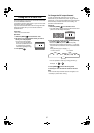
TAPE SELECT
[AUTO]
NTSC INPUT SELECT [AUTO]
NTSC PB SELECT [onPALTV]
JET NAVIGATOR [OFF]
DELETE NAVIDATA [NO]
OSD REC [OFF]
OSD [AUTO]
SELECT:
OPTION