


7
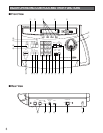
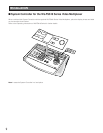
q Alarm Indicator (ALARM)
Blinks to indicate that an alarm condition exists.
It changes to steady light when the alarm is reset auto-
matically.
To turn the indicator off, press the ACK RESET button.
w Busy Indicator (BUSY)
Lights up when you attempt to control a monitor or a
camera that is already used by a higher priority opera-
tor, or when the higher priority operator selects the
monitor or camera you are currently operating.
Operations from the System Controller are disabled
until this indicator goes off.
e Function Buttons (F1/F2/F3/F4)
Select functions displayed on the LCD (Liquid Crystal
Display) display.
r LCD (Liquid Crystal Display) Display
Displays function menus, numeric input, and system
status.
t Direction Buttons (A, B, D, C)
Select a function menu for display on the LCD display.
y Zoom Wheel Controller
This control is used for zooming cameras equipped
with the specified lens. Moving the control to the right
will zoom in the image. Moving the control to the left will
zoom out the image.
u Joystick Controller (UP/DOWN/LEFT/RIGHT)
The joystick is used to manually operate the Pan/Tilt
Head, or move the cursor in the Matrix Switcher’s Setup
Menu on the active monitor screen.
i Top Button
Pressing this button will automatically set the lens focus
of a specified camera.
o Iris Control Buttons (IRIS CLOSE, OPEN)
Close or open the lens iris of cameras equipped with
the specified lens.
When these buttons are pressed at the sometime for 3
seconds or more, the lens iris is reset to the factory
default setting.
!0 Focus Control (FOCUS NEAR/FAR)
Adjust the lens focus of cameras equipped with the
specified lens.
!1 Zoom Control (ZOOM TELE/WIDE)
This control is used for zooming cameras equipped
with the specified lens.
!2 Preset Button (PRESET)
Auto Focus Button (AF)
PRESET: This button, in combination with the Numeric
keys, is used to move the selected camera to a pre-
set position in a system equipped with the specified
cameras.
AF: Pressing this button will automatically set the lens
focus of a specified camera.
!3 Camera (Set) Key [CAM (SET)]
CAM: Used for camera selection. To select a camera,
enter the desired camera number with the Numeric
keys, and then press the CAM key.
SET: This key, in combination with the Numeric keys, is
used to enter numeric input, such as operator ID
and password.
It is also used to execute the currently highlighted
selection and to enter a submenu in the Setup
Menu of the Matrix Switcher.
!4 Numeric Keys (0 to 9)
These keys are used for numeric input into the system,
such as the camera and monitor number, sequence
number, preset position, etc.
!5 Monitor (Escape) Key [MON (ESC)]
MON: This key is used to select a monitor.
To select a monitor, press the corresponding
Numeric keys, followed by the MON key.
ESC: This key is used to escape from the currently
highlighted selection on the Setup Menu of the
Matrix Switcher.
Pressing this key, while the Alternate (ALT) indicator is
on, will display the video that is connected to the
Monitor Input (MONITOR IN) Connector on the WV-
PB5504A Video Output Board.
!6 Stop/Slow Button (STOP/SLOW)
STOP: Pauses a sequence that is being run on the
active monitor.
SLOW: For fine pan/tilt control, move the joystick while
holding down the SLOW button.
!7 Increment Button (INC +1CAM)
When a sequence running in forward direction has
been paused with the STOP button, pressing this button
will move the sequence one frame to the next step (in
forward run direction). If the sequence was running in
reverse direction, the button will move the sequence
one frame to the next step (in reverse run direction).
This button is also used to select a camera. Pressing
this button will replace the currently selected camera
with the next higher camera number, if the active moni-
tor is in Spot mode.