


14
15
Note
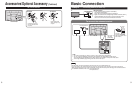
About broadcasting
systems
Analog (NTSC):
Conventional
broadcasting
Digital (ATSC):
New
programming
that allows
you to view
more channels
featuring
high-quality video
and sound
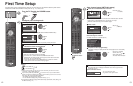
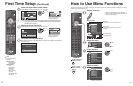
Select the Input labels (Label inputs)
Select NEXT then press OK to go to the next step.
Label inputs
Step 5 of 6
Press RIGHT to select a label for each input.
Example: DVD, Blu-ray, etc. or “Not used”.
Press OK to customize the label.
Edit
Blu-ray, DVD ...
HDMI HDMI
RETURN
Change
Select
HDMI 3
Component 1
Component 2
Video 1
Video 2
Next
PC
HDMI 1
HDMI 2
ABC Deleteabc
R G B Y
1
@.
4
GHI
7
PQRS
2
ABC
5
JKL
8
TUV
3
DEF
6
MNO
9
WXYZ
0
- ,
LAST
select
set
or
OK
RETURN
Select
ABC Deleteabc
R G B Y
1
@.
4
GHI
7
PQRS
2
ABC
5
JKL
8
TUV
3
DEF
6
MNO
9
WXYZ
0
- ,
LAST
Blu-r
Video 2
NEXT
GA
GA
Follow the instructions on
screen to complete the
following operations.
Label: [BLANK] Not used/Blu-ray/DVD/DVD REC/HOME THTR/GAME/COMPUTER/
VCR/CABLE/SATELLITE/DVR/CAMERA/MONITOR/AUX/RECEIVER/MEDIA
CTR/MEDIA EXT/OTHER
Adjust the Clock (Set clock)
Select NEXT then press OK to go to the next step.
Step 6 of 6
Edit
RETURN
Change
Select
09
Set clock
--
--
--
--
--
Day
Hour
Minute
Next
Year
Month
Current year.
select
set
OK
RETURN
Select
09
10
Minute
Next
10
or
Follow the instructions on
screen to complete the
following operations.
Complete the First time setup
Completion message is displayed when you have successfully completed the
First time setup.
OK
RETURN
Setup is complete. Enjoy your
Panasonic VIERA TV.
Press OK to exit.
First Time Setup (Continued) How to Use Menu Functions
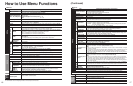
Various menus allow you to make settings for the picture, sound, and other functions so that you can enjoy
watching TV best suited for you.
Press to exit from
a menu screen
Press to return
to the previous
screen
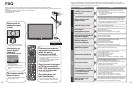
Display the menu
Shows the functions that can be adjusted.
Some functions will be disabled depending on
the type of input signal.
Edit
RETURN
ABC Deleteabc
Menu
R G B Y
1
@.
4
GHI
7
PQRS
2
ABC
5
JKL
8
TUV
3
DEF
6
MNO
9
WXYZ
0
- ,
LAST
Change
Select
Select or enter the name of the device
connected to the HDMI 1 terminal.
Input labels
Component 1
Component 2
Video 1
Video 2
PC
HDMI 2
HDMI 3
HDMI 1
Menu structure
Menu bar
Press OK to move to the Menu items.
Menu items
Press OK to proceed to next screen if
available.
Help information
Operation guide
(example: Input labels)
Select the menu
Custom
Menu
0
0
Picture 1/2
Brightness
Picture mode
Contrast
Reset to defaults
select
next
Select the item
Custom
Menu
Resets all picture adjustments to factory
default settings except for “Advanced
picture”.
0
0
0
0
0
Picture 1/2
Brightness
Color
Tint
Sharpness
Picture mode
Contrast
Reset to defaults
(example: Picture menu)
select
Adjust or select
Vivid
Menu
Selects from preset picture modes.
0
0
0
0
0
Picture 1/2
Brightness
Color
Tint
Sharpness
Picture mode
Contrast
Reset to defaults
(example: Picture menu)
adjust
or
select