20 C4675M (2/11)
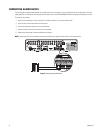
CONNECTING USB DEVICES
The unit has one high speed USB 2.0 port on the front panel and two high speed USB 2.0 ports on the rear panel. You can use a USB flash drive
to upgrade the unit software or to export video. You can use a USB hard disk drive to back up video data.
To connect a USB device:
1. Connect a USB cable (not supplied) to one of the USB connectors on the front or rear panel.
2. Connect the other end of the cable to your USB device. The unit automatically recognizes it.
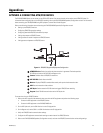
CONNECTING AUDIO DEVICES
The unit supports up to four line input and two line output audio devices. Each of the audio inputs can be associated with one or more video
channels.
You can connect up to four audio input devices to the CH1 to CH4 connectors on the rear panel. You can also connect up to two audio output devices
to the AUDIO-OUT 1 and AUTO-OUT 2 connector on the rear panel. Refer to Appendix B: Connecting Audio Devices on page 26 for more information.
NOTE: To send and receive live audio, CH 01 to CH 04 must be configured for audio. For more information about configuring the unit for live
audio, refer to the DX Series Client Operation/Configuration manual.
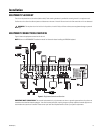
To connect live audio devices:
1. Connect an audio input source (microphone) and output device (amplified speaker) to the DX Series Client computer.
2. Connect a microphone and speaker to the DX4700/DX4800 HVR:
a. Connect a microphone to an audio input channel (CH 1 to CH 4) located at the rear of the unit.
b. To hear live and playback audio at the server, connect a speaker to Audio Out 1.
c. To hear live audio received from the DX Series client, connect a speaker to Audio Out 2.
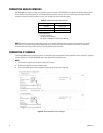
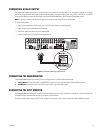
CONNECTING THE MOUSE
Connect the supplied USB mouse to the MOUSE connector on the rear panel.
CONNECTING TO A NETWORK
The unit supports a 10/100/1000Base-T network interface. You can use the DX Series client application to configure and operate the unit over
the network. You can also use various network services, including Dynamic Host Configuration Protocol (DHCP) and Network Time Protocol (NTP)
to support various DX4700/DX4800 network features.
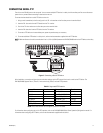
To connect the unit to a network:
1. Connect a straight Ethernet cable (not supplied) to the local area network (LAN) port on the rear panel.
2. Connect the other end of the cable to your network device. The NET indicator on the front panel glows when the network establishes
communication with the unit.
CONNECTING POWER
The unit includes three power cords: one USA standard, one UK standard, and one European standard.
To connect power:
1. Connect the power cord to the rear panel.
2. Connect the other end of the power cord to the power source.