


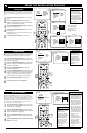

U
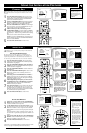
SING THE TV BUTTONS
S
hould your remote control be lost or broken, you can still
change some of the basic picture and sound settings with the
buttons on the TV. Follow the steps below to familiarize yourself
with the functions of the TV buttons.
1
Press POWER/STANDBY to turn the TV on (or off).
Allow about 10 seconds for the TV to power on.
2
Press the VOLUME + or – buttons to decrease or
increase the sound level.
Press the VOLUME + and – buttons simultaneously to dis-
play the on-screen menu. After the menu appears, use these
buttons to enter submenus and make selections or adjust-
ments. (Use the CHANNEL buttons to move up and down
in the menu or submenus.) Press both VOLUME buttons
simultaneously to back out of the on-screen menus.
3
Press SOURCE SELECT to choose from among the sig-
nal inputs you have connected to the TV.
4
Press the CHANNEL buttons to select TV channels.
P
IP
2
1
3
5
4
6
8
7
9
0
O
K
S
W
A
P
P
IP
C
H
D
N
U
P
F
R
E
E
Z
E
S
O
U
N
D
V
O
L
CH
MUTE
CC
A
/C
H
P
O
W
E
R
P
I
C
T
U
R
E
S
T
A
T
U
S
/
E
X
IT
M
E
N
U
/
S
E
L
E
C
T
P
O
S
IT
IO
N
TV
D
N
U
P
1
2
3
4
5
6
7
8
9
0
SURF
A
/C
H
ACC
VCR
UP
DN
TV/VCR
A
C
T
IV
E
C
O
N
T
R
O
L
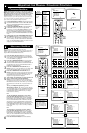
TV MODE
Button
TV
VCR
ACC
O
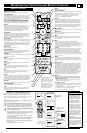
PERATING THE
TELEVISION AND R
EMOTE CONTROL
TELEVISION
R
EMOTE CONTROL
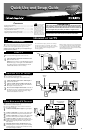
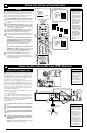
HOOKING UP THE TV
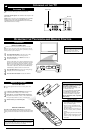
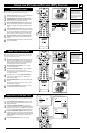
INSTALLING BATTERIES
T
o load the supplied batteries into the remote, follow these
steps.
1
Gently press and hold the indention on the back of the
remote and slide the battery cover off the remote.
2
Place the two “AA” size batteries in the remote’s bat-
tery case. Ensure that the (+) and (–) ends of the batteries
line up correctly with the (+) and (–) inside the case.
3
Slide the battery cover back into place.
POINTING THE REMOTE
Press the TV mode button on the remote to ensure that the
remote sends its commands to the TV. When operating the remote
control, point the remote toward the remote sensor window on the
TV.
To prevent battery leakage that
may result in injury to you or dam-
age to the remote control:
• Install ALL batteries correctly, + and –,
as marked on the unit.
• Do not mix batteries (OLD and NEW
or CARBON and ALKALINE, etc.)
• Remove batteries when the remote
control is not used for a long time.
Do not take apart, heat, or put bat-
teries in fire.
Remote Sensor
Window
You can set up your TV remote control to work with accessory
devices such as VCRs, DVD players, and cable converter boxes.
See pages 18–23 in the Directions for Use manual.
cc
C
HECK IT OUT
2
BATTERY USAGE CAUTION
SOURCE
SELECT
>
?
+
A
-
A
VOLUME
CHANNEL
MENU
SOURCE
SELECT
>
?
+
A
-
A
VOLUME
CHANNEL
MENU
Power/Standby
Button
You can press any of the buttons on
the front of the TV to turn the TV on,
but you must press the Power/
Standby button to turn the set off.
HELPFUL
HINT
VIDEO
S-VIDEO
L
Pb
Pr
VIDEO
S-VIDEO
L
AUDIO
L
R
AUDIO
L
R
G/Y
R/Pr
B/Pb
V
H
SYNC
L
R
AUDIO
HD INPUT-AV 4
INPUT-AV 2OUTPUT
INPUT-AV 1
ANTENNA IN 75Ω
Y
L
R
AUDIO
HD INPUT-AV 5
DVI
Back of TV
Antenna Signal
ANTENNA TV
T
his connection WILL supply stereo sound to the TV.
Connect the antenna signal to the ANTENNA IN 75Ω jack on the
back of the TV.
NOTE: Refer to the sections on TUNER MODE and AUTO PRO-
GRAM on page 4 of this guide. Set TUNER MODE to the
ANTENNA option. Run AUTO PROGRAM to store all available
cable channels in the TV’s memory.
• Be sure to point the remote toward the
sensor window on the TV or accessory
device you wish to operate.
• Press the correct mode button for the
device: TV, VCR, ACC (for accessories
other than VCRs).
• Be within about 30 feet (10 meters) of
the TV or accessory device you wish to
operate.
• Avoid dropping the remote on hard sur-
faces.
• Do not use harsh chemicals to clean the
remote. Use only a soft, lightly mois-
tened cloth.
HELPFUL HINTS