


1 23
POWER
12VDC
EXT. ANT
TV
VCR
TV
230/240V
TV
P
H
I
L
I
P
S
Intern
Extern
Gain
2
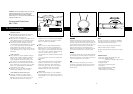
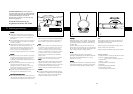
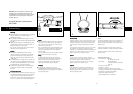
ConnectionsConnections
ConnectionsConnections
Connections
Connect the cable of the aerial to the television aerial socket.
If there is a video recorder already installed, connect the
cable of the aerial to the aerial socket of the video recorder.
If there is a cable network connection in use, disconnect this
cable from the television set or the video recorder, and
connect it to the socket on the back of the aerial (EXT. ANT).
Connect the mains lead of the aerial to a 230-240 VAC mains
socket. Press the power button on the aerial. All three LEDs
light up for a second and the aerial is now in the “Standby”
position.
Note: the aerial is also fitted with a 12 VDC supply socket for
use in caravans, campers, boats, etc.
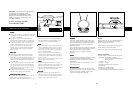
Switching onSwitching on
Switching onSwitching on
Switching on
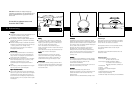
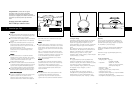
To turn the aerial on, press any of the remote control buttons.
Initially the aerial switches to the intern position and the
intern/extern LED lights up orange. The aerial is now
operational. Your television set/radio receives signals directly
from the SBC TT 900 aerial.
Use the instruction manual supplied with your television to
tune to the different channels. Rotate the parabolic UHF dish
(see Fig. 2 and step 8) and turn the amplifier control dial (Fig.
3) to vary the signal gain until you obtain optimum signal
reception.
To obtain the best reception for VHF and FM Radio signals,
vary the length and angle of the telescopic aerials.
Selection of internal/external aerialSelection of internal/external aerial
Selection of internal/external aerialSelection of internal/external aerial
Selection of internal/external aerial
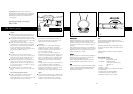
If you want to use the aerial with an external cable network,
press any of the remote control buttons quickly four times.
The orange LED changes to green indicating that the aerial is
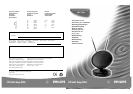
Instructions for use
Universal amplified indoor aerial
SBC TT900
Congratulations! The product you have just
purchased offers you exceptionally high quality
reception. Please read the following instructions
before using the indoor aerial, and retain this
booklet for future reference.
GB
Ê
Ë
Ì
Í
Î
Ï
Ð
27
working with the external cable network connected to the
aerial EXT-ANT socket (See step 2). Your television now
receives signals from the external cable TV system.
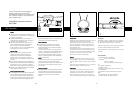
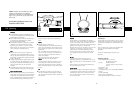
RotationRotation
RotationRotation
Rotation
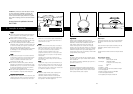
To rotate the aerial, hold any of the remote control buttons
for six seconds. To change the direction, release the button
and then press it within 2 seconds. If more than 2 seconds
pass, you have to re-start again.
Note 1: It is recommended that you select the channel key of
the channel you are currently watching on the TV to rotate
the aerial. By doing so you prevent your TV settings from
being inadvertently changed.
Note 2: When the aerial rotates, it will automatically reverse
direction once it has reached the end of each rotation.
CautionCaution
CautionCaution
Caution
If during the rotation the aerial is stopped manually by some
other obstacle, it will attempt to change the direction three
times. Following this, the microprocessor will stop the motor
and the supply LED will flash for five seconds. The aerial will
work again once the obstacle concerned has been removed.
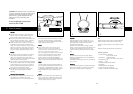
Switching offSwitching off
Switching offSwitching off
Switching off
To return to the “Standby” position, press any of the remote
control buttons quickly three times, while holding the button
for slightly longer the third time (for at least two seconds).
The red LED switches off.
Ñ
Ò
Notlar:
Bu anten 230-240 VAC elektrik akýmýna baðlandýðý zaman
çalýþýr. Antenin elektrik baðlantýsýný kesmek için prizden
fiþini çekin.
Antenin alt kýsmýnda dört tane kauçuk altlýk vardýr. Bu
altlýklar antenin her türlü zeminde sabit durmasýný saðlar.
Antenin teknik özellikleri alt kýsmýndaki etikettedir.
Teknik özellikler
• Ulaþým alaný (anten + anfi):UHF36 ±2dB, VHF20 ±2dB
• Güç tedariki: 230-240 VAC 50-60 Hz
Karavan, kamping, tekne vs’de kullanýmda
• Güç tüketimi: 3VA
• Öz direnç: 75 Ohm
• Üstün kalitede görüntü saðlar
• TSE onaylýdýr
• EN 60065 emniyet kurallarýna uygundur
• Her türlü uzaktan kumanda ile çalýþýr
• FM radyolar ile kullaným için adaptör ilavelidir
Test fonksiyonu
Antenin fišini prizden en az on saniyelik bir süre kadar
çýkartýn. Uzaktan kumandanýn herhangi bir düðmesini basýlý
tutun ve fiþi tekrar prize takýn. Düðmeyi iki saniye kadar
daha basýlý tuttuktan sonra býraktýðýnýzda test fonksiyonu
devreye girecektir.
Bu test fonksiyonu ile, üç ýþýðýn çalýþýr durumda olup
olmadýðýný kontrol edebilirsiniz.
Ayrýca antenin her iki tarafa doðru yönelip yönelmediðini,
yöneldikten sonra tekrar otomatik olarak geri dönüp
dönmediðiný kontrol edebilirsiniz. Test fonksiyonu sona
erdikten sonra, anten “Standby” durumuna, yani “kullanýma
hazýr” durumuna dönecektir.
FM radyo
Anteni FM radyolarýnda kullanmak için, adaptörü (antenle
birlikte verilmiþtir) sinyal kablosunun giriþine takýn.
Antenin kablosunu da FM radyosunun anten giriþine takýn.
Amplifikatörün kontrol düðmesini (þekil 3) maksimuma
gelecek þekilde çevirin ve 3. 4. ve 6. adýmlara geçin.
Baša dönme (“reset”)
Anten çalýþýr durumdayken herhangi bir arýza meydana
gelirse, antenin fiþini en az on saniye kadar prizden
çýkartýn ve tekrar prize takýn. Anten. “Standby” durumuna
dönecektir.