


English
20
En
OSD (On Screen Display) Controls
Information
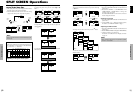
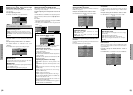
Ⅵ RGB SELECT modes
One of these 8 modes must be selected in order to
display the following signals correctly.
AUTO: Select the suitable mode for the specifications
of input signals as listed in the table “Computer input
signals supported by this system” on page 27.
STILL: To display VESA standard signals. (Use this
mode for a still image from a computer.)
MOTION: The video signal (from a scan converter)
will be converted to RGB signals to make the picture
more easily viewable. (Use this mode for a motion
image from a computer.)
WIDE1: When an 852 dotן 480 line signal with a
horizontal frequency of 31.7kHz is input, the image may
be compressed horizontally. To prevent this, set RGB
SELECT to WIDE1.
WIDE2: When an 848 dotן 480 line signal with a
horizontal frequency of 31.0 kHz is input, the image
may be compressed horizontally. To prevent this, set
RGB SELECT to WIDE2.
WIDE3: When an 1920 dotן 1200 line signal with a
horizontal frequency of 74.0 kHz is input, the image
may be compressed horizontally. To prevent this, set
RGB SELECT to WIDE3.
WIDE4: When an 1280 dotן 768 line signal with a
horizontal frequency of 59.8 kHz or an 1680 dotן1050
line signal with a horizontal frequency of 60 kHz is
input, the image may be compressed horizontally. To
prevent this, set RGB SELECT to WIDE4.
DTV: Set this mode when watching digital broadcasting
(480P).
See page 27 for the details of the above settings.
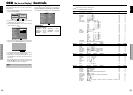
Setting the black level for HDMI signal
Set the black level for the signal transmitted via the HDMI
terminal.
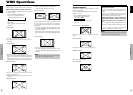
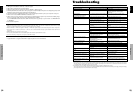
Example: Setting “COLOR2”
On “HDMI SET UP” of “SET UP” menu, select
“COLOR2”.
SEL. ADJ.
EXIT
RETURN
SET UP
LANGUAGE
BNC INPUT
D-SUB INPUT
HD SELECT
RGB SELECT
HDMI SET UP
COLOR SYSTEM
BACK GROUND
SIDE MASK
S1/S2
DISPLAY OSD
OSD ADJUST
ALL RESET
: ENGLISH
: COMPONENT
: RGB
: 1080I
: AUTO
: COLOR2
: AUTO
: GRAY
: 3
: OFF
: ON
: TOP LEFT
: OFF
Information
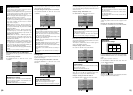
Ⅵ HDMI SET UP settings
COLOR1: When connected to the SET TOP BOX,
DVD etc. Change “COLOR1” into “COLOR2” if the
black level appears gray.
COLOR2: Darker black level (real black).
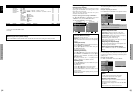
Setting the video signal format
Use these operations to set the color systems of composite
video signals or Y/C input signals.
Example: Setting the color system to “3.58 NTSC”
On “COLOR SYSTEM” of “SET UP” menu, select
“3.58NTSC”.
SEL. ADJ.
EXIT
RETURN
SET UP
LANGUAGE
BNC INPUT
D-SUB INPUT
HD SELECT
RGB SELECT
HDMI SET UP
COLOR SYSTEM
BACK GROUND
SIDE MASK
S1/S2
DISPLAY OSD
OSD ADJUST
ALL RESET
: ENGLISH
: COMPONENT
: RGB
: 1080I
: AUTO
: COLOR1
: 3.58NTSC
: GRAY
: 3
: OFF
: ON
: TOP LEFT
: OFF
Information
Ⅵ Video signal formats
Different countries use different formats for video signals.
Set to the color system used in your current country.
AUTO: The color systems are automatically identified
and the format is set accordingly.
PAL: This is the standard format used mainly in the
United Kingdom and Germany.
SECAM: This is the standard format used mainly in
France and Russia.
4.43 NTSC, PAL60: This format is used for videos in
countries using PAL and SECAM video signals.
3.58 NTSC: This is the standard format used mainly
in the United States and Japan.
PAL-M: This is the standard format used mainly in
Brazil.
PAL-N: This is the standard format used mainly in
Argentina.
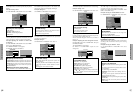
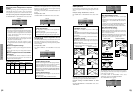
Setting the background color when no signal
is being input
The color displayed on the background when there is no
signal can be set to gray.
Example: Setting “BACK GROUND” to “BLACK”
On “BACK GROUND” of “SET UP” menu, select
“BLACK”.
SEL. ADJ.
EXIT
RETURN
SET UP
LANGUAGE
BNC INPUT
D-SUB INPUT
HD SELECT
RGB SELECT
HDMI SET UP
COLOR SYSTEM
BACK GROUND
SIDE MASK
S1/S2
DISPLAY OSD
OSD ADJUST
ALL RESET
: ENGLISH
: COMPONENT
: RGB
: 1080I
: AUTO
: COLOR1
: AUTO
: BLACK
: 3
: OFF
: ON
: TOP LEFT
: OFF
Information
Ⅵ BACK GROUND Settings
BLACK: Sets the background color to black.
GRAY: Sets the background color to gray.
Setting this makes it easier to see that there is no signal.
English
OSD (On Screen Display) Controls
21
En
Setting the screen size for S1/S2 video input
If the S-video signal contains screen size information, the
image will be automatically adjusted to fit the screen when
this S1/S2 is set to AUTO.
This feature is available only when an S-video signal is
input via the VIDEO3 terminal.
Example: Setting “S1/S2” to “AUTO”
On “S1/S2” of “SET UP” menu, select “AUTO”.
SEL. ADJ.
EXIT
RETURN
SET UP
LANGUAGE
BNC INPUT
D-SUB INPUT
HD SELECT
RGB SELECT
HDMI SET UP
COLOR SYSTEM
BACK GROUND
SIDE MASK
S1/S2
DISPLAY OSD
OSD ADJUST
ALL RESET
: ENGLISH
: COMPONENT
: RGB
: 1080I
: AUTO
: COLOR1
: AUTO
: GRAY
: 3
: AUTO
: ON
: TOP LEFT
: OFF
Information
Ⅵ S1/S2 settings
AUTO: Adjusts the screen size automatically according
to the S1/S2 video signal.
OFF: Turns the S1/S2 function off.
Setting the gray level for the SIDE MASK
Use this procedure to set the gray level for the parts on the
screen on which nothing is displayed when the screen is
set to the 4:3 size.
Example: Setting “SIDE MASK” to “5”
On “SIDE MASK” of “SET UP” menu, select “5”.
SEL. ADJ.
EXIT
RETURN
SET UP
LANGUAGE
BNC INPUT
D-SUB INPUT
HD SELECT
RGB SELECT
HDMI SET UP
COLOR SYSTEM
BACK GROUND
SIDE MASK
S1/S2
DISPLAY OSD
OSD ADJUST
ALL RESET
: ENGLISH
: COMPONENT
: RGB
: 1080I
: AUTO
: COLOR1
: AUTO
: GRAY
: 5
: OFF
: ON
: TOP LEFT
: OFF
Information
Ⅵ SIDE MASK settings
This adjusts the brightness of the black (the gray level)
for the sides of the screen.
The standard is 0 (black). The level can be adjusted
from 0 to 15. The factory setting is 3 (dark gray).
Turning on/off the information display
When this is set to OFF, the information will not be
displayed even if you press the DISPLAY button.
Example: Turning the DISPLAY OSD off
On “DISPLAY OSD” of “SET UP” menu, select “OFF”.
SEL. ADJ.
EXIT
RETURN
SET UP
LANGUAGE
BNC INPUT
D-SUB INPUT
HD SELECT
RGB SELECT
HDMI SET UP
COLOR SYSTEM
BACK GROUND
SIDE MASK
S1/S2
DISPLAY OSD
OSD ADJUST
ALL RESET
: ENGLISH
: COMPONENT
: RGB
: 1080I
: AUTO
: COLOR1
: AUTO
: GRAY
: 3
: OFF
: OFF
: TOP LEFT
: OFF
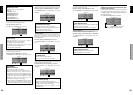
Setting the position of the menu
Adjusts the position of the menu when it appears on the
screen.
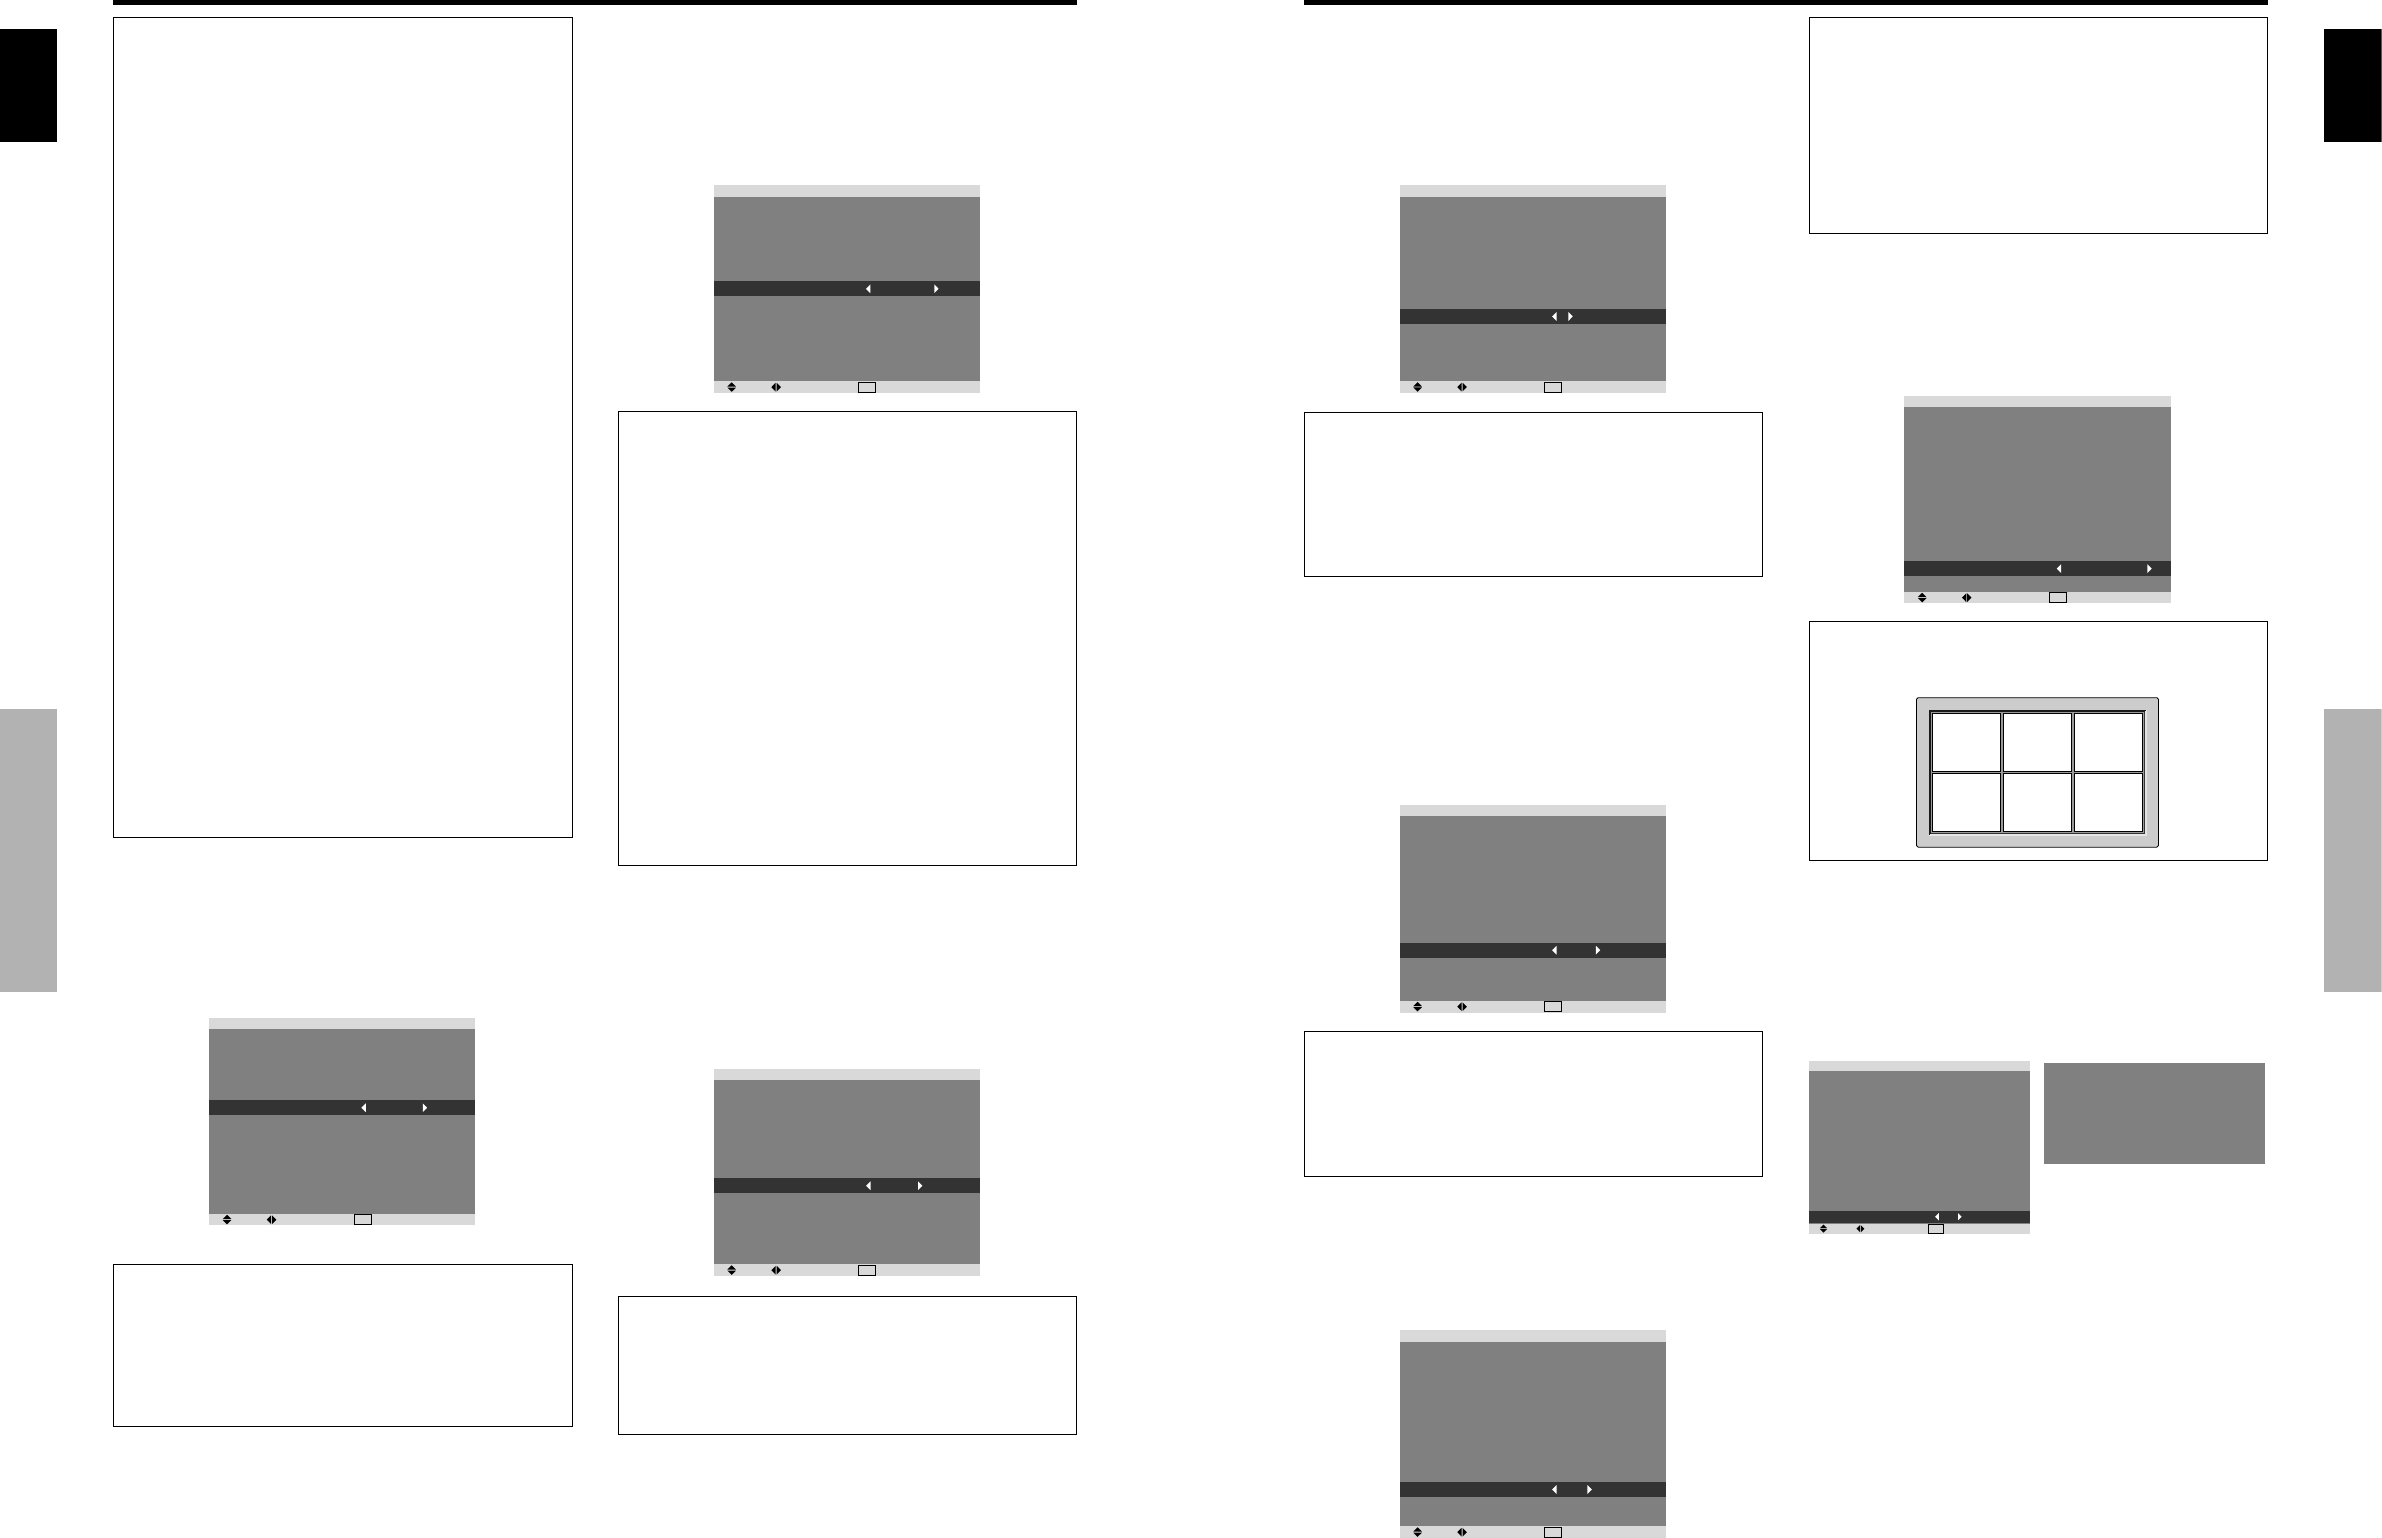
Example: Set the position to “TOP CENTER”
On “OSD ADJ.” of “SET UP” menu, select “TOP CENTER”.
SEL. ADJ.
EXIT
RETURN
SET UP
LANGUAGE
BNC INPUT
D-SUB INPUT
HD SELECT
RGB SELECT
HDMI SET UP
COLOR SYSTEM
BACK GROUND
SIDE MASK
S1/S2
DISPLAY OSD
OSD ADJUST
ALL RESET
: ENGLISH
: COMPONENT
: RGB
: 1080I
: AUTO
: COLOR1
: AUTO
: GRAY
: 3
: OFF
: ON
: TOP CENTER
: OFF
Information
Ⅵ OSD ADJUST settings
TOP
LEFT
TOP
CENTER
TOP
RIGHT
BTM
LEFT
BTM
CENTER
BTM
RIGHT
Resetting to the default values
Use these operations to restore all the settings (PICTURE,
SOUND, SCREEN, SET UP, etc) to the factory default
values.
Refer to page 13 for items to be reset.
On “ALL RESET” of “SET UP” menu, select “ON”, then
press the MENU/SET button.
SEL. ADJ.
EXIT
RETURN
SET UP
LANGUAGE
BNC INPUT
D-SUB INPUT
HD SELECT
RGB SELECT
HDMI SET UP
COLOR SYSTEM
BACK GROUND
SIDE MASK
S1/S2
DISPLAY OSD
OSD ADJUST
ALL RESET
: ENGLISH
: COMPONENT
: RGB
: 1080I
: AUTO
: COLOR1
: AUTO
: GRAY
: 3
: OFF
: ON
: TOP LEFT
: ON
ALL RESET
SETTING NOW
When the “SETTING NOW” screen disappears, then all the
settings are restored to the default values.
Information
Ⅵ DISPLAY OSD settings
ON: The informations on screen size, volume control,
etc. will be shown.
OFF: The informations on screen size, volume control,
etc. will not be shown.
The DISPLAY button on the remote control will not
function either.