


TWM-103
Installation Instructions Page 5
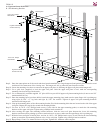
A
A
B
B
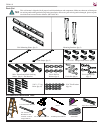
A - Upper and Lower Wall Plates
B - Side Mounting Brackets
10-32 x 3/8” Phillips
Head Screws
Level
10-32 x 3/8” Phillips
Head Screws
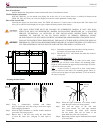
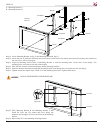
Step 9. Once the center points on all the wood studs have been determined, use a large hanger nail and partially drive it into the wood
stud that will be center-most of the viewing area. The hanger nail will go where the pencil mark was made.
Step 10. Locate the mounting slot closest to center on the upper wall plate (A) and hang the upper wall plate on the hanger nail.
Step 11. Use a spirit level (supplied) to level the upper wall plate. Once the upper wall plate is level, mark the corresponding
mounting slots that line up with the studs.
Step 12. Use a commercially available supplied 1/4” pilot drill bit to pre-drill all upper wall plate mounting holes (do not exceed 1/4”
maximum drill bit size).
Step 13. Once the mounting holes have been drilled, attach the upper mounting plate (make sure the open-flange side is pointing up)
using eight (8) 5/16” x 3” lag bolts and eight (8) 5/16” flat washers. Tighten all upper wall plate mounting hardware
and remove the hanger nail.
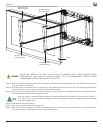
Step 14. Line up the mounting holes of the side mounting bracket (B) with the mounting holes that are located on the side of the upper
wall plate. Repeat this step for the second side mounting bracket.
Step 15. Use four (4) 10-32 x 3/8” Phillips heads screws (2 each side for the upper mounting points) to attach the side mounting
brackets to the upper wall plate. Tighten using a Phillips head screwdriver.
Step 16. After securing the upper side mounting bracket hardware, slide the lower wall plate between the lower side mounting
brackets (reference arrow pointing up; in the event that there is no arrow, make sure the open-flange side is pointing up).
Step 17. While the lower wall plate is held in place, use four (4) 10-32 x 3/8” Phillips heads screws (2 each side for the lower mounting
points) to attach the side mounting brackets to the lower wall plate. Tighten using a Phillips head screwdriver.
Step 18. Repeat Steps 12 and 13 to mount the lower wall plate. Tighten ALL hardware when complete.
Mounting Slots
Lag Bolts and Washers -
wooden studs only
Open Flange
Open Flange
Lag Bolts and Washers -
wooden studs only