


RAISE THE DISPLAY TO THE WALL PLATES FOLLOWING THE LIFTING INSTRUCTIONS
PROVIDED BY THE DISPLAY MANUFACTURER. USE AN APPROPRIATE LIFTING DEVICE
ASSIST WHEN LIFTING THE DISPLAY INTO PLACE.
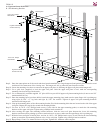
Step 27. Raise the flat panel with the mounting brackets attached and hang the top and bottom hooks over the mounting rods that are on
the upper and lower wall plates.
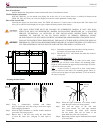
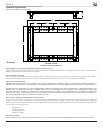
Step 28. Once the display is attached to the wall, insert four (4) M8 x 70mm lateral shift locking screws. The mounting points for these
screws are located on the top and at the bottom of the mounting brackets.
Step 29. These screws, once tightened down, will prevent the display from sliding side to side. Make any lateral adjustments at this time
and then tighten the lateral shift locking screws down.
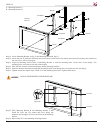
Once the display is mounted securely to the wall, the forward tilt must be determined. There are four tilt setting: 1°,
2°, 3° and 4°; the 1° setting will leave the display in a full vertical position). There are four hole settings at the bottom
of each mounting bracket.
Step 30. Determine the forward tilt setting.
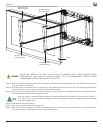
Step 31. Insert the clevis pin through the mounting hole.
Step 32. Once the clevis pin is completely through the mounting hole, place the clevis pin flat washer onto the clevis pin and insert the
cotter pin into the clevis pin. Repeat this step for the remaining side.
M8 x 70mm Lateral
Shift Locking Screw
M8 x 70mm Lateral
Shift Locking Screw
TWM-103
Installation Instructions Page 7
M8 x 70mm Lateral
Shift Locking Screw
M8 x 70mm Lateral
Shift Locking Screw
Display