


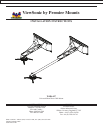
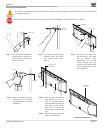
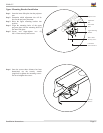

Page 8 Installation Instructions
Please review the Operator’s Manual that came packaged with your projector before attaching the upper mounting
bracket. The correct throw distance (the distance from the projector to the screen) must be determined prior to mounting
the projector.
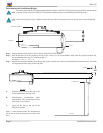
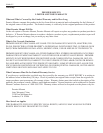
Throw Distance Calculation
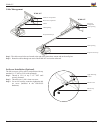
Step 1. Refer to the projectors Users Manual to
determine the distance from the lens to the
front of the screen.
Step 2. Measure the distance from the front of the
lens to the center of the PDS-PLUS (see
diagram).
Front Mounted Lens
For front-mounted lenses, add distance (Y)
to distance listed in projector Users Manual.
Rear Mounted Lens
For rear-mounted lenses, subtract disance (Y) from
the distance listed.
Step 4. Use a tape measure to mark the appropriate
distance on the WMK-027. This
will be where the center of the mounting
bracket will be located.
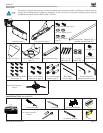
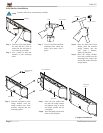
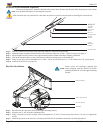
WMK-027
MAKE SURE THE PROJECTOR ARM IS FULLY SEATED BEFORE RELEASING THE UNIT.
Step 4. Locate the two (2) lock mounting points on the projector arm. These two points will be aligned with the lock mounting
points on the wall plate.
Step 5. Using a security wrench, insert and tighten two (2) M5 x 12mm security head screws.
DO NOT OVERTIGHTEN THE SCREWS.
Lock Mounting Point
M5 x 12mm Security Head Screw
Screwdriver/Security Wrench
If installing WMK-027, please refer
to Page 10 before continuing.
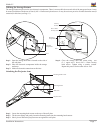
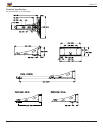
Front Lens
Rear Lens
Calculations
X = Manufacturers recommended
throw distance
Z = Distance from wall to face of
whiteboard/screen
Front Lens Throw Distance =
(X + Y + Z)
Rear Lens Throw Distance =
(X - Y + Z)