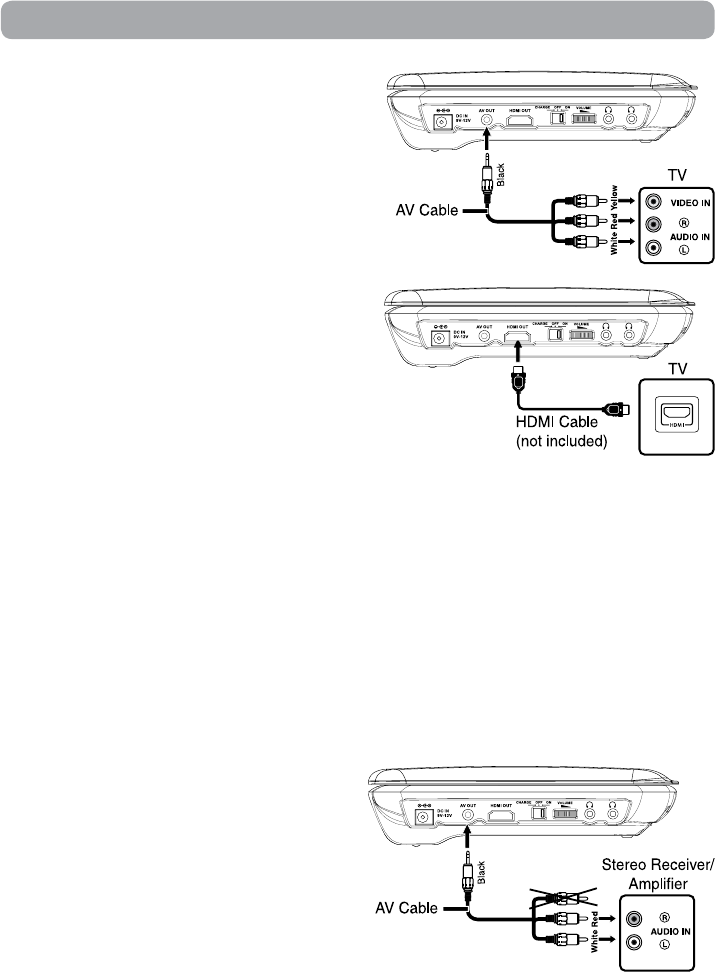
2. Using a HDMI cable (not included)
For TVs that support it, HDMI can provide the best
quality audio and video output (depending on media
source), and so is the preferred connection type. The
HDMI cable incorporates both audio and video signals,
so you will have just one cable running from the unit to
your TV. Using a HDMI cable (not included), connect the
HDMI OUT jack on your unit to the HDMI IN jack on your
TV or HDMI-compatible display.
• Congure the Video Setup options (found in the
SETUP menu) to best match the capabilities of your
TV.
• SettheHDMIresolutiontomatchthecapabilitiesofyourTV.ThissettingisalsointheVideoSetupsection
of the SETUP menu. Note: this setting can be selected only when the HDMI cable is connected to a TV.
Note:
• RefertoyourTVowner’smanualaswell.
• WhenyouconnecttheplayertoyourTV,besuretoturnoffthepowerandunplugbothunitsfromthe
wall outlet before making any connections.
HDMI, the HDMI logo and High-Definition Multimedia Interface are trademarks or registered trademarks of
HDMI licensing LLC.
Connections
A. Connecting to a TV
1. Using the supplied AV cable
If your TV has Audio/Video inputs, you can connect
the player to your TV using the supplied AV cable.
B. Connecting an Audio Receiver
This player will down-mix Dolby Digital or DTS multi-
channel audio to stereo audio for playback on the
player's internal speakers or for output to a connected
amplifier.
Listening on External Audio Equipment
1. Connect the player to the left/right Audio In jacks
on the other equipment using the included AV
cable.
2. Turn on your audio equipment and follow the
instructions provided with it to select the AUDIO IN
function.
Note:
• Makesuretousethecorrectcable.Connectingtheplugsincorrectlymaycauselackofsignal,orweak
signal.
