


11English10 RR-969
Sending Macro Commands
Twenty of the buttons on the RR-969 (the 10 device buttons
plus the number buttons 0 - 9) can store multiple com-
mand macro sequences – for example, a sequence that
turns on the TV set, selects channel 5, turns on the sur-
round processor, and selects the TV input. A macro se-
quence is sent by pressing the MACRO button fol-
lowed by the button where the macro is stored.
Multi-Step Button Operation
The POWER Button and the five buttons labelled SHIFT,
PTY, TA, TP, DISPLAY provide a special option – the ability
to program up to three different commands. The first
command is sent when the button is pressed once, the
second command is sent the next time the button is
pressed, and the third command is sent the third time
the button is pressed.
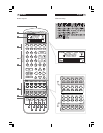
LIGHT Button
In a dark room, the RR-969 automatically activates its
backlighting feature for 6 seconds when a button is
pressed. Press the LIGHT button to manually turn on the
backlighting in a dim room. This button is disabled in
a bright room.
KEY TONE Button
The RR-969 can be configured to beep whenever a button
is pressed. When this feature is activated, the indi-
cator appears in the display. Press the /CLONE button
to toggle this feature on or off.
Time/Alarm Feature
The RR-969 displays the current time in the display. It
also includes an alarm feature which beeps for fifteen
seconds at a specified time and, if desired, send a
MACRO sequence of commands such as turning on a
VCR and begin recording.
Press the TIME/ALM button to turn the alarm function
on or off. When the alarm function is activated, an alarm
indicator is shown in the display.
To set the TIME:
1. Press the EDIT button followed by the TIME/ALM
button. The hour digits of the display flash and SET
HOUR appears in the display.
2. Press the UP or DOWN buttons to set the correct
hour. Advancing the hour sequentially steps through
two options: 12-hour mode with a PM indicator and
24-hour mode. Continue advancing until you have
set the current time in the mode you prefer. Hold-
ing the buttons activates a fast scan mode.
3. When the hour is correct, press the + button to
advance to the next step. The minute digits of the
display flash and SET MINUTES appears in the dis-
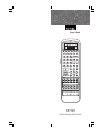
Special Buttons
Five rectangular buttons behind the sliding cover are
used for programming the RR-969 and for special fea-
tures such as the MACRO function, the TIME/ALM func-
tions, and the KEY TONE feature.
Configuration Buttons
Four recessed buttons behind the sliding cover are used
in configuring the unit. These buttons are recessed to
prevent pressing them accidentally. Use the tip of a
ballpoint pen to press them.
Operating the RR-969
This section of the manual explains the basic operation
of the RR-969 and most of its standard features.
NOTE
: The RR-969 is pre-programmed with the codes
for Rotel surround sound processors stored under the
AUDIO DEVICE storage bank. All other DEVICE stor-
age banks are empty and will not operate until com-
mands for those components have been programmed.
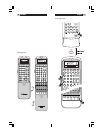
Sending IR Commands
Instead of putting down one remote and picking up
another, you simply press a button on the RR-969 to
convert it from the remote control for your CD player to
the remote control for your TV set. Here’s how:
1. Press a DEVICE button to activate the command
set for the desired component. For example, press
the AUD button for a Rotel surround processor. The
label for your selection appears in the display. The
selected command set remains active until you press
a different DEVICE button.
2. Press a COMMAND button to send an IR
command to the component you have selected. For
example, press the POWER button to turn on or off
a Rotel surround processor. The label for the COM-
MAND button appears in the display. If the label
“EMPTY” appears in the display, the button has no
learned command for that DEVICE.
NOTE
: The default labels that appear in the display match
the button labels. You can customize the labels for ev-
ery DEVICE and COMMAND button.
Remember that the COMMAND buttons duplicate con-
trols on many different types of audio/video compo-
nents. Their function depends on the type of component
selected. Make sure that you have pressed the correct
DEVICE button and use the button labels and LEAF
OVERLAY as guides.