


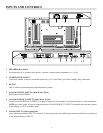
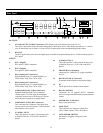
Step I Connection
1. Connect the RGBHV cable between the Plasma display and the DHD RGBHV output
2. Connect the 9-pin to RJ-11 adapter only to the plasma’s Com Link (RS-232) input, tighten the retaining
screws.
3. Connect the RJ-11 phone type cable between the projector and the DHD controller.
4. Connect the AC Power cord to the Plasma, but leave the Main AC in Off position.
5. Connect all input sources to the controller. Video (Composite), S-Video to1 or 2, Component 480i (RCA)
input, HD signals to HD1 or HD2 (BNC), DVI
Note: For proper system calibration S-Video or Component 480i from the DVD player must be used;
preferably Component 480i connects to the 3 RCA type input. Joe Kane Video Essential or Avia DVD
test disk can be used for image calibration.
6. Connect AC to the DHD controller.
7. Switch both main AC to On position from the Plasma and the DHD.
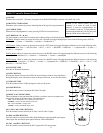
Step 2 Calibration and Setup
1. From the controller or use the supplied remote and press the power button (ON) to turn the system on.
2. Make sure you have picture on the screen from all connected sources.
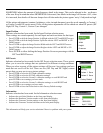
To get into Calibration and Service mode. Press Menu, highlight an empty space below Information.
Press “Enter, Right, Right, Left, Left, Enter”
Note: The system must be setup first by using S-Video or Component 480i (RCA input) preferably
Component 480i first.
3. Select Component SD from the DHD controller.
4. From the DHD controller, press Menu button to call up the DHD OSD. Use the Up or Down arrow button to
select Calibration and press Enter.
5. From the Calibration screen select ISF Night Input Image.
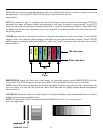
7. Using a test disc and select the Pluge pattern for Brightness and 10-step gray scale for Contrast Adjust for
correct Brightness and Contrast.
8. Select Display Color and use the 80 IRE window to adjust the Gain for D6500 Kelvin and 20 or 30 IRE
window for Offset setting for D6500.
9. Return to Input Image for Color and Tint adjustments.
For S-Video and Composite input
Select Calibration and highlight Input Image for ISF night option and only adjust the Brightness, Contrast,
Color, Tint, and Sharpness. No other adjustment is needed.
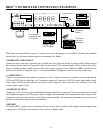
Step 3 HD and DVI Setup
From DHD controller:
1. For HD input and DVI, select Calibration press Enter and under ISF Night select Input Image for video
adjustments.
2. Select Input Color for white balance adjustments.
Special suggestion: For Y/Pb/Pr Input Color, only adjust the Pb and Pr offset.
QUICK SETUP GUIDE
16