


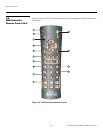
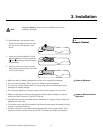
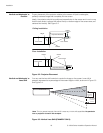
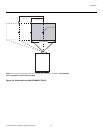

Installation
22 Q-1500d Series Installation/Operation Manual
PRE
L
IMINAR
Y
3.2
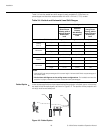
Quick Setup
Table 3-1 gives a quick overview of the Q-1500d installation process. The sections
following this one provide detailed instructions.
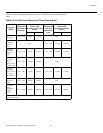
Table 3-1. Installation Overview
Step Procedure
For Details, Refer to
page...
1 Choose a location for the projector 23
2 Install CineWide lens mounting assembly (stationary base
plate or AutoScope lens motor – optional)
31
3 Mount the projector 36
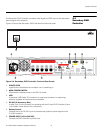
4 Mount the Primary DHD Controller, Secondary DHD
Controller and Brightness Acceleration Engine
37
5 Connect the Primary and Secondary DHD Controllers to
the projector
38
6 Connect the Brightness Acceleration Engine to the Primary
and Secondary DHD Controllers
40
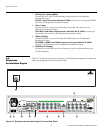
7 Connect other external equipment to Primary DHD
Controller (optional):
• Audio processor or secondary display device
• Control system interface (RS-232)
• 12-volt trigger-activated equipment (retractable screens
or screen masking)
• External IR repeater
• Network hub, router or gateway (Ethernet)
42
8 Connect signal sources to the Brightness Acceleration
Engine
46
9 Connect system components to AC power 50
10 Power up the system and perform optical alignment
procedures (refer to Table 3-6)
51
11 Display calibration —Primary DHD Controller: set
Adjustment Mode to Primary; adjust the following for each
input and display mode (resolution and frame rate); save
settings when finished:
• Aspect ratio
•Brightness
•Contrast
• Color level
•Tint
•Sharpness
• White Balance
67
12 Display calibration —Secondary DHD Controller: set
Adjustment Mode to Secondary; repeat Step 11
67