


17
Samson AirLine
The basic procedure for setting up and using your AirLine System takes only a few minutes:
1. For your AirLine system to work correctly, both the receiver and transmitter must be set to the same channel. Remove all packing materi
-
als (save them in case of need for future service) and check to make sure that the supplied receiver and transmitter are set to the same chan
-
nel (a complete channel plan is printed on the inside back cover of this manual). If these channels do not match, contact your distributor or,
if purchased in the United States, Samson Technical Support at 1-800-372-6766.
2. Physically place the receiver where it will be used (the general rule of thumb is to maintain “line of sight” between the receiver and trans-
mitter so that the person using or wearing the transmitter can see the receiver). The CR77 can be rack-mounted if desired (taking a half-rack
space), using an optional Samson adapter kit. The UM1 can be mounted to a video camera using the supplied velcro.
3. Extend the receiver antenna(s) and place it (them) in a vertical position. Make sure the Power on-off switch in your transmitter is set to
“Off.”
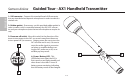
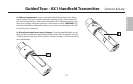
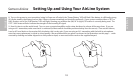
4a. If your system contains an AX1 handheld transmitter, unscrew the bottom section by turning it counterclockwise and then slide it off.
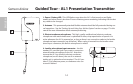
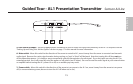
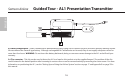
4b. If your system contains an AL1 body pack transmitter, turn it over and slide off the battery door.
5. Place a fresh AAA alkaline battery in the transmitter battery compartment, taking care to observe the polarity markings. If you are using
an AX1 transmitter, replace the bottom section by sliding it on and then screwing it back on. If you are using an AL1 transmitter, replace the
battery door by sliding it in until it clicks. Whichever transmitter you are using, leave it off for the moment.
6. Make the physical cable connection between the receiver output jack and a mic level audio input of your amplifier or mixer. The bal
-
anced XLR jack is preferable, since it will deliver an electromagnetically cleaner signal. If required, both the balanced and unbalanced out
-
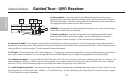
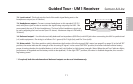
puts can be used simultaneously. If your system contains a CR77 or UM1 receiver, be sure to set its Audio Output Level switch correctly (see
pages 8 and 10 for details). Leave your amplifier (and/or mixer) off at this time.
7. Turn the Volume, Level or AF Level knob on the receiver completely counterclockwise. Connect the supplied AC adapter to the CR77
receiver and plug it in (the UM1 receiver can also operate off battery power or a 12 volt power supply from a connected video camera), then
plug the adapter into any standard AC outlet. Slide the Power switch in the direction of the arrow to turn on the receiver. If ysystem con
-
tains a CR77 receiver, its “Power” LED will light steadily red. (Note: The UM1 receiver has no “Power” LED indicator.)
Setting Up and Using Your AirLine System
ENGLISH