


11
4. Select Access Point Selection, and
then press the
v
button.
The Network function searches for
available wireless networks.
When done, it displays a list of the
available networks.
5. In the list of networks, press the ▲▼
buttons to select a network, and then
press the
v
button.
6. If the Security Key screen appears, go
to Step 7. If the Network Connecting
Screen appears, go to Step 10.
7. On the Security Key screen, enter your
network’s Pass Phrase.
✎
NOTE
`
You should be able to find the Pass Phrase on
one of the set up screens you used to set up
your router or modem.
8. To enter the Pass Phrase, follow these
general directions:
Display
Audio
Network
System
Language
Security
General
Support
Settings
Network Setting
Access Point Selection : Not Selected
Internet Protocol Setup : Auto
\
IP Address :
0
0
0
0
Subnet Mask :
0
0
0
0
Gateway :
0
0
0
0
DNS : Auto
DNS Server :
0
0
0
0
a
WPS(PBC)
>
Move
"
Select
'
Return
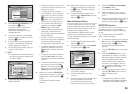
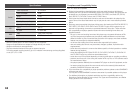
• Use the arrow keys on your remote
to move from button to button on the
Security Key screen.
•
To change the kind of characters
you are entering, move to the button
labeled a/A/1/
, and then press the
v
button. Each time you press the
v
button, you change the kind of
characters you can enter (a/A/1/
).
• You can also change the kind of
character by pressing the DISC
MENU button on the remote.
• To enter a letter, press the number
button that corresponds to the
letter. Pressing the button repeatedly
changes the letter.
• To enter a number or symbol when
the Security Key screen is displaying
numbers or symbols, press the
corresponding number button once.
• To delete the last letter, number, or
symbol you entered, move to the
Delete button, and then press the
v
button.
• To see and use additional symbols,
press the
[
or
]
button when
the Security Key screen is displaying
symbols.
• To clear all entered letters, numbers,
and symbols, move to the Clear
All button, and then press the
v
button. You can also just press the
RED (A) button on your remote.
9. When done, press the YELLOW (C)
button on your remote, or move to the
Done button, and then press the
v
button.
The Network Connecting screen
appears.
Display
Audio
Network
System
Language
Security
General
Support
Settings
Security Key
(
/
)
Cursor
"
Select
'
Return
a b c
Security Key
(0)
.,@
1
abc
2
def
3
ghi
4
jkl
5
mno
6
pqrs
7
tuv
8
wxyz
9
a/A/1/
0
Delete
a
Clear All
b
Space
c
Done
10. Wait until the connection confirmation
message is displayed, and then press
the
v
button. The Network Settings
screen reappears.
11. To test the connection, press the ▼
button to select Network Test, and then
press the
v
button.
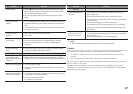
Manual Network Setup
If the Auto Setting does not work, you need
to enter the Network settng values manually.
Before you start manual network setup, you
need the network setting values.
To get the Network setting values, contact
your ISP or your network administrator.
To Enter the Network settings into your player,
follow these steps:
1. On the Internet Protocol Setup screen,
press the
v
button.
2. Press the ▲▼ buttons to select Manual,
and then press the
v
button.
3. Press the ▼ button to go to the first
entry field (IP Address).
4. Use the number buttons to enter
numbers.
5.
When done with each field, use the ► button
to move successively to the next field.
You can also use the other arrow
buttons to move up, down, and back.
6. Enter the IP Address, Subnet Mask,
and Gateway values.
7. Press the ▼ to go to DNS.
8. Press the ▼ button to go to the first
DNS entry field. Enter the numbers as
above.
9.
When done, press the ▲ button to return
to Access Point Selection. Select the
network, and then press the
v
button.
WPS(PBC) function
The easiest way to set up the wireless
network connection is using the WPS(PBC)
function.
If your wireless router has a WPS(PBC)
button, follow these steps:
1. In the Network Settings menu, press the
▲▼ buttons to select Network Setting,
and then press the
v
button.
The Internet Protocol Setup screen
appears.
2. Press the RED (A) button on the remote
control.
3. Press the WPS(PBC) button on your
router within two minutes. Your player
displays the Network Selection Screen,
and automatically acquires all the
network setting values it needs and
connects to your network. When it is
done, it displays an OK button. Press
the
v
button on your remote.
4. After the network connection is set up,
press the RETURN button to exit the
Network Setting screen.
✎
NOTE
`
To comply with the revised Wi-Fi standard
specifications, WEP encryption of the wireless
router does not support WPS connections.
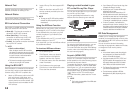
Display
Audio
Network
System
Language
Security
General
Support
Settings
Network Setting
Access Point Selection : Not Selected
Internet Protocol Setup : Manual
\
IP Address :
0
0
0
0
Subnet Mask :
255
255
255
0
Gateway :
0
0
0
0
DNS : Manual
DNS Server :
0
0
0
0
a
WPS(PBC)
>
Move
"
Select
'
Return