


14
Preparation
Installation and Basic Adjustments
15
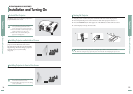
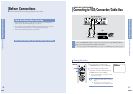
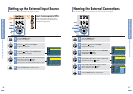
1. Plug the power cord into the power terminal on the rear side of the projector.
2. Press and push the power switch on the rear side of the projector toward "
-
".
3. Press the POWER button of the projector or the ON button of the remote control.
4. Screen display comes up in 30 seconds.
NOTE
■
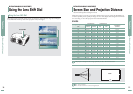
The projector may be installed on the ceiling
in front / back side of the screen.
■
When installing the projector on the ceiling,
contact your dealer.
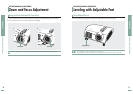
Install the projector so that the projection is
perpendicular to the screen.
Install a translucent screen to place the
projector on the backside of the screen.
The Translucent will show the horizontally
flipped image. Rotate the image (projected
from the projector) horizontally.
(Page 44)
Install the projector at the viewers’ side.
231
INSTALLATION AND BASIC ADJUSTMENTS
Installation and Turning On
Preparation
Installation and Basic Adjustments
To Install the Projector
Installing Projector on Backside of Screen
Installing Projector in Front of the Screen
Turning On Projector
NOTE
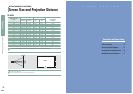
■
Center the lens to the screen. If the projector
is not positioned perpendicular to the
screen, the image may appear trapezoidal.
■
Do not install the screen in a bright place as
it makes it harder to see the screen.
■
Darken the room when installing the
projector in a bright place.
NOTE
■
When you turn off the projector, the cooling fan stops within 1 minute and 30 seconds.
■
When the cooling fan stops, push the power switch toward "O" and unplug the power cord.