


Troubleshooting
Before Contacting Service Personnel
Troubleshooting
Before Contacting Service Personnel
6968
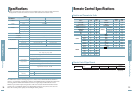
Screen and External Source
Symptoms Troubleshooting Note
Installation and Connection
Menu and Remote Control
Be sure that the power cord in place and the power switch
on the rear side of the projector is turned on "
-
".
No Power.
Page 15
Be sure to make the projection beam perpendicular to the
screen and adjust the focus using the Zoom Knob and the
Focus Ring. Avoid to use the
V-Keystone function if possible.
Image is distorted or
trapezoidal.
Pages
16~20
Ceiling bracket is an optional accessory.
Please contact your dealer.
Want to install
projector on ceiling.
Be sure that the connection cable (video) is properly
connected to the proper port. Unless they are connected
properly, the device is not available.
Image is distorted or
trapezoidal.
Pages
23~25
Symptoms Troubleshooting Note
■
Be sure that the proper external source is selected.
■
Check batteries of the remote control. If there is a
problem, replace them with recommended ones.
■
Check the angle and distance between the remote control
and the projector. Be sure that there is no obstacle
between the projector and the remote control that may
block the signal.
■
Direct lighting of 3-way light bulbs or other lighting
device on the remote sensor of the projector may affect the
sensitivity and cause the remote control to malfunction.
Remote control does
not work.
Page 26
Page 12
Page 13
Refer to the user manual. Some functions are locked
depending on sources and type of the input signal.
Some of Menu functions
do not work.
Pages
23~26
Symptoms Troubleshooting Note
■
Be sure that the power cord of the projector is in place.
■
Be sure that the proper input source is selected.
■
Be sure that cable is properly connected to the rear panel
of the projector.
■
Check the Remote Control batteries.
■
Be sure that the Color, Brightness settings are not at their
lower limit.
Cannot see picture
images.
Page 15
Page 26
Pages
23~25
Page 12
Page 31
Contact your service personnel if the noise continues due
to defective parts.
Strange noise.
Adjust the Color and Brightness.
Poor color.
Page 31
■
Adjust the focus.
■
Check that the projection distance is either too far or too
near to the screen.
Images are not clear.
Page 16
Page
19~20
Refer to instructions on lamp and repair.
Repair indicator is on.
Page 9
Noisy lines may appear for PC mode in case of frequency
discrepancy. Adjust the vertical frequency of your video
card on the advanced display property.
Lines appear on screen.
Page 63
Be sure to properly connect the external devices.
Especially, connect the component (Y, Pb, Pr) cables
matching the color codes.
Green appears on the
screen.
Pages
23~25
Be sure that the proper operation of the external device.
Adjustable items of the Custom Picture Menu are properly
set.
Cannot see the picture
from the external
devices.
Pages
26, 31
Be sure to properly connect the external devices.
Check the connection cables again.
Only blue screen
appears.
Pages
26,
23~25
■
Adjustable items of the Custom Picture Menu are
properly set.
■
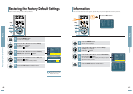
Execute Factory Default if you want to restore the factory
default setting values.
Screen appears in
black and white or
odd color/screen is too
dark or bright.
Page 31
Page 48
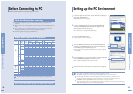
Before Contacting Service Personnel
If this projector does not operate properly, check the following first.
If the problem is continues, contact your dealer.