


5
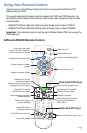
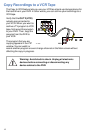
Press the Guide and Info
keys at the same time
Selecting Picture Formats With the Setup Wizard
Setting up the DVR to support a variety of picture formats allows you to toggle
among the settings you have chosen while watching TV. You can also select the
setting that provides the best picture quality for the format currently being
broadcast.
Note: If your HDTV displays a black screen when you turn on the HDTV and the
DVR, you may need to select a compatible picture format for your HDTV. Go to
Selecting Compatible Picture Formats on page 7.
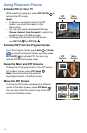
There are three ways you can select picture formats for your HDTV. The 8000HD
Setup Wizard guides you through each one:
• The Quick Setup method, which automatically selects a setting according to
the screen type:
- For a standard-screen (4:3) HDTV, the Wizard selects 480i.
- For a wide-screen (16:9) HDTV, the Wizard selects 1080i.
• The Standard Setup method, which selects the settings 480i and 1080i.
You can then toggle between these two settings while watching TV.
• The Custom Setup method, which allows you to select any combination of
the following picture formats that the DVR supports:
- 480p (wide and standard)
- 480i (wide and standard)
- 720p (wide only)
- 1080i (wide only)
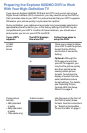
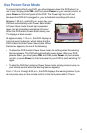
Setting Up Your Explorer 8000HD DVR With an HDTV
If you have an HDTV, use the component outputs to connect the DVR to your
HDTV. Refer to the Explorer 8000 Home Entertainment Server User’s Installation
Guide (part number 4002771) for connection information.
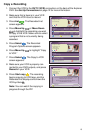
Follow these steps to start the Setup Wizard.
1. Make sure that the Explorer DVR is Off
and the HDTV is On.
2. On the Explorer DVR, press Guide and
Info at the same time. The TV Connection
Set-up screen appears, and the front panel
LED displays either HD-1 or SD-1. This LED
changes between HD-1 and SD-1 every
few seconds.
3. When the front panel LED displays HD-1,
press
A
. The Output Selection screen appears.