


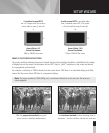
Prepare the set-top to send picture formats that your HDTV supports
If your HDTV displays a black screen when you turn it on, the set-top may be sending a picture format that your
HDTV does not support. Prepare the set-top to send all picture formats that your HDTV supports. Later, while
watching TV, you will be able to toggle among the different settings to select the format that provides the best
picture quality for the program you are watching.
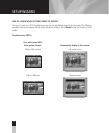
Complete these steps to prepare the set-top to deliver programming in the picture format settings that your HDTV
supports.
1. Refer to the user guide that came with your HDTV to find the picture formats that your HDTV supports.
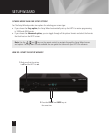
2. If the set-top is turned off, press the POWER key to turn it on.
3. On the front of the set-top, press and hold the SELECT button until the message light blinks.
4. Then, press the VOL– key to indicate that you want to select a picture format setting. The LED display shows
HdSr to indicate that the set-top is in the Picture Format mode for HDTV settings.
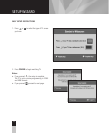
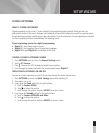
5. In the following table, find each of the picture formats that your HDTV supports. Then, press the corresponding
buttons on the front panel of the set-top.
Important: Before you start, read these instructions carefully. When you get to step 5, you have
20 seconds to begin selecting picture format settings. After 20 seconds, the set-top is no longer in
the Picture Format mode. If this occurs, repeat this process, starting at step 2.
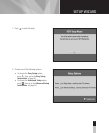
Note: If 1080i is one of the settings that your HDTV supports, we suggest you select it last. Then, when you
turn on the TV to use the Setup Wizard, the picture format will be 1080i.
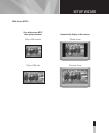
To select this
picture format:
Press this button
on the front panel:
The set-top
briefly displays:
And then
briefly displays:
480i
720p
480p
1080i
CH+
VOL–
CH–
VOL+
480i
720p
480p
1080
SEt
SEt
SEt
SEt
41
41
SETUP WIZARD
41