


English
4
WIRELESS SYSTEM OPERATION
AXR4N
AXR3
T1G
SHURE
45°
45°
SHURE
45°
45°
AXR3 AXR4N
SHURE
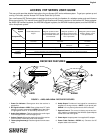
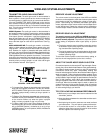
FIGURE 8. WIRELESS SYSTEM OPERATION
ESTABLISHING A WIRELESS LINK
When powered on, your transmitter broadcasts an RF carrier
signal. When picked up by your receiver, this signal links your
wireless system together and allows wireless transfer of audio
signals from your microphone or instrument. The RF signal is
broadcast steadily, even when your transmitter is muted. The
yellow RF light (
AXR3
) and ANTENNA A/B lights (
AXR4N
) indi-
cate when this link is established.
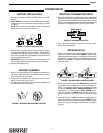
To test your wireless link, setup your transmitter and receiver as
described above. Turn on your transmitter while remaining
close enough to the receiver to see the yellow RF or ANTENNA
lights. The RF light (
AXR3
) or one of the ANTENNA lights
(
AXR4N
) should illuminate.
• If the RF or ANTENNA lights do not illuminate, see the
Troubleshooting section in this guide.
Turn your transmitter off. The RF or ANTENNA light should go
out.
• If the RF or ANTENNA lights do not go out after you turn off
your transmitter, your receiver is picking up an RF signal
from some other source. If you cannot identify and remove
this source (usually other digital or wireless electronic
equipment nearby), place your receiver in another loca-
tion. If external RF sources cannot be avoided, you may
need a wireless system that operates on a different carrier
frequency. Contact your Shure dealer.
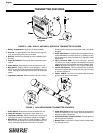
OPERATING YOUR WIRELESS SYSTEM
1. Once you have established a wireless link, slide the trans-
mitter MUTE switch to the ON position.
2. Sing, speak, or play your instrument at typical volume lev-
els. (AXSGW systems: turn the volume control on your gui-
tar or bass all the way up.) Normal operation is indicated by:
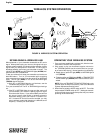
•
Steady glow of yellow RF light (AXR3) or ANTENNA light A
or B (AXR4N).
•
Flickering of the red PEAK light (AXR3) or TRANSMITTER
AUDIO PEAK light (AXR4N) when loud sounds are trans-
mitted
.
NOTE: If the red TRANSMITTER AUDIO PEAK light on the
receiver does not flicker occasionally, refer to the
Wireless
System Adjustments
Section below.
3. When finished, slide the MUTE switch to MUTE. Then slide
the transmitter POWER switch to OFF. (Muting the transmit-
ter first will help prevent audio thumps that may occur when
powering off the transmitter.)