64
4 Press ENTER.
The display asks for confirmation.
5 Select “Yes,” and press ENTER.
The display asks whether to use the same title
name as before.
To use the same name, select “Yes” and press
ENTER to finish.
6 Select “No,” and press ENTER.
The display asks whether to rename the title.
7 Select “Yes,” and press ENTER.
The “Title Name” display appears.
8 Follow steps 4 to 6 of “Changing the Name
of a Title” (page 60) to complete
renaming.
The two Playlist titles become one Playlist
title with the new name.
Erasing a scene (Erase)
You can erase a selected scene.
1 Follow steps 1 to 6 of “Editing a Playlist”
(page 62).
2 Select a scene in the “Edit Scene” display
and press ENTER.
3 Select “Erase,” and press ENTER.
The display asks for confirmation.
4 Select “OK,” and press ENTER.
The selected scene is erased.
To erase other scenes, repeat from step 2.
Modifying a scene (Modify)
You can change the start and end point of the
selected scene.
1 Follow steps 1 to 6 of “Editing a Playlist”
(page 62).
2 Select a scene in the “Edit Scene” display
and press ENTER.
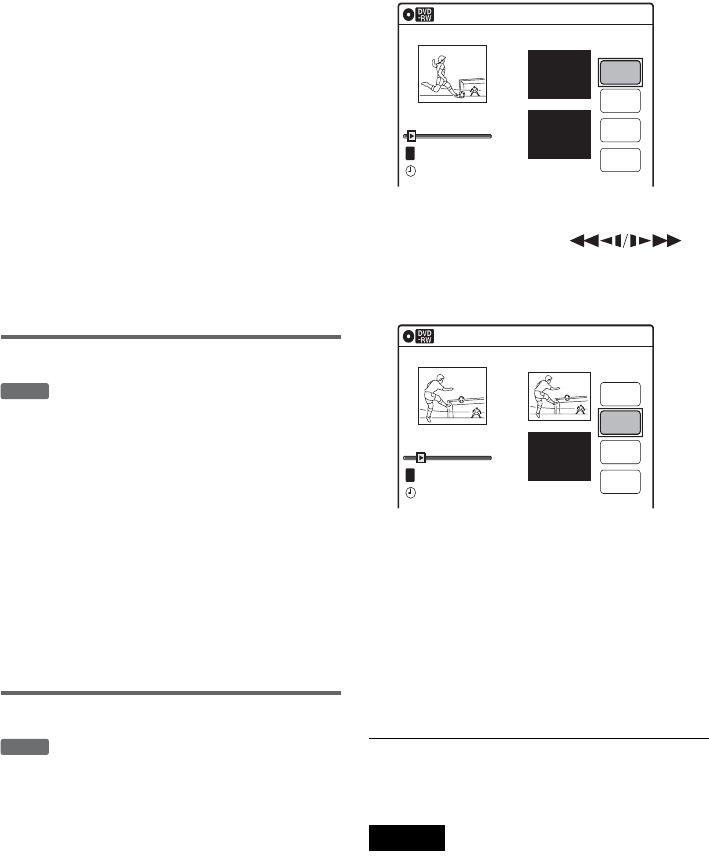
3 Select “Modify,” and press ENTER.
“Start” is selected.
4 Press ENTER at the start point.
You can use H PLAY, ,
./>, x STOP, and X PAUSE to find
the point.
“End” is selected.
5 Press ENTER at the end point.
“Change” is selected.
To reset the start or end point, select “Start” or
“End” and repeat step 4 or 5.
6 Press ENTER.
The display returns to the “Edit Scene”
display.
The re-selected section is captured as a scene.
To modify other scenes, repeat from step 2.
To cancel modifying
Select “Cancel,” and press ENTER.
Note
The start and end point of a scene may be different from
what you have set.
-
RWVR
-
RWVR
Modify
10:10 AM
T
Change
Cancel
00:00:07
Playlist No. 01
Scene No.01
End 00:00:00
Start 00:00:00
Start
End
May/02/2005 03:25 PM
Modify
10:10 AM
Scene No.01
T
00:00:10
May/02/2005 03:25 PM
Playlist No. 01
Change
Cancel
End 00:00:00
Start 00:00:10
Start
End
