17
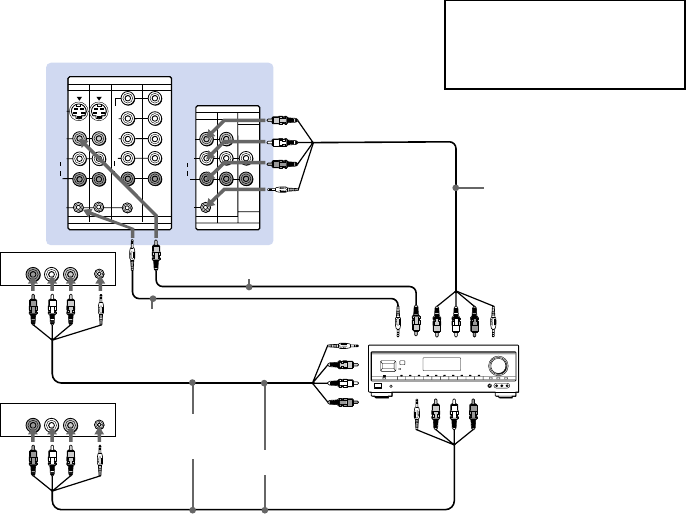
Using the S-Link function with a
Sony AV receiver
1 Using a VIDEO cable, connect VIDEO 1
IN on the projection TV to MONITOR
OUT on the Sony AV receiver.
2 Using an AUDIO/VIDEO cable, connect
TV OUT on the projection TV to TV
AUDIO and VIDEO IN on the AV
receiver.
3 Using an S-LINK cable, connect S-LINK
on the VIDEO 1 IN panel on the
projection TV and S-LINK on MONITOR
OUT on the AV receiver.
4 Using an S-LINK cable, connect S-LINK
on the TV OUT panel on the projection
TV to S-LINK on TV IN on the AV
receiver.
5 Using AUDIO/VIDEO and S-LINK
cables, connect the Sony video equipment
to the AV receiver.
6 Use the Audio menu to set “Speaker” to
“Off” or “Center.” (see “Speaker” on
page 32)
7 Press CH (CHANNEL) +/– to activate
the S-Link function.
Disconnect all power sources before making any connections.
Refer also to the Operating
Instructions supplied with the VCR,
satellite receiver, DVD player, LD
player and other Sony video
equipment for details.
(Rear of projection TV)
Audio/video/
S-Link cable (not
supplied)
TV OUT
Audio/
video
outputs
VCR 1
Audio/
video
outputs
RK-G34, etc.
(not supplied)
TV IN
(S-LINK, video/
audio inputs)
VIDEO 1 IN
(S-LINK, video/
audio inputs)
Audio/video/
S-Link cable
(not supplied)
VCR 2
VIDEO 2 IN (S-LINK,
video/audio inputs)
Sony AV receiver
S-LINK
2, 4
5
1
S-LINK
3
S-LINK
MONITOR OUT
(video output)
MONITOR OUT
S-LINK
S VIDEO
S-LINK
S-LINK
VIDEO
AUDIO
L
R
R
VIDEO
L
AUDIO
(MONO)
IN
IN
VIDEO 1 VIDEO 3 VIDEO 4
OUT
MONITOR
AUDIO
(VAR/FIX)
TV
VIDEO 5
VIDEO 1 VIDEO 3 VIDEO 4 VIDEO 5
Y
P
B
PR
R
L
(MONO)
AUDIO
OUT
MONITOR
AUDIO
(VAR/FIX)
TV
AUDIO R AUDIO L VIDEO
LINE
OUT
AUDIO R AUDIO L VIDEO S-LINK
S-LINK
LINE
OUT
Video cable
(not supplied)


