


4
US
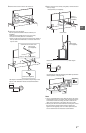
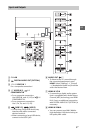
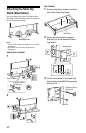
• Be sure to install the Wall-Mount
Bracket securely to the wall
following the instructions in this
instruction manual. If any of the
screws are loose or fall out, the
Wall-Mount Bracket may fall and
cause injury or property damage.
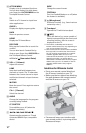
• Be sure to use the screws supplied
with the Wall-Mount Bracket when
attaching the Wall-Mount Bracket
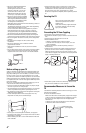
to the TV set. The supplied screws
are designed as indicated by
illustration when measured from the attaching surface of
the Wall-Mount Bracket.
The diameter and length of the screws differ depending
on the Wall-Mount Bracket model.
Use of screws other than those supplied may result in
internal damage to the TV set or cause it to fall, etc.
See page 22 (Using the supplied Wall-Mount Bracket).
See page 29 (Using an optional Wall-Mount Bracket).
• Be sure to assemble the bracket properly following the
instructed procedure explained in this instruction manual.
• Be sure to tighten the screws securely in the designated
position.
• Be careful not to subject the TV to shock during
installation.
• Be sure to install the TV on a wall that is both
perpendicular and flat.
• After proper installation of the TV, secure the cables
properly.
• Do not allow the AC power cord or the connecting cables
to be pinched as the internal conductors may become
exposed and cause a short circuit or an electrical break.
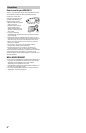
Before setting up your TV
Some TV models are packaged with a detached Table-Top
Stand so you can mount your TV to a wall right away. See
page 22 (Installing the TV to the Wall) if you want to mount
the TV to a wall. If you are not mounting the TV to a wall,
you will need to attach the Table-Top Stand. You will need a
Phillips screwdriver (not supplied) and the supplied screws
to complete the task. Look for the supplied Table-Top Stand
instruction leaflet.
Be sure to consider the following while setting up your TV:
• Disconnect all cables when carrying the TV.
• Carry the TV with the adequate number of people; larger
size TVs require two or more people.
• To avoid slipping and causing personal injury, do not step
on the TV protection bag when unpacking the TV set.
• Pay attention so that a child does not approach during the
Table-Top Stand installation.
• Correct hand placement while carrying the TV is very
important for safety and to avoid damage.
• Ensure your TV has adequate ventilation, see page 31.
• For best picture quality, do not expose the screen to direct
illumination or sunlight.
• Avoid installing the TV in a room with reflective wall and
floor materials.
• Avoid moving the TV from a cold area to a warm area.
Sudden room temperature changes may cause moisture
condensation. This may cause the TV to show poor
picture and/or poor color. Should this occur, allow
moisture to evaporate completely before powering the TV
on.
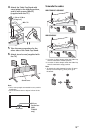
Securing the TV
Sony strongly recommends taking
measures to prevent the TV from
toppling over.
Unsecured TVs may topple and result
in property damage, serious bodily
injury or even death.
Preventing the TV from Toppling
• Secure the TV to a wall and/or stand.
• Do not allow children to play or climb on furniture and TV
sets.
• Avoid placing or hanging items on the TV.
• Never install the TV on:
slippery, unstable and/or uneven surfaces.
furniture that can easily be used as steps, such as a
chest of drawers.
• Install the TV where it cannot be pulled, pushed, or
knocked over.
• Install the TV so that the TV’s Table-Top Stand does not
protrudes out from the TV stand (not supplied). If the
Table-Top Stand protrudes out from the TV stand, it may
cause TV set to topple over, fall down, and cause personal
injury or damage to the TV.
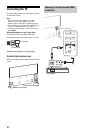
• Route all AC power cords and connecting cables so that
they are not accessible to curious children.
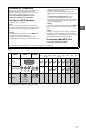
Recommended Measures to Secure the
TV
Consider the following measures when securing your TV to
a Stand (not supplied).
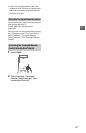
1 Secure the Stand for the TV.
Make sure the Stand can adequately support the weight
of the TV. Use two angle braces (not supplied) to secure
the stand. For each angle brace use the appropriate
hardware to:
• Attach one side of the angle brace to the wall stud.
• Attach the other side to the Stand.
Angle brace
(not supplied)
Stand