


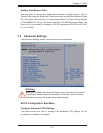

Chapter 6: Advanced Chassis Setup
6-5
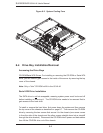
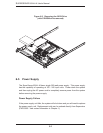
The hard drive that sits below the CD-ROM is now accessible. Remove the four
screws from the bottom of the chassis that secure the drive, then lift the hard drive
out. To add a new SATA drive, install a drive into the tray with the printed circuit
board side facing down and so that the mounting holes align with those in the tray.
Secure the drive to the tray with the four screws through the bottom of the chassis.
Replace the CD-ROM drive (including reconnecting the power and data cables) and
fi nally the top cover when fi nished. See Figure 6-3.
CD-ROM Drive Installation
The top cover of the chassis must be opened to gain full access to the CD-ROM
drive bay. The CD-ROM must have a "slim" profi le to fi t into the 6014L-M. If you
cannot remove the top cover with the system remaining in the rack, follow the
procedure below.
First, shutdown the system and disconnect all cables from the back of the server
chassis. Make sure the system is supported from underneath then remove the
front bracket screws that secure the unit to the rack. Carefully lift the server out
of the rack.
Open the cover by following the procedure described on page 6-7. You must
power down the system before installing or removing CD-ROM or Serial ATA drives.
Remove the two screws that secure the CD-ROM drive to the chassis (one screw
comes in from the side of the chassis and the other screws straight down into a
standoff) then lift the drive out of the chassis. See Figure 6-3.
Note: A red mark on a wire typically designates the location of pin 1.