


Advanced functions
16
EN
Customising your television
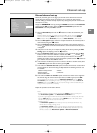
Preferences
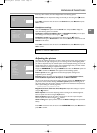
You can set preferences for some features.These preferences remain in force as long as you
do not change them.
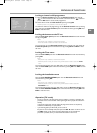
Display the OVERVIEW menu by pressing the MENU button. Select the Installation
option and confirm by pressing OK. Select the Preferences option from the
Installation menu and press OK to confirm.The Preferences menu offers the
following options:
Channel number: check this box using the OK button to permanently display the
number of the channel being watched.
Language: select from the list the language the menus will be displayed in using the
buttons.
Note:When you select a language, it is applied to the menus immediately.
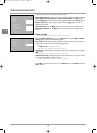
Maximum TV volume: set the maximum volume level using the buttons.To hear
the level that you have just set, press the
OK button and hold it for a few seconds.
Programme info pages: if you have changed the reference page for the TV
programmes in Teletext you can restore the factory-set reference pages. Press
OK until the
message
Running appears. Once the setting is implemented the message Done appears.
Power Savings Mode: when this function is active the TV set automatically goes into
standby mode after five minutes if it does not receive any signal on the selected channel or
AV programme.To enable this function, check the box by pressing
OK.
Teletext adjustment: use this function if one of the following situations occurs:
- Some channel names are missing following auto installation. Check/uncheck the box by
pressing
OK and run autoinstallation again.
- Teletext subtitles are not visible or are frozen. Check/uncheck the box by pressing
OK
and access the Teletext page displaying the subtitles.
- Some Teletext lines never display. Check/uncheck the box by pressing
OK and access the
Teletext page again.
Press
EXIT to close the menu. Select the option Return and press OK to return to the
Installation menu.
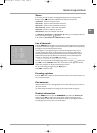
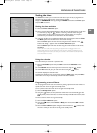
Configuring AV sockets
You can configure your TV set according to the equipment you connect to it.
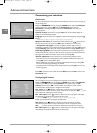
Display the
OVERVIEW menu by pressing the MENU button. Select the Installation
option and press OK to confirm.The Installation menu appears. Select the AV
settings
option and press OK to confirm. Follow the messages on screen and the
instructions below explaining how to configure the AV sockets.
AV1 name: use the buttons to select from the list the name of the equipment
connected to this socket. If the factory preset names do not suit you, select
AV1_ _ _ and
enter another one, following the screen messages.
AV1 video input: use the buttons to select from the list the type of video signal
transmitted by the equipment connected to the AV1 socket.
Note: Select RGB if no picture is displayed when you connect a games console.
Repeat the same procedure to configure the AV2 socket.
AV3 name: use the buttons to select from the list the name of the device
connected to the AV3 sockets. If none of the devices in the list is appropriate, select
AV3___and enter the name of the device following the instructions on the screen.
AV3 video input: use the buttons to select from the list the type of video signal
transmitted by the equipment connected to the AV3 sockets.
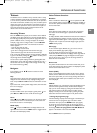
Preferences
Return
Channel number
Language
❿❿
English...
Maximum TV volume
Programme info pages ...
Power Savings Mode
Teletext adjustment
Select your language using the ➛✓❿ keys.
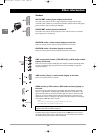
AV settings
Return
AV1 name
❿❿
DECOD.
AV1 video input RGB...
AV2 name VCR1
AV2 video input S-Video...
AV3 name CAMCOR
AV3 video input Video...
CMP name CMP _ _ _
HDMI name HDMI _ _
Select the name of the device connected
to AV1.
IFC130-L_EN-2 8/12/05 15:22 Page 16