


15
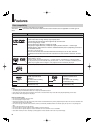
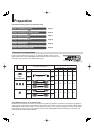
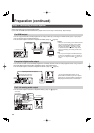
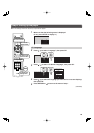
Via HDMI input
To view 1080p output, make this connection.
HDMI transfers digital audio and uncompressed digital video on
a single cable. As a result, audio cables and video cables don’t
need to be connected separately to a device.
Note
• This player supports simultaneous output of video on its HDMI and component video ports. However, some discs may restrict output of video
on the component video ports when viewing high defi nition content or up-converted DVD content. The resolution on the HDMI output will be
the same as the resolution output on the component video output. Thus, because the HDMI output can change automatically to match the
maximum available resolution of your display, if you connect both the HDMI output and component output, the resolution on the component
output will change if the HDMI output auto-adjusts.
Notes
•
When the HDMI connection is not verifi ed, an error message appears
on the front panel display. In this case, disconnect the HDMI cable then
connect it again, or turn off the connected HDMI device then turn it on.
• HDMI output is digital only, DVI analog is not supported.
• HDMI is an evolving technology, so it is possible that some devices
may not operate properly with this player.
• To get the most possible benefi t from Dolby Digital Plus, you should
connect your HD DVD player to your AV receiver using its HDMI
input. If your AV receiver has this type of input, make sure it is
connected to your HD DVD player and that the input is set to use
audio from HDMI (and not the SPDIF coaxial or optical input). If your
AV receiver does not have an HDMI input, then the next best choice
is to use the SPDIF (coaxial or optical) input on your AV receiver.
• If you use the SPDIF optical output or analog outputs to connect
your audio system and have the “Digital Out HDMI” (
page 22) set
to “Auto” or “PCM”, the audio output level from these jacks will be
reduced when listening to a multichannel disc. To restore the audio
output level, set “Digital Out HDMI” to “Downmixed PCM”.
• Be sure to confi rm compatibility of a cable when connecting a Deep
Color compatible display device.
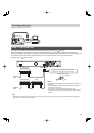
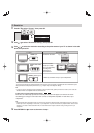
Via component video input
• Connect the player directly to your TV. If you connect the player to a VCR, TV/VCR combination, video selector
or AV amplifi er, the playback picture may be distorted due to copy protection.
• Be sure to turn off the power and unplug both units from the wall outlet before making any connections.
This connection only sends video signals. Be sure to make audio
connection on
page 16.
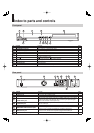
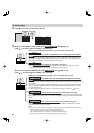
Step 1: Connecting to a TV
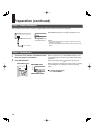
Via VIDEO (yellow) input
480i output only regardless of the resolution settings ( page 21)
or the connections of other output jack.
This connection only sends video signals. Be sure to make audio
connection on
page 16.
Some discs may be down converted or require HDMI
connection.
Not compatible with 1080p. To view 1080p output, select HDMI
connection.
HDMI INPUT
TV
To HDMI OUTPUT
HDMI cable (not supplied)
Component video cables
(not supplied)
TV
To COMPONENT
VIDEO OUTPUT
YPB PR
Composite video (yellow) cable
(not supplied)
To VIDEO OUTPUT
TV
Depending on the TV connected, you can use the CEC
function. For detail, see
page 38.