


24
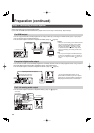
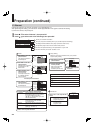
E: Ethernet
Perform this setting if you connect the player to your LAN ( page 17).
After performing this setting, you need to turn off this player and turn it on again to activate this setting.
If you do not connect, skip to Step 20.
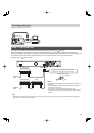
18
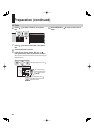
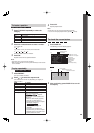
Press / to select “Ethernet”, then press OK.
19
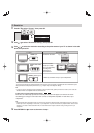
Press / to select each of the followings, then press OK.
Mac Address
Off
DHCP Off
Off
OffNTP Server Off
Network Speed
56kbps Modem
Cookie Setting Accept
Proxy Setting
To set your network information.
To input proxy server address (when your provider requires the setting).
To display the Mac address of the player. (Fixed. No need to set.)
To adjust the player’s clock via the network time protocol.
To select the speed according to the specification of your LAN.
To select whether you access “Cookies” or not.
On
DHCP
DHCP
IP Address
0... 0 0 0
Subnet Mask
0... 0 0 0
Gateway
0... 0 0 0
Off
Gateway
0... 0 0 0
DNS Server
0 ... 0 0 0
DNS
On
Confirm
OK Cancel
Off
On
DHCP
DHCP
IP Address
192 . .. 168 1 15
Subnet Mask
255 . .. 255 255 0
Gateway
192 . .. 168 1 1
DNS Server
192 . .. 168 1 1
DNS
Off
On
Confirm
OK Cancel
Off
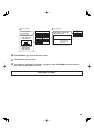
1
2
3
4
5
1
DHCP
2
Proxy Setting
Enter the proxy server address when your provider
requires proxy setting.
3
Skipped when “DHCP”
is set to “On”.
On
Proxy Setting
Proxy
Server
Port
0
Off
Skipped when “DNS”
is set to “On”.
OK Cancel
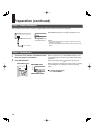
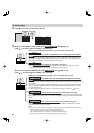
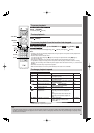
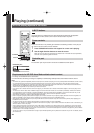
1 Set “DHCP” to “On” and
press OK button.
The network information is
automatically set.
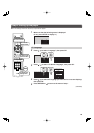
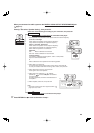
1 Set “Proxy” to “On” and
press OK button.
3 Select “OK” and press
OK button.
2 Enter the specified data
from the provider.
a) Set “DHCP” to “Off” and
press OK button.
The network information is
automatically set.
b) Input the addresses using the number buttons.
c) Select “OK” and press OK button.
“IP Address” This sets a different address within the
same subnet of the PC on your network.
e.g. if the IP address of the PC is
192.168.1.10, set 192.168.1.15 (or some
other unused address.)
“Subnet Mask” This sets the subnet mask of the network
environment that will be connected.
e.g.: 255.255.255.0
“Gateway”
“DNS Server”
This sets the gateway used by the player
(e.g.: 192.168.1.1).
This sets the DNS server to be used by the
player (e.g.: 192.168.1.1).
2 Set “DNS” to “On” and
press OK button.
The DNS server is obtained
automatically from the
DHCP server.
3 Select “Confirm”, then
press OK button.
Confirming starts.
If the setup is successful,
an IP address appears.
Press OK button.
If the setup is not successful:
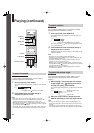
OK button
CLEAR button
Number buttons
To begin or finish input.
To select a character.
To move to the next character.
To erase to correct.
To input a number.
How to input characters
Refer to the instructions
below for inputting
characters. (Server, Port)
/ buttons
buttons
/
NTP Server
NTP Server
On
Off
Select “On” or “Off” and press OK
button.
“On” The player automatically
accesses an internet server
to adjust time protocol.
“Off” The player does not access
an internet server
to adjust its clock.
Preparation (continued)