


16
English
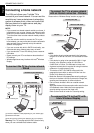
SETTING UP YOUR TV
There are 3 methods for Wireless Setup:
• Easy Setup (WPS) - If the AP supports WPS,
this method can be used. WPS is an industry
standard designed to make connection of
wireless LAN equipment and security setup
easy. WPS will automatically configure all
wireless settings.
NOTE: WEP encryption may not be able to
configured by easy setup.
• Assisted Setup - follow step 11.
Input the Security Key only.
• Manual Setup, skip to step 12.
Input the all settings.
NOTE: EXIT is available during settings.
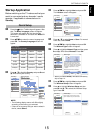
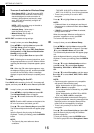
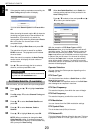
j In step 9, when you select Easy Setup;
Press
BbC c to highlight Next and press OK.
The Easy Setup screen will appear.
Press
c and B / b to select PBC (Push Button
Configuration) or PIN (Personal Identification
Number) and press OK.
Press
b to highlight Start Scan and press OK.
PBC - Following the on-screen instructions, push
the appropriate button on your AP. When a window
reporting that the setup is complete appears, press
OK.
PIN - When the PIN code window appears, enter
the displayed PIN into your AP, and then press OK
to continue the PIN Setup. When a message
displays to report that the setup is complete, press
OK.
To cancel searching for the AP:
Press BACK while searching for the AP. A message will
appear, and then press
C / c to select Yes and press OK.
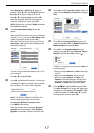
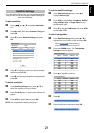
k In step 9, when you select Assisted Setup;
Press
BbC c to highlight Next and press OK.
The Assisted Setup screen will appear.
Press
B / b to select the desired AP and press
OK.
NOTE: Check the MAC address on the label of the
AP or in the manual, and select your AP.
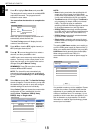
Press
B / b to select Security Key and press OK.
The Software Keyboard window will appear (page
44).
Input the Security Key by using the Software
Keyboard. To save your setting, press the GREEN
button.
NOTE:
• The Security Key must adhere to these
conditions:
- TKIP/AES: 8-63 ASCII or 64 Hex characters
- WEP: 5 or 13 ASCII or 10 or 26 Hex characters
• There is only one key ID to set for WEP
encryption.
Press
B / b to highlight Done and press OK.
NOTE:
• If Network Name is not displayed, see Manual
Setup below to set Network Name before Done
is selected.
• If BACK is pressed before Done is selected,
settings are not saved.
When the message “Wireless configuration is
complete.” appears on screen, press OK.
The screen will skip to step 13.
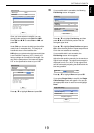
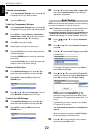
l In step 9, when you select Manual Setup;
Press
BbC c to highlight Next and press OK.
The Manual Setup screen will appear. Press
B /
b to select Network Name and press OK.
The Software Keyboard window will appear (page
44).
Input the Network Name by using the Software
Keyboard. To save your setting, press the GREEN
button.
Press
B / b to select Authentication and then
press
c and B / b to select Open System,
Shared Key, WPA-PSK or WPA2-PSK. Press
OK.
Press
B / b to select Encryption, and then press
c and B / b to select None, WEP, TKIP or AES.
Press OK.
NOTE:
• Certain encryption types are only compatible
with specific authentication types.
- When Authentication is Open System, only
WEP or None is compatible.
- When Authentication is Shared Key, only WEP
is compatible.
- When Authentication is WPA-PSK or WPA2-
PSK, only TKIP or AES is compatible.
• When incompatible Authentication/Encryption
pairings are detected, a warning message will be
displayed, and no connection attempt will be
made until the incompatibility is resolved.
• There is only one key ID to set for WEP
encryption.
Press
B / b to select Security Key and press OK.
Input the Security Key by using the Software
Keyboard (page 44).
To save your setting, press the GREEN button.
This item is greyed out when Encryption is None.