


left and right analog audio. In the right
position you get left and right analog audio
and no AC-3 audio. If you change the position
of the audio selector switch, you must cycle
the power so the change is recognized by the
microprocessor.
5. Be sure the video selector switch on the
SD3006 is in the proper position when you
check out the video outputs. In the left
position you get composite and S video. In
the right position you get component video.
6. If the color difference cables are reversed the
picture information is present, but the color
has a blue tint.
7. Putting the luminance cable in the wrong
connector causes a very visible sync problem.
8. A dirty disc can cause playability problems,
.so be sure the disc is clean. Use a soft cloth
to clean a disc. Refer to the cleaning instruc-
tions in the service manual.
Power Supply Checks
1. Push the power button and see if the red
power led comes on.
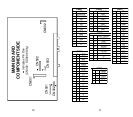
2. Check the dc voltages on pins 2, 3, 4, 5, 6, 7,
8, 12, 13, and 14 of CN801.
3. If any of these voltages are improper or
missing, or the power LED does not come on,
unplug the power supply from the main board
and jumper pins 2 and 3 on CN801.
4. Recheck the dc voltages on pins 2, 3, 4, 5, 6,
7, 8, 12, 13, and 14.
5. If the voltages are still improper or missing
there is a problem with the power supply.
However, if the voltages are normal the power
supply is alright, and there is most likely a
problem on the main board or 1 of the other
boards that is loading down the power supply.
6. For a loading problem on a board other than
the main board, remove AC power and
reconnect the power supply to the main board.
Remove the connector to the front panel and
apply AC power. Check the voltages supplied
to the front board. Repeat this process for
each board, and when the board causing the
problem is disconnected the power supply
voltages should return to normal.
Front Panel Checks
1. Using a meter check pin 2 for the ever 5 volts,
pin 8 for the -24 volts, pin 9 for the F+, and
pin 10 for the F-.
2. Using a scope, check the front panel reset
signal at pin 1 of CN602 when AC is applied
to the player. The signal goes high when
power is applied to the player.
3. To check the communications between the
main board and the front panel, connect
channel 1 of the scope to the FSTBX signal
on pin 7 of CN602. Communications be-
98