


32
Setting details
Menu, Subtitle, Audio
You can select the language of “Menu”, “Subtitle” and
“Audio” if more than one languages are recorded onto
the disc.
English, Francais, Espanol, Deutsch, Italiano:
The selected language will be heard or seen.
Other:
Other language can be selected (see the
“Language code list” on page 36).
Automatic: (Subtitle)
• The unit will automatically select the same
language in the AUDIO setting.
• When the unit selects the same language as
the AUDIO, the subtitles will not appear during
playback.
• When you do not use the same language as
the AUDIO, the subtitles will appear during
playback.
Off: (Subtitle)
Subtitles do not appear.
Original: (Audio)
The unit will select the first priority language of
each disc.
Note:
If the selected language is not recorded on the disc, the
first-priority language is selected.
E.B.L.
To select the black level of playback pictures, set your
preference and monitor’s ability.
On: Enhanced grey scale (0 IRE cut off)
Off: Standrard grey scale (7.5 IRE cut off)
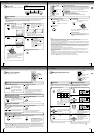
Tv Screen
You have the following screen sizes to choose from:
4:3
Letter box:
Select this mode when connecting to a conven-
tional TV. When playing back a wide screen-DVD
disc, it displays the wide picture with black bands
at the top and bottom of screen.
4:3
Pan scan:
It displays the wide picture on the whole screen
with left and right edges automatically cut off.
16:9
Wide:
Select this mode when connecting to a wide-screen
TV. A wide screen picture is displayed full size.
Note:
If the DVD disc is not formatted in the pan & scan style,
it displays 4:3 style.
Language
Picture
Customizing the Function Settings (continued)
Function setup
33
E
JPEG Interval
You can continuously play back all JPEG files automati-
cally.
After the setting below, start playing the disc on which
JPEG files have been recorded.
Off:
Plays back one file at a time.
5 Seconds:
Plays back images in the form of a slide show at
5 second intervals.
10 Seconds:
Plays back images in the form of a slide show at
10 second intervals.
15 Seconds:
Plays back images in the form of a slide show in
15 second intervals.
Select Files
When playing back a CD containing a mixture of MP3,
WMA and JPEG files, only MP3/WMA or JPEG files can
be displayed on the file menu.
Display
On screen display can be switched on or off when you
press the buttons.
On: On screen displays appear when you press
the buttons (factory setting).
Off: On screen displays do not appear when you
press any buttons.
All:
Displays all files.
Music Only:
Displays only MP3/WMA files.
Pictures Only:
Displays only JPEG files.
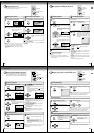
Dialogue
On : DRC(TV)
Off : DRC(Std)
/Enter/Setup/Return
Language Picture Parental OtherSound
Off
On: Loud sound such as explosion or similar
is toned down slightly when played back.
This makes it suitable for when it is con-
nected to a stereo.
Off: It plays back at the recording level on the
disc.
Notes:
• This function works only during playback of Dolby Digital
recorded discs.
• The level of Dynamic Range Reduction may differ
depending on DVD video disc.
Sound
Dialogue
DRC (Dynamic Range Control) enables you to control
the dynamic range so as to achieve a suitable sound for
your equipment.
34
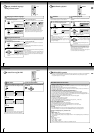
Parental control setting
Some discs are specified not suitable for children.
Such discs can be limited not to play back with the unit.
1) Press C or D to select “Parental”, then press B
or A until the level you require appears.
• Level Off: The parental control setting does not
function.
• Level 8: All DVD software can be played back.
• Level 1: DVD software for adults cannot be
played back.
Select from the level 1 to level 8. The limitation will
be more severe as the level number is lower.
2) Press C or D to select “Password”.
Press Number buttons (0–9) to input a 4-digit
password. Be sure to remember this number!
• If you input a wrong number, press CLEAR.
3) Press ENTER to store the password.
Note: Now the rating is locked and the setting can
not be changed unless you enter the correct pass
word.
OSD Language
You can select the language of On Screen Display.
English, Francais, Espanol, Deutsch, Italiano:
The selected language will be seen.
To change the parental level
1) Press C or D to select “Password”.
2) Press Number buttons (0–9) to enter the password
you have stored.
3) Press ENTER.
• The rating is now unlocked.
4) Press C or D to select “Parental”, then press B
or A to change the parental level.
5) Press C or D to select “Password”, then press
Number buttons (0–9) to enter the password.
Note: You can change the password if you want.
6) Press ENTER.
Now the parental level is changed and locked.
Parental
Other
Note:
If each setup (pages 32~34) has been completed, the unit
can always be worked under the same conditions (espe-
cially with DVD discs).
Each setup will be retained in the memory even if you turn
the power off.
If you forget the password...
1. Press OPEN/CLOSE to open the disc tray.
2. Remove the disc.
3. Press OPEN/CLOSE again to close the disc tray.
“No Disc” appears on the screen.
4. While holding STOP down on the front panel, press 7
on the remote control. “PASSWORD CLEAR” appears
on the screen.
5. Enter a new password again.
Function setup
Output
You can select the video output signal of the DVD
video player to the TV from “RGB”, “Component” or
“Progressive”.
RGB:
Select when connecting to an RGB or composite
TV.
Component:
Select when connecting to a TV equipped with
component video inputs but progressive scan is
not compatible.
Progressive:
Select when connecting to a TV equipped with
component video inputs, progressive scan
compatible.
Warning:
Once “Progressive” is selected when connecting to a
TV progressive scan incompatible, no image will be
seen on the video display.
In this case, you must reset the unit by pressing the
STOP button on the front panel for five seconds. The
video output will be restored to “RGB” setting, and a
picture will once again be seen on a conventional
analog display. (You may need to make the Scart
connection if you connect a TV, progressive scan
incompatible, with component lead only.)
Notes:
• Some discs may not be played back with the progres-
sive scanning mode correctly because of the disc
characteristics or recording condition.
• Once Progressive scan on, all other video outputs are
disabled except component video outputs.
Notes:
• Depending on the discs, the unit cannot limit playback.
• Some discs may not be encoded with specific rating
level information though its disc jacket says “adult.”
For those discs, the age restriction will not work.
Setting details
35
E
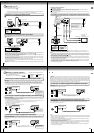
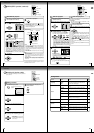
Temporary disabling of rating level by DVD disc
Depending on the DVD disc, the disc may try to temporarily cancel the rating
level that you have set.
It is up to you to decide whether to cancel the rating level or not.
Load a DVD disc and press PLAY or OPEN/
CLOSE on the unit
16
.
Note:
This temporary cancellation of rating level will be kept until the
disc is ejected.
When the disc is ejected, the original rating level will be set again
automatically.
1
Playback will commence if the entered pass-
word was correct.
4
2
Your disc exceeds
the parental control level#.
Parental Control Level
Cancel Picture
/Enter/Return
3
5
PLAY
ENTER
▲/▼
RETURN
PLAY
0–9
OPEN/CLOSE
If the DVD disc has been designed to temporarily
cancel the Rating level, the screen which follows
the “Reading” screen will change, depending on
which disc is played. If you select “YES” with the
ENTER key, “Your disc exceeds the parental
control level#.” screen will then appear.
If you wish to cancel the set rating level temporar-
ily, select “Parental Control Level” with
or ,
then press ENTER. If the 4-digit password at step
2 on page 34 has been set, the password entering
screen will appear as shown in step 4.
Alternatively, if the password has not been set,
playback will commence. If you don’t know (or have
forgotten) the password, select “Cancel Picture”.
The setting screen will disappear. Press OPEN/
CLOSE to remove the disc.
Enter the password with Number buttons (0–9).
Then press ENTER.
If you interrupt the entering, press
RETURN.
Reading
OPEN/CLOSE
OPEN/CLOSE