


12
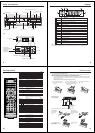
Basic connection
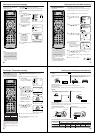
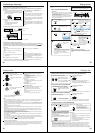
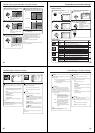
Connect your DVD/VCR to your home's aerial and to your TV-set as shown in the illustration.
When you have finished these connections, connect your DVD/VCR to the 230 V / 50 Hz mains.
In addition to the coaxial cable connection, you should also connect the SCART cable from the DVD/VCR to your
TV as shown. As well as transferring the high quality pictures and sound to your TV, the SCART connection can
automatically switch the TV to its AV channel for playback.
If your TV-set does not switch to video-playback operation automatically, please turn your TV's video switch to
VIDEO position manually.
Note:
Make sure that both the television and the DVD/VCR are switched off before connecting the cables.
Connect a TV with the Scart socket
TV
AC mains lead 230V/50 Hz
DVD/VCR
Aerial-Input
To Scart socket
RF-Input (from
house aerial)
RGB OUT, Composite IN/
OUT Scart Socket (L1)
RF-Output (to TV)
Aerial
Supplied Coaxial cable
Scart cable
(not supplied)
VCR/DECODER Scart Socket (L2)
13
SCART-cable (not supplied)
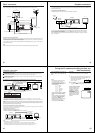
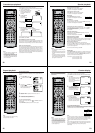
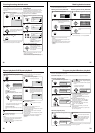
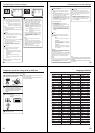
If a Satellite Receiver is used, we recommend the following configuration:
Connection to a Satellite Receiver
Playback connection
The exact arrangement you use to interconnect various video and audio components to the DVD/VCR is dependent
on the model and features of each component. Check the Owner's Manual provided with each component for the
location of SCART socket.
To view TV-program from Satellite Receiver, press AUX on the remote control of DVD/VCR repeatedly
until "L1" appears on the front display.
To record TV-program from Satellite Receiver, press VCR/DVD to select the VCR mode. Then load a
blank cassette tape with the erase prevention tab intact and select the desired TV-program. And follow
steps 3~4 on page 25.
Satellite
Aerial
Satellite
Receiver
DVD/VCR
TV
SCART-cable (not
supplied)
14
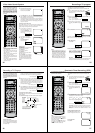
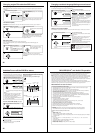
Connect to an AV Amplifier with built-in digital surround
If you are using an Amplifier with a built-in digital surround as follows, you can enjoy the various audio systems such as Dolby
Digital and DTS by using the Coaxial Digital Output.
Use this connection to connect an:
• AV amplifier with built-in Dolby Digital decoder
• AV amplifier with built-in DTS decoder
TV
TV
Playback connection
Coaxial digital cable (not supplied)
AV Amplifier with
built-in various
decoder as above
DVD/VCR
To Audio (L) Input
To Audio (R) Input
Audio cables (not supplied)
Stereo Amplifier
DVD/VCR
Audio (R) Output
Component video cables (not supplied)
Audio (L) Output
Component
video input
Component video outputs/inputs
PROGRESSIVE outputs/inputs
Some TVs or monitors are equipped with component video inputs that are capable of reproducing a progressively scanned
video signal. Connecting to these inputs allows you to view the highest quality pictures with less flicker.
INTERLACED outputs/inputs
Some TVs or monitors are equipped with component video inputs. Connecting to these inputs allows you to enjoy the highest
quality DVD picture playback.
Connecting to an audio system and TV equipped with component video inputs
Note:
In connecting to TV’s that are not capable of reproducing a progressively scanned video signal using the component
sockets, do not select “Progressive” in “Output” menu. If you do, the component video outputs do not feed the correct
signals and you cannot see any picture (see page 53).
Notes:
• Actual labels for component video inputs may vary depending on the TV manufacturer. (ex. Y, R-Y, B-Y or Y, CB, CR)
• In some TVs or monitors, the colour levels of the playback picture may be reduced slightly or the tint may change. In such a
case, adjust the TV or monitor for optimum performance.
• Make the following setting
SCART-Socket
(for RGB OUT,
Composite IN/OUT)
Coaxial digital Audio Output
SCART-cable (not supplied)
To SCART
input
Notes:
• The COAXIAL jack is useful only for DVD section.
• DTS audio will output only from the coaxial output. To hear DTS audio, DTS-Decoder is necessary.
When playing DTS-encoded CDs, only noise will be heard from the speakers or analogue stereo outputs.
• Some DTS decoders which do not support DVD-DTS interface may not work properly with the unit.
Component (Y) Output
Component (P
B) Output
Component (P
R) Output
15
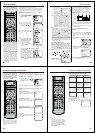
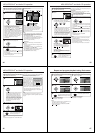
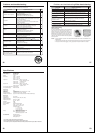
Plug your DVD/VCR's plug into the mains supply. "Auto"
will start to flash in the display. Your DVD/VCR will auto-
matically tune itself in and set the correct
time and date (This may take
approx. 4 minutes).
Plug your DVD/VCR into the mains sup-
ply and it will start automatically tune
itself in and set the correct date and
time.
Preparation
•
•
Make sure that your DVD/VCR is connected properly to the TV.
Turn on the TV and switch the TV to it’s AV channel.
Tuning the TV stations and setting the time and
date automatically
1
• The DVD/VCR automatically corrects
the clock setting every hour and
automatically adjusts the clock setting
for Daylight Saving Time (see page 17).
• Your DVD/VCR will tune the TV
stations as follows.
CH 1 BBC 1
CH 2 BBC 2
CH 3 ITV
CH 4 Channel 4
CH 5 Channel 5
CH 6 Satellite
CH 7 etc.
•
Skipped channels still may be selected
directly through the Number buttons
(0-9).
• To cancel skipping, select the skipped
channel using the Number buttons
(0-9), then press CANCEL. The
channel No. does not blink any longer,
and the channel No. now can be
selected again using
CHANNEL +/–.
Notes:
Press POWER
to turn OFF the DVD/VCR.
The broadcast stations received will be turn on your unit.
To skip a channel position
Unwanted channels can be
skipped so that they cannot
be called up by pressing
CHANNEL +/–. Select the
channel to be skipped, then
press CANCEL.
This channel number will be
flashing and you can cancel
further channels one after
the other.
VCR
VCR
CH 29
2