


32
5
1
2
3
4
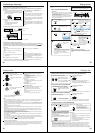
Press AUX on the recording DVD/VCR repeatedly until “L3” appears.
OR
Playback on camera
Playback unit
Recording DVD/VCR
Audio/Video cables (not supplied)
1
2
3
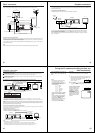
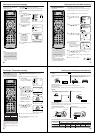
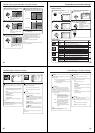
Duplicating a video tape
When you try to connect video recorder or Video camera to the recording DVD/VCR with audio/video
cables, make sure the power of both units have been turned off.
Connect the recording DVD/VCR with the TV. Therefore, you can watch what the recording DVD/VCR is
recording.
Load a blank cassette tape with the erase prevention
tab intact into the recording DVD/VCR. Load the
previously recorded cassette tape into the playback
VCR or a video camera.
Use AUX or CH +/– of the recording DVD/VCR to
select the “L1”, “L2” or “L3” instead of the preset
channel.
L1 = TV-RGB/Composite Scart Socket
L2 = VCR/DECODER Scart Socket
L3 = Front AV jacks
Press REC/OTR and then PAUSE/STEP on the
Recording DVD/VCR.
Press PLAY-button and then PAUSE/STEP-button
on the Playback unit. Now you can see the still
picture of the scene that you wish to duplicate.
Press PLAY-button on the Playback unit and REC/
OTR on the Recording DVD/VCR simultaneously to
start the duplicating.
Note:
Before starting the duplicating process, select the proper
tape speed using SP/LP. For a pre-recorded tape, the
correct tape speed will be set automatically during
playback.
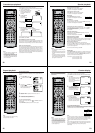
Duplicating a disc material onto a video tape
You can record disc material in DVD, Video CD, Audio CD, etc. onto a video tape with this DVD/VCR only.
If the DVD disc has a Copy-guard feature, the duplicating is not possible. A symbol mark “
” will
appear on the screen for approx. 4 seconds. See page 33 for more information about the DVD playback.
Preparation:
• Load a cassette tape with the erase prevention tab
intact.
• Select the tape speed in the VCR mode. (see page
25)
• Load a disc you wish to duplicate.
PressDVD to select the DVD mode. (The DVD indi-
cator will light)
Press PLAY to start the disc playback.
During disc playback, press REC/OTR.
Notes:
• You can set the duplicating time using the OTR-
function. At step 3 above, press REC/OTR repeatedly
until the desired duplicating time appears on the
screen. (see page 27)
• Only non-protected PAL discs can be dubbed to video
tape.
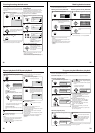
Connection with second Video recorder or Video camera
* Unauthorized recording of copyrighted television programs, films, video cassettes and other materials may
infringe the rights of copyright owners and be contrary to copyright laws.
To Video Output To Audio (L) Output
To Audio (R) Output
To AV jack
To Video Input To Audio (L) Input
To Audio (R) Input
33
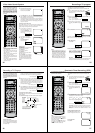
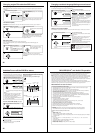
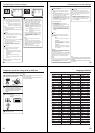
Playing a disc
Press OPEN/CLOSE or PLAY on the unit.
The disc tray closes automatically.
On the TV-screen, “
” changes to
“Reading” and then playback
commences.
• A menu screen will appear on the TV screen if
the disc has a menu feature.
• Press
CC
CC
C/
DD
DD
D/
BB
BB
B/
AA
AA
A
to select title, then press
ENTER.
Title is selected and play commences.
Press STOP to end playback.
• The unit records the stopped point,
depending on the disc. “
”
appears on the screen. Press
PLAY
to resume playback (from
the scene point).
• If you press STOP again (“
”
appears on the screen.), the unit
will clear the stopped point.
Press ON/STANDBY.
The DVD/VCR turns on.
Press VCR/DVD to select the DVD mode.
The DVD indicator will light.
Press OPEN/CLOSE.
The disc tray opens.
Place a disc on the disc tray.
With the playback
side down
• There are two different disc sizes. Place the disc
in the correct guide on the disc tray. If the disc is
out of the guide, it may damage the disc and
cause the DVD/VCR to malfunction.
• Do not place a disc which is unplayable in this
DVD/VCR.
1
3
4
5
2
6
To start playback in the stop mode
PressPLAY.
OR
Reading
This section shows you the basics on how to play a
disc.
Basic playback (DVD/VCD/CD)
Preparations:
• When you want to view a disc, turn on the TV and select
the corresponding video input connected to the DVD/VCR.
This may include component video inputs which is
exclusive to DVD playback.
• When you want to enjoy the sound of discs from the audio
system, turn on the audio system and select the input
connected to the DVD/VCR.
CAUTION
Keep your fingers well clear of the disc tray as it is closing.
Neglecting to do so may cause serious personal injury.
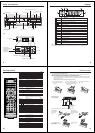
Display window
OPEN/CLOSE
STOP Disc trayVCR/DVD
PLAY
ON/STANDBY
Note:
If the unit does not operate property:
Static electricity, etc., may affect the player’s operation.
Disconnect the AC power cord once, then connect it
again.
34
To pause playback (still mode)
Press PAUSE/STEP during playback.
To resume normal playback, press
PLAY.
• The sound is muted during still
mode.
To stop playback
PressSTOP.
To remove the disc
Press OPEN/CLOSE.
Remove the disc after the disc tray
opens completely.
Be sure to press OPEN/CLOSE to close the disc
tray after you remove the disc.
Notes:
• If a non-compatible disc is loaded, “Incorrect Disc”, “Region Code Error” or “Parental Error” will appear on the
TV screen according to the type of loaded disc. In this case, check your disc again (see pages 6 and 52).
• Some discs may take a minute or so to start playback.
• When you set a single-faced disc label downwards (i.e. the wrong way up) and press OPEN/CLOSE or PLAY
on the unit, “Reading” will appear on the display for a few minutes and then “Incorrect Disc” will continue to be
displayed.
• Some discs may not work the resuming facility.
• Resuming cannot function when you play a PBC-featured Video CD while the PBC is on. To turn off the PBC,
see page 42.
• Some playback operations of DVDs may be intentionally fixed by software producers. Since this unit plays
DVDs according to the disc contents the software producers designed, some playback features may not be
available. Also refer to the instructions supplied with the DVDs.
• Do not move the unit during playback. Doing so may damage the disc.
• Use the OPEN/CLOSE to open and close the disc tray. Do not push the disc tray while it is moving. Doing so
may cause the unit to malfunction.
• Do not push up on the disc tray or put any objects other than discs on the disc tray. Doing so may cause the
unit to malfunction.
• In many instances, a menu screen will appear after playback of a movie is completed. Prolonged display of
an on-screen menu may damage your television set, permanently etching that image onto its screen. To avoid
this, be sure to press POWER
on your remote control once the movie is completed.
• There may be a slight delay between the button is pressed and the function activates.
To obtain a higher quality picture
Occasionally, some picture noise not usually visible on the TV screen during a normal broadcast may appear
while playing a DVD video disc. It is due to high resolution pictures on these discs which include a lot of
information. The amount of noise depends on the TV you use with this unit. You should generally reduce the
sharpness adjustment on your TV when viewing DVD video discs.
Playing a Disc while the VCR section is
recording or standing by for timer recording
1) Start to record.
Follow steps 1~4 on page 25.
• If the DVD/VCR is standing by for recording, turn
on the DVD/VCR.
2) Press VCR/DVD to select DVD mode.
3) Play a disc.
Follow steps 3 ~ 5 on page 33.
• Press PLAY if the DVD/VCR does not start to play
a disc automatically.
4) Stop playback.
Press STOP to stop playing a disc.
Screen saver function
The screen saver operates when you leave the unit
in DVD stop mode for approx. five minutes.
The DVD VIDEO logo moves randomly on the
screen.
Please press any button when you want to return to
an usual screen.
To turn on or off the screen saver, see page 51.
Playing a disc
35
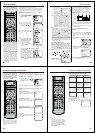
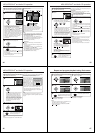
You can play discs at various speeds.
Playing in fast reverse or fast forward directions (DVD/VCD/CD)
Playing frame by frame (DVD/VCD)
Press REV or FWD during playback.
REV: Fast reverse playback
FWD:Fast forward playback
Each time you press REV or FWD,
the playback speed changes.
To resume normal playback
PressPLAY.
Notes:
• The DVD/VCR mutes sound during reverse and
forward scan of DVD/VCD/Audio CD discs.
• The playback speed may differ depending on the disc.
Press PAUSE/STEP during still playback.
Each time you press PAUSE/
STEP, the picture advances one
frame.
To resume normal playback
PressPLAY.
Note:
The sound is muted during frame by frame playback.
Press SLOW during playback.
Each time you press SLOW, the
slow-motion speed changes.
To resume normal playback
PressPLAY.
Notes:
• The sound is muted during slow-motion playback.
• You can use slow motion playback for DivX
®
CD.
Press SKIP
or repeatedly to display the chapter or track number you want.
Playback starts from the selected chapter or track.
To locate succeeding chapters or
tracks.
Playback starts from the beginning of
the current chapter or track.
When you press twice in quick
successions, playback starts from the
beginning of the preceding chapter or track.
Notes:
• A prohibition symbol “
” may appear at the upper right of the screen. This symbol means either the feature
you tried is not available on the disc, or the DVD/VCR cannot access the feature at this time. This does not
indicate a problem with the DVD/VCR.
• The unit is capable of holding a still video image or On screen display image on your television screen
indefinitely. If you leave the still video image or On screen display image displayed on your TV for an extended
period of time, you risk permanent damage to your television screen. Projection televisions are very susceptible.
Locating a chapter or track (DVD/VCD/CD)
Playing in slow-motion (DVD/VCD)
Playing a disc
Notes:
• Some discs may not work with the one touch repeat
function.
• Some functions may be unavailable due to the disc
configuration.
• Depending on the playback status, one touch repeat
may not skip back as intended.
• In case of Video CD with PBC, one touch repeat
function is prohibited.
Press ONE TOUCH REPEAT during playback.
The playback skips back about 10 seconds and
starts playing again.
If you press ONE TOUCH REPEAT again after the
skipping back, it skips back a further 10 seconds.
One touch repeat (DVD/VCD/CD)