


16
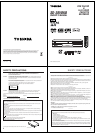
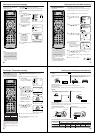
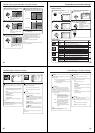
Setting the on-screen language
3
1
2
4
Turn on your TV and select the AV
input mode. So you can follow the
setting on TV screen.
Notes:
• If the unit does not operate properly,
or No key operation (by the unit and/
or the remote control): Static elec-
tricity, etc., may affect the player's
operation. Disconnect the AC mains
lead once, then connect it again.
• If no buttons are pressed for more than
60 seconds, the VCR menu screen will
return to normal TV-operation auto-
matically.
Preparation:
• Press POWER
button to turn on the DVD/VCR.
• Press VCR to select the VCR mode. (The VCR indicator will light.)
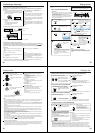
You can choose from five different languages for the on-screen
displays.
Press VCR MENU. Press
or
to select the SYSTEM
SETUP menu, then press
ENTER.
If you use the unit for the first
time and press VCR MENU,
instead of the main menu
screen on the right, the
LANGUAGE setup menu
screen in step 3 may appear.
Press
or to select the
LANGUAGE option, then
press ENTER.
Press
or to select the
desired language:
English (ENGLISH),
German (DEUTSCH),
French (FRANCAIS),
Italian (ITALIANO),
Spanish (ESPANOL),
then press ENTER.
Press VCR MENU repeatedly until the TV picture appears on
the screen.
SELECT :
SYSTEM SETUP
LANGUAGE/SPRACHE/LANGUE
LINGUA/LENGUA
ENTER
EXIT
: ENTER
: MENU
CLOCK SET
17
4
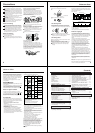
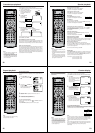
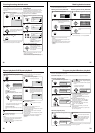
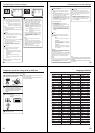
Setting the time and date manually
2
3
1
5
7
CLOCK SET
DAY SAT
31
MONTH
YEAR
TIME
3
2007
11:30
SELECT :
SET :
OK
: ENTER
EXIT
: MENU
AUTO TIME ON
8
VCR
Preparation:
• Turn ON the TV and set to the AV input mode.
•
Press VCR to select the VCR mode. (The VCR indicator will light.)
Example: Setting the clock to "11:30" March, 31 (SAT), 2007.
Press VCR MENU. The VCR menu screen will appear.
Press
or to select SYS-
TEM SETUP, then press EN-
TER.
Press
or to select CLOCK
SET, then press ENTER.
Press
or repeatedly until
“31” appears. Then press
.
Set the month, year, hour and
minute as in step 4.
Then press ENTER.
• In case of an erroneous input,
press to go back to previ-
ous step and enter again.
The clock will begin operation.
CLOCK SET
DAY WED
AUTO TIME ON
31
MONTH
YEAR
TIME
1
2007
0:00
SELECT :
SET :
OK
: ENTER
EXIT
: MENU
You must set the date and time
manually for timer recordings if
Auto setup process did not set
them correctly.
Notes:
•In case of a power failure, the clock will
continue to operate for another 30 min-
utes with quartz-controlled precision.
To indicate that the power failure has
lasted for an excessive period of time
"--:--" will appear on the display. In this
case, readjust time and date.
• The AUTO TIME function adjusts the
clock only if the error is within 5
minutes.
• The VCR automatically adjusts the
clock setting for Daylight Saving Time
once you set AUTO TIME to ON.
Press VCR MENU repeatedly until the TV picture appears on
the screen.
6
Press or to select AUTO TIME ON or OFF.
The VCR automatically corrects the clock setting every hour
once you set AUTO TIME to ON.
18
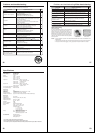
The Auto setup function (see page 15)
memorizes all broadcasts to the suit-
able CH positions.
However, some broadcasts may not
be memorized due to weak signal. In
this case, use manual tuning function.
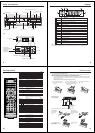
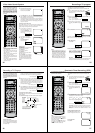
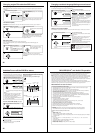
Tuning the TV stations manually
Note:
Occasionally, the auto search might catch
a weak signal and stop. If the TV station
signal is weak, you shouldn't store this
station.
In that case, restart the auto search using
or .
CH 01
CH 02
CH 03
CH 04
CH 05
CH 06
BBC 1
BBC 2
ITV
CH4
CH5
SATELLITE
CH 2
EXIT : MENU
CH : / 0–9
OK :
ENTER
Preparation
• Turn ON the TV and set to the AV input mode.
• Press VCR to select the VCR mode. (The VCR indicator will
light)
Example: Preset the BBC 2 on programme position 2.
1
PressVCR MENU.
Press
or to select the CH
TUNING. Then press ENTER.
2
Press (falling frequency) or
(rising frequency) once to
start the search. It stops at each
broadcast automatically ("
"
changes to "
"). Press or
repeatedly until BBC 2 appears.
Only in case of receiving of the
weak
broadcast (drifting picture),
search does not stop. If you
want to stop, press
or .
Press ENTER to preset. The
search menu screen will
disappear if the next mode is
not activated in less than 50
seconds.
3
Press or repeatedly until 2
is displayed. (Or enter 0 2 with
the Number buttons (0-9)).
Then press ENTER.
4
Repeat the steps 2 and 3 to preset other TV stations.
5
Press VCR MENU repeatedly until the TV picture
appears on the screen.
TIMER REC SET
AUTO REPEAT
CH TUNING
SYSTEM SETUP
SELECT :
ENTER : ENTER
[OFF]
[AUTO]
MENU
EXIT
:
NICAM
CH 1
EXIT : MENU
SEARCH :
OK : ENTER
19
VCR
VCR
VCR
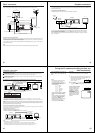
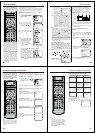
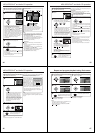
Loading and unloading a cassette tape
Erase prevention tab
Screwdriver
Adhesive tape
Erase prevention tab
12
Use only video cassette tapes marked .
Loading
Push the centre of the tape until it is automatically
inserted.
Insert the cassette tape with its labeled side facing up and
the erase prevention tab positioned at your left. An in-
verted cassette tape cannot be inserted.
Automatic power ON
When you insert a cassette tape, the DVD/VCR power will turn ON automatically.
Automatic playback
When loading a cassette tape without an erase prevention tab, playback will start automatically.
Unloading
PressEJECT on the DVD/VCR. Even if a tape
is being played, press this button only once.
Remove the cassette tape.
Automatic tape eject
This VCR will automatically rewind the tape when the tape has ended and when the tape has rewound to it’s
beginning, the cassette tape will be ejected automatically.
To prevent accidental erasure
Remove the erase prevention tab with a screw-
driver.
To record again
Cover the hole with a piece of adhesive tape.
Tape speed and maximum recording/playback time
VIDEO CASSETTE TAPE
LP (Long Play)
TAPE SPEED
SP (Standard Play )
E-30
30 minutes
1 hour
1 hour
2 hours
E-60
E-90
1-1/2 hours
3 hours
E-180
3 hours
6 hours
4 hours
8 hours
E-240
5 hours
10 hours
E-300