- 5 -
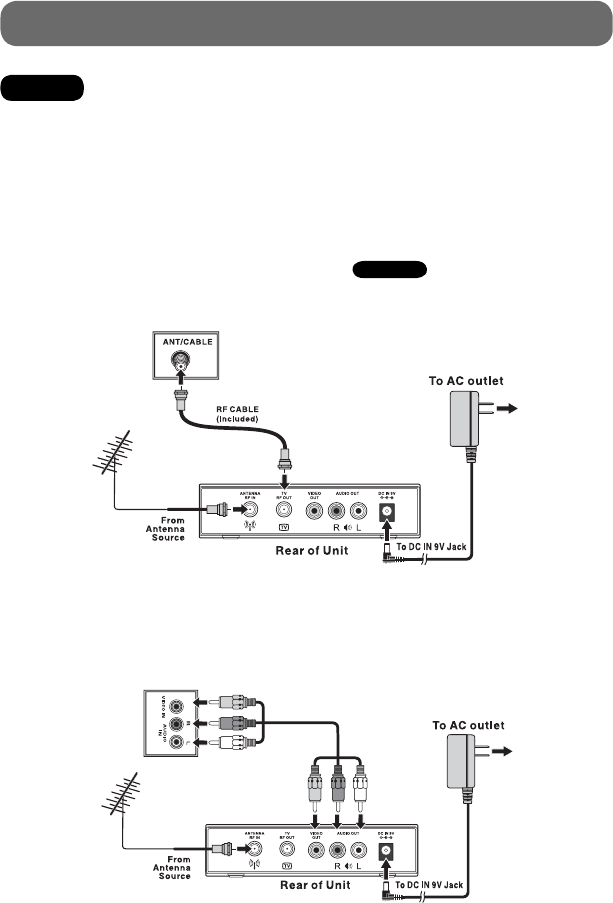
1. Connect an antenna cable to the RF IN terminal on the rear of the unit.
2. Use the RF cable (included) to connect the unit and TV/Monitor.
3. Use the AC adapter (included) to connect a suitable wall outlet. The supplied 9V adapter operates
on AC 120V ~ 60Hz.
4. Turn on your TV and switch TV’s channel selection to
Channel 3 .
Option Two: Using the AV Cable to Connect a TV
1. Connect an antenna cable to the RF IN terminal on the rear of the unit.
2. Use the AV Cable (not included) to connect the unit and TV/Monitor.
3. Use the AC adapter (included) to connect a suitable wall outlet. The supplied 9V adapter operates
on AC 120V ~ 60Hz.
4. Turn on your TV and follow the instructions included with it to select the “AV IN” function.
QUICK START GUIDE
Rear of TV
YELLOW
RED
WHITE
YELLOW
RED
WHITE
Rear of TV
Option One: Using the RF Cable to Connect a TV
STEP 1: CONNECTIONS
Warning: This system does not support cable TV.
When this converter box is powered on, digital signals from the ANTENNA RF IN jack are converted
to analog signals and output from the TV RF OUT jack or the VIDEO OUT jack.
When this converter box is in standby state, analog RF TV signals pass through the box and output
from the TV RF OUT jack.
Note:
• If a local TV Station happens to broadcast on Channel 3, we recommend you switch the unit’s
Output Channel to Channel 4 (and switch TV to Channel 4), following the instructions on Page 15.
811-776691W032.indd 5811-776691W032.indd 5 12/18/2008 9:55:49 AM12/18/2008 9:55:49 AM


