VIZIO VW26L HDTV10F User Manual
Version 2/6/2007 8
www.VIZIO.com
Chapter 1 Basic Controls and Connections
1.1 Front Panel
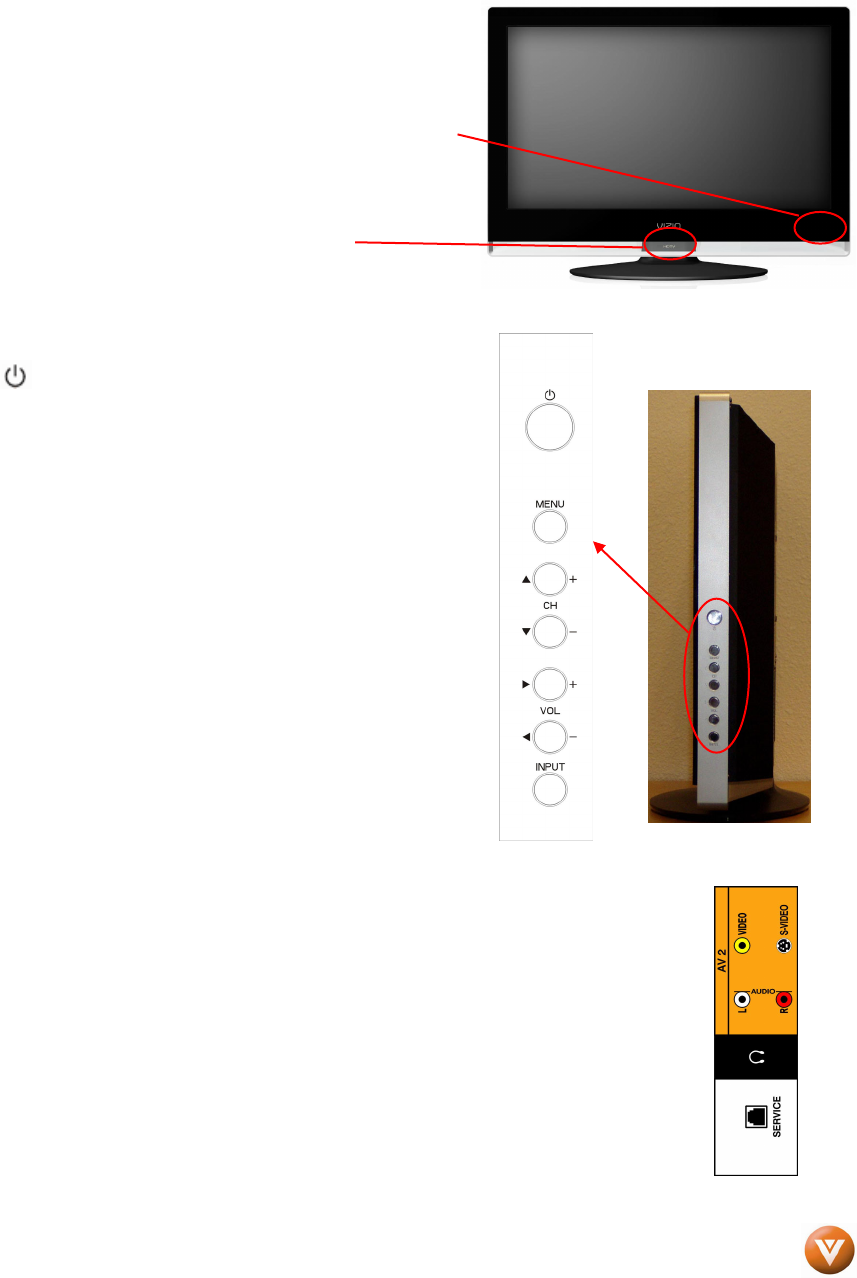
Remote Control Sensor – This is the window through which
all of the remote control signals pass to the sensor. Point the
remote control directly at this window for the best response to
the remote signal.
Power ‘HDTV’ light – When plugged into your power outlet,
the HDTV name on the stand will glow red when the HDTV is
powered off.
1.2 Right Side Panel Controls
Power ( ) – Switch the VW26L on by pressing the button
once. Press the button again to the VW26L off.
MENU – This button activates the On Screen Display (OSD). If
a sub-menu is active, pressing this button will return to the
previous menu level.
CH +/- (▲/▼) – Use these buttons to step up or down the TV
channels. While the OSD is active, these buttons function as
up and down controls in the OSD menus.
VOL +/- (◄/►) – Use these buttons to increase or decrease to
the speaker volume. While the OSD is active, these buttons
function as left and right controls in the OSD menus.
INPUT – Repeated pressing of this buttons steps through the
input sources in the following sequence: TV, AV1, AV2 (S-
Video or Video), Component 1, Component 2, HDMI 1, HDMI 2,
and RGB. Once you have stepped through the entire sequence,
you will return to the beginning.
Additionally, when the OSD is active, this button confirms the
menu function to be adjusted. When the OSD is not active,
pressing this button will display the current input mode.
1.3 Left Side Connections
1. AV2 In – Connect the secondary source for composite
video devices, such as a VCR or video game. Use the
white and red connectors to connect the external audio
from the same source. The orange color band on the
side of the TV indicates this connection. The S-Video, if
connected, will take priority over AV1 RCA connector.
2. Headphone – Connect your headphone here.
3. SERVICE – This custom communication port is for factory
service only.
