


3
Amplifiers & Preamplifiers
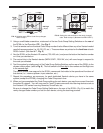
RC68+
9. BALANCE buttons. When the BALANCE "arrow" buttons are pressed, the audio output will move to
the left or right (with a 2 dB/step reduction in the attenuated channel) with each left or right press.
NOTE: No change will occur if the BALANCE buttons are held down continuously!
10. Balance "Center" button. This button, when pressed (identified by a "—" mark), will instantly return
the balance to the center position (equal volume in each channel) from any previous setting.
11. OFF button. Turns any zone on the ZPR68 OFF. The ZPR68, however, remains in "standby" mode,
ready for zone turn-ON when any INPUT button is pressed.
12. LAST button. Returns to the last adjusted values on the ZPR68 when comparing customized tone and
balance settings to electrical flat (E-FLAT). Refer to the ZPR68 instructions for details.
13. E-FLAT button. Switches the tone settings to electrical flat (flat frequency response) and the balance
to center, from customized settings. In conjunction with the LAST button, it allows instant comparisons
during setup procedures. Refer to the ZPR68 instructions for details.
14. TREBLE & BASS control buttons. When the "arrow" buttons are pressed, the treble and bass
response can be increased or decreased from 0 dB to ± 12 dB in 2 dB steps with
each
up or down press.
NOTE:
No change will occur if the TREBLE & BASS buttons are held down continuously!
Use these controls to "EQ" (equalize) the sound for each zone's acoustic differences during the "Z-
ADJ" settings on the ZPR68. The values arrived at will become the "N-Flat" values (nominal or acoustic
flat) for the user.
15. Treble & Bass "N-Flat" buttons. These buttons, when pressed (identified by a "—" mark), will
instantly return the treble and bass to the "N-Flat" values (nominal or acoustic flat) from any previous
settings the user may have made.
16. Z-ADJ button. Activates the ZONE ADJUSTMENTS mode on the ZPR68, allowing customized bass,
treble, balance and maximum level settings for each individual zone. Z-ADJ will turn off automatically
10 seconds after the last button press - or it can be instantly defeated by pressing the ADJ-OFF button.
Refer to the ZPR68 instructions for details.
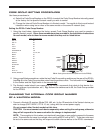
17. Code Group Numbers. The front face of each button on the RC68+ is marked with a Code Group
Number identifying a total of 55 different IR Remote Control Code Groups. You will need to change
the Code Group Number on the RC68+ to match the Code Group Number factory set for each different
Xantech model.
The RC68+ may also be used to change the Code Group Number within the Xantech model itself, so
that it is different than the factory setting. This is necessary when two or more of the same Xantech
model are used in the same IR system. See CODE GROUP SETTING PROCEDURES.
18. A, B, C buttons. These operate special control functions on certain Xantech products. See applicable
model instructions for details.
19. Code Group Setting Switches. These rotary switches are for setting and selecting the specific IR
Remote Control Code Group Numbers. See Code Group Setting Procedures.
20. Battery Compartment. Holds two 1.5V "AA" batteries that power the RC68+. Use Alkaline batteries
for longest life. Slide cover in the direction of the arrow for removal.