


Operating Manual - WR-5e Remote Control for NE Products
4
3. Getting Started
The WR-5e comes with all function buttons set to “Off”. To program from a PC running Protea
NE Software, follow these steps:
1) Connect a PC running Protea NE Software to the host NE product using a standard ethernet
RJ-45 cable.
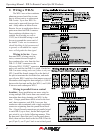
2) Connect the rst WR-5e to the NE product’s data connector as shown, installing the jumper
on J6 if it is the only WR-5.
Upon connecting and powering up the system, the WR-5e will have a “heartbeat”, meaning an
internal small green LED on the PCB will be ashing. As a WR-5 powers up, the LCD rst shows
the two digit rmware revision, then once communication with the host is established the WR-5e
displays “- -” in the LCD window. If there is a two-digit number showing in the LCD, that means
the WR-5 has been previously programmed to control a zone and that number is the gain level for
that zone.
In the Protea NE software window, the WR-5e will appear in an expaned menu of its host unit
in the left side listing on the screen. Individual NE products and their remote control units can be
dragged onto the project canvas to simulate physical rack and room installation groups, but editing
each product can be done from either the product list or the canvas. Once an image has been placed
on the canvas, it must be deleted by hand if that device is no longer available to the software. Scan-
ning for devices does not automatically remove images which may have been installed at one time
but are now off line. However, in the NE system menu at the left side of the screen, an ofine host
unit will appear in red text while an online unit appears in green. Further WR-5 help is available
by opening the WR-5 device and pressing F1, or by navigating through the software Help menu.
The project canvas is used to visually represent and control a xed physical sound system
installation, and can display all Ashly NE processors, ampliers, and remotes used in that system.
Lines, rectangles, text, and image les can be added to create a custom virtual control screen along
with the NE products and individual control objects. To see all available canvas tools, right click
anywhere over open canvas. Checking <Design Mode> allows placed objects to be moved around,
while unchecking <Design Mode> locks objects in place.
4. Programming the WR-5e
Protea NE software is able to determine from the host product which functions are available for
WR-5 control, as not all functions listed below are available on all NE products.
1) Off - No function assigned and the button’s LED remains unlit
2) Preset Recall - A single preset number is assigned to a button. When the button is pressed,
the recalled preset number and the letters “PC” are alternately ashed on the WR-5 for seven sec-
onds, also locking out any other WR-5 action for that time.
3) Preset Scroll Mode - A range of presets can be assigned to a button and selected by press-
ing and holding the up/down buttons. Upon release of the up/down button, the displayed preset will
load. The button’s LED will ash for the duration of the preset scroll operation.
4) Gain Control - Ashly NE products with Hot-Plug DSP processing must have an (ne)WR5
Remote Gain block placed in software on the channel(s) whose gain is to be under WR-5 control.